Linksys WPS54GU2 User Guide - Page 32
The Printer Tab - Logical Port, Select Printer, Parallel 1, USB 1, Get Data, Details, Pre-string Hex
 |
UPC - 745883557806
View all Linksys WPS54GU2 manuals
Add to My Manuals
Save this manual to your list of manuals |
Page 32 highlights
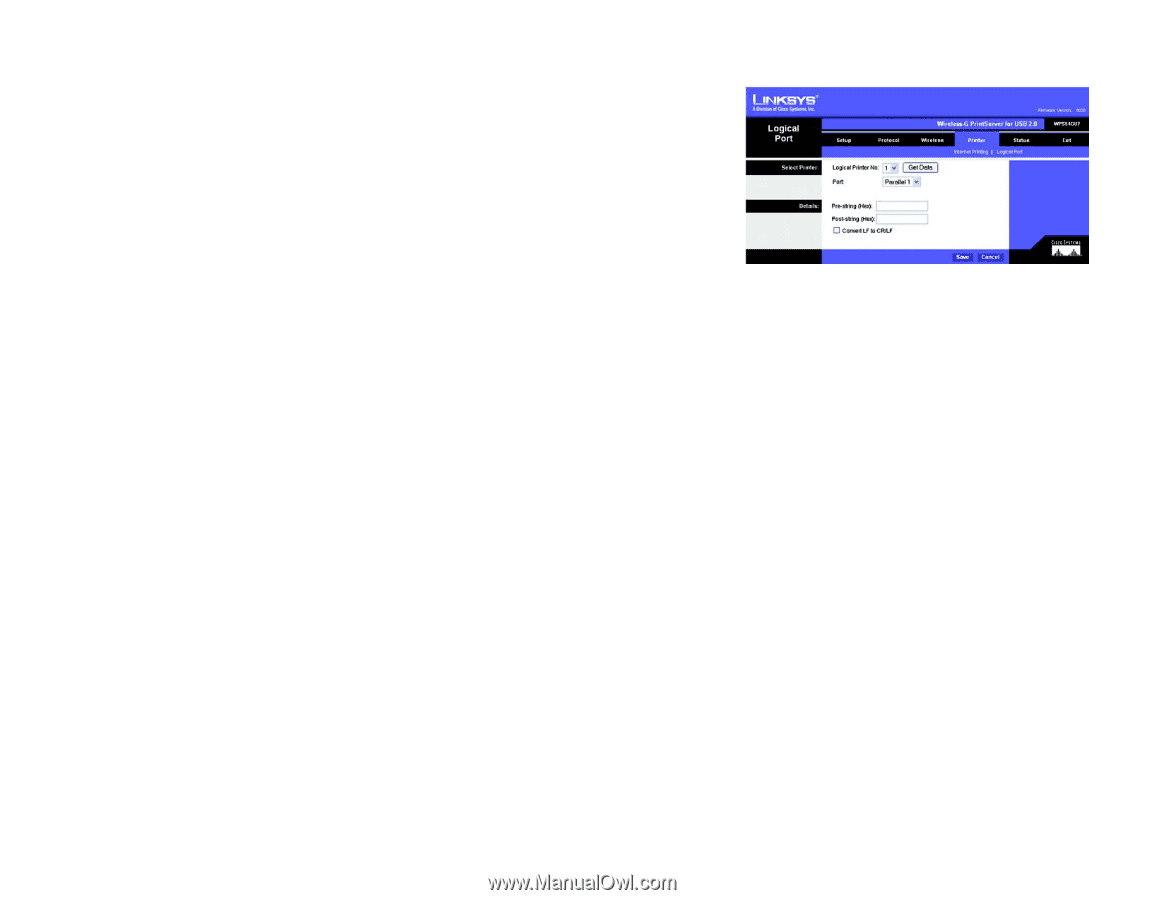
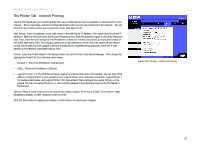
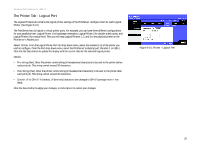
Wireless-G PrintServer for USB 2.0 The Printer Tab - Logical Port The Logical Printers tab contains the logical printer settings of the PrintServer. Configure them for each Logical Printer. (See Figure 6-10.) The PrintServer has six logical or virtual printer ports. For example, you can have three different configurations for your parallel printer: Logical Printer 1 for landscape orientation, Logical Printer 2 for double-sided copies, and Logical Printer 3 for manual feed. Then you will map Logical Printers 1, 2, and 3 to the physical printer on the PrintServer's Parallel port. Select Printer. From the Logical Printer Port No: drop-down menu, select the number (1-6) of the printer you wish to configure. From the Port drop-down menu, select the PrintServer's physical port, Parallel 1 or USB 1. Click the Get Data button to update the display with the current data for the selected logical printer. Details • Pre-string (Hex). Enter the printer control string (in hexadecimal characters) to be sent to the printer before each print job. This string cannot exceed 30 characters. • Post String (Hex). Enter the printer control string (in hexadecimal characters) to be sent to the printer after each print job. This string cannot exceed 30 characters. • Convert LF to CR+LF. If checked, LF (line feed) characters are changed to CR+LF (carriage return + line feed). Click the Save button to apply your changes, or click Cancel to cancel your changes. Figure 6-10: Printer - Logical Port Chapter 6: Configuring the PrintServer Using the Web-based Utility 25 The Printer Tab - Logical Port
-
 1
1 -
2
-
3
-
4
-
5
-
6
-
7
-
8
-
9
-
10
-
11
-
12
-
13
-
14
-
15
-
16
-
17
-
18
-
19
-
20
-
21
-
22
-
23
-
24
-
25
-
26
-
 27
27 -
 28
28 -
 29
29 -
 30
30 -
 31
31 -
 32
32 -
 33
33 -
 34
34 -
 35
35 -
 36
36 -
 37
37 -
38
-
39
-
40
-
41
-
42
-
43
-
44
-
45
-
46
-
47
-
48
-
49
-
50
-
51
-
52
-
53
-
54
-
55
-
56
-
57
-
58
-
59
-
60
-
61
-
62
-
63
-
64
-
65
-
66
-
67
-
68
-
69
-
70
-
71
-
72
-
73
-
74
-
75
-
76
 |
 |