Linksys WPS54GU2 User Guide - Page 61
WEP Encryption, Wireless, Security tab, Bit Keys 10 Hex chars, Bit Keys 26 Hex, chars, Open System - user manual
 |
UPC - 745883557806
View all Linksys WPS54GU2 manuals
Add to My Manuals
Save this manual to your list of manuals |
Page 61 highlights
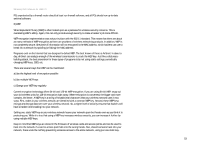
Wireless-G PrintServer for USB 2.0 The solution, then, is to segment your network up into multiple groups. If your network had 80 users and you used four WEP keys, a hacker would have access to only ¼ of your wireless network resources. In this way, multiple keys reduce your liability. Finally, be sure to change your WEP key regularly, once a week or once a day. Using a "dynamic" WEP key, rather than one that is static, makes it even harder for a hacker to break into your network and steal your resources. WEP Encryption There are two ways to enable WEP encryption for the PrintServer. The first way is through the Setup Wizard, and the second way is through the web-based utility. To use the Setup Wizard, refer to "Chapter 4: Configuring the PrintServer Using the Setup Wizard." To use the web-based utility, follow these instructions: 1. Click the Wireless tab of the web-based utility. 2. Click the Security tab. See Figure B-2. 3. From the WEP Encryption drop-down menu, select 64 Bit Keys (10 Hex chars) or 128 Bit Keys (26 Hex chars), depending on the level of encryption your wireless network uses. 4. From the Security Mode drop-down menu, select your wireless network's authentication type, Open System, Shared Key, or Auto. If you are not sure which type to choose, select Auto, which will enable the PrintServer to automatically use Open System or Shared Key authentication, depending on the authentication being used by your wireless network. 5. Select the Default Transmit Key used by your wireless network. 6. Enter a Passphrase in the Passphrase field, and click the Generate Keys button. The Passphrase is casesensitive and should have 16 alphanumeric characters or fewer. 7. If you do not want to use a Passphrase, then enter the WEP keys manually in the Key 1 to Key 4 fields. Each WEP key must consist of valid hexadecimal characters, the letters "A" through "F" and numbers "0" through "9". For 64-bit WEP encryption, the key must consist of exactly 10 hexadecimal characters. For 128-bit WEP encryption, the key must consist of exactly 26 hexadecimal characters. 8. Click the Save button to apply your changes. Important: Always remember that each device in your wireless network MUST use the same WEP encryption method and encryption key or your wireless network will not function properly. Figure B-2: Wireless Tab - Security Appendix B: Wireless Security 54 What Are The Risks?
-
 1
1 -
2
-
3
-
4
-
5
-
6
-
7
-
8
-
9
-
10
-
11
-
12
-
13
-
14
-
15
-
16
-
17
-
18
-
19
-
20
-
21
-
22
-
23
-
24
-
25
-
26
-
27
-
28
-
29
-
30
-
31
-
32
-
33
-
34
-
35
-
36
-
37
-
38
-
39
-
40
-
41
-
42
-
43
-
44
-
45
-
46
-
47
-
48
-
49
-
50
-
51
-
52
-
53
-
54
-
55
-
 56
56 -
 57
57 -
 58
58 -
 59
59 -
 60
60 -
 61
61 -
 62
62 -
 63
63 -
 64
64 -
 65
65 -
 66
66 -
67
-
68
-
69
-
70
-
71
-
72
-
73
-
74
-
75
-
76
 |
 |