Maytag MAH5500BWW Service Manual - Page 37

Ticking or Knocking Noise In Spin - bearing

Page 37 highlights

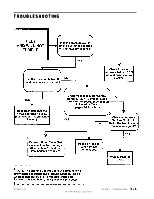
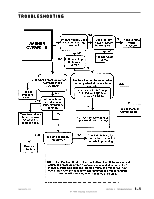
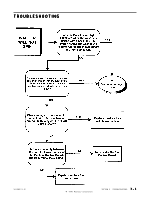
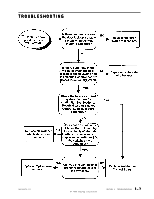
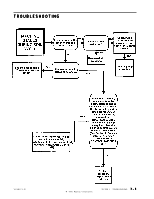
Door Leaks: Dispenser Does Not Dispense: Usually this occurs when the door is remounted into the shroud and the technician fully tightens the top hinge screw prior to inserting the lower screw. The technician should fully seat the door into the shroud evenly prior to tightening the hinge bracket screw into the shroud. Check also for excess plastic flashing in the tab area of the plastic shroud. Carefully remove the excess flash and remount the boot gasket. "Thumping" Noise In Spin: The noise could be from loose lower front weight mounting bolts or a loose bolt securing the driven pulley. Check the belt for a weak seam and replace if necessary. Check the motor adjustment bolt for tightness. "Ticking or Knocking" Noise In Spin: The noise could be from a loose wire harness, plastic purse-lock wire harness retainer on upper hose hitting the topcover or a plastic injection mold standoff on the outer tub bearing housing may possibly be interfering with the driven pulley. Examine the siphon cap to see if the cap was twisted, causing the cap to seal the siphon tube against the bottom of the siphon cup. Reposition cap to lift the siphon tube off the bottom of the cup. The wax motors are activated a full 30 seconds prior to turning on the water valves. If the timing is not correct, suspect a bad wiring connection. Also, examine the linkage of the acutuator arm and proper location of the spring on the wax motor (See Section 6: Water Carrying Components). Clothes Wet: Possibly due to the washer shutting down too soon or execessive suds present. Did the timer advance to OFF? If yes, then excessive suds may be the cause or the intertial unbalance switch tripped too soon, resulting in lower spin speeds. Change the inertial switch if suds were not detected. Note: If the timer motor is energized for five minutes without the cycle inputs changing, the machine control board will drop the line voltage relay. Also, check the drive belt for a weak spot on the belt. Ussually felt on the backside of the belt as a "flat" spot. Replace the belt. RF (Radio Frequency) Interference: The interference could occur if the RPT shutter on the motor was misaligned or a motor terminal has been pushed inward slightly when the motor harness connector was placed on the motor. Remove the motor phase harness connector and check the motor terminals. Replace the motor if the motor teminals are loose. 16008373-01 © 1998 Maytag Corporation SECTION 3. TROUBLESHOOTING 3 - 3

  • 1
  • 2
  • 3
  • 4
  • 5
  • 6
  • 7
  • 8
  • 9
  • 10
  • 11
  • 12
  • 13
  • 14
  • 15
  • 16
  • 17
  • 18
  • 19
  • 20
  • 21
  • 22
  • 23
  • 24
  • 25
  • 26
  • 27
  • 28
  • 29
  • 30
  • 31
  • 32
  • 33
  • 34
  • 35
  • 36
  • 37
  • 38
  • 39
  • 40
  • 41
  • 42
  • 43
  • 44
  • 45
  • 46
  • 47
  • 48
  • 49
  • 50
  • 51
  • 52
  • 53
  • 54
  • 55
  • 56
  • 57
  • 58
  • 59
  • 60
  • 61
  • 62
  • 63
  • 64
  • 65
  • 66
  • 67
  • 68
  • 69
  • 70
  • 71
  • 72
  • 73
  • 74
  • 75
  • 76
  • 77
  • 78
  • 79
  • 80
  • 81
  • 82
  • 83
  • 84
  • 85
  • 86
  • 87
  • 88
  • 89
  • 90
  • 91
  • 92
  • 93
  • 94
  • 95
  • 96
  • 97
  • 98
  • 99
  • 100
  • 101
  • 102
  • 103
  • 104
  • 105
  • 106
  • 107
  • 108
  • 109
  • 110
  • 111
  • 112
  • 113
  • 114
  • 115
  • 116
  • 117
  • 118
  • 119
  • 120
  • 121
  • 122
  • 123
  • 124
  • 125
  • 126
  • 127
  • 128
  • 129
  • 130
  • 131
  • 132
  • 133
  • 134
  • 135
  • 136
  • 137
  • 138
  • 139
  • 140
  • 141
  • 142
  • 143
  • 144
  • 145
  • 146
  • 147
  • 148
  • 149
  • 150
  • 151
  • 152
  • 153
  • 154
  • 155
  • 156
  • 157

© 1998 Maytag Corporation
16008373-01
SECTION 3.
TROUBLESHOOTING
3-3
3-3
3-3
3-3
3-3
Door Leaks:
Door Leaks:
Door Leaks:
Door Leaks:
Door Leaks:
Usually this occurs when the door is re-
mounted into the shroud and the technician
fully tightens the top hinge screw prior to in-
serting the lower screw. The technician should
fully seat the door into the shroud evenly prior
to tightening the hinge bracket screw into the
shroud. Check also for excess plastic flashing
in the tab area of the plastic shroud.
Care-
fully remove the excess flash and remount the
boot gasket.
“Thumping” Noise In Spin
“Thumping” Noise In Spin:
The noise could be from loose lower front
weight mounting bolts or a loose bolt secur-
ing the driven pulley. Check the belt for a weak
seam and replace if necessary. Check the
motor adjustment bolt for tightness.
"Ticking or Knocking" Noise In Spin
"Ticking or Knocking" Noise In Spin:
The noise could be from a loose wire harness,
plastic purse-lock wire harness retainer on
upper hose hitting the topcover or a plastic
injection mold standoff on the outer tub bear-
ing housing may possibly be interfering with
the driven pulley.
Also, check the drive belt for a weak spot on
the belt.
Ussually felt on the backside of the
belt as a "flat" spot.
Replace the belt.
RF (Radio Frequency) Interference:
The interference could occur if the RPT shut-
ter on the motor was misaligned or a motor
terminal has been pushed inward slightly
when the motor harness connector was
placed on the motor.
Remove the motor phase
harness connector and check the motor ter-
minals.
Replace the motor if the motor
teminals are loose.
Dispenser Does Not Dispense
Dispenser Does Not Dispense:
Examine the siphon cap to see if the cap was
twisted, causing the cap to seal the siphon
tube against the bottom of the siphon cup.
Re-
position cap to lift the siphon tube off the bot-
tom of the cup.
The wax motors are activated
a full 30 seconds prior to turning on the water
valves. If the timing is not correct, suspect a
bad wiring connection.
Also, examine the link-
age of the acutuator arm and proper location
of the spring on the wax motor
(See Section
(See Section
(See Section
(See Section
(See Section
6: Water Carrying Components).
Clothes Wet:
Clothes Wet:
Clothes Wet:
Clothes Wet:
Clothes Wet:
Possibly due to the washer shutting down too
soon or execessive suds present.
Did the timer
advance to OFF? If yes, then excessive suds
may be the cause or the intertial unbalance
switch tripped too soon, resulting in lower spin
speeds.
Change the inertial switch if suds were
not detected.
Note:
Note:
Note:
Note:
Note:
If the timer motor is en-
ergized for five minutes without the cycle in-
puts changing, the machine control board will
drop the line voltage relay.