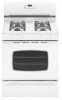
Maytag MGR5752BDW Use and Care Guide - Page 10
Troubleshooting - problems
 |
View all Maytag MGR5752BDW manuals
Add to My Manuals
Save this manual to your list of manuals |
Page 10 highlights
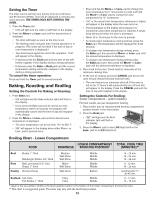
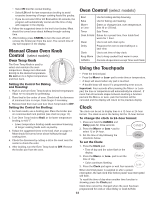
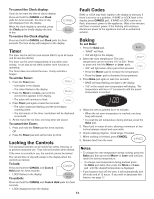
Troubleshooting For most concerns, try these first. • Check if oven controls have been properly set. • Check to be sure plug is securely inserted into receptacle. • Check or reset circuit breaker. Check or replace fuse. • Check power supply. Surface burner fails to light. • Check to be sure unit is properly connected to power supply. • Check for a blown circuit fuse or a tripped main circuit breaker. • Check to be sure ignitor is dry and clicking. Burner will not light if ignitor is damaged, soiled or wet. If ignitor doesn't click, turn control knob OFF. The flame is uneven. • Burner ports may be clogged. Surface burner flame lifts off ports. • Check to be sure a pan is sitting on the grate above. Baking results are not as expected or differ from previous oven. • Check the oven temperature selected. Make sure oven is preheated when recipe or directions recommend preheat. • Make sure the oven vent has not been blocked. See page 18 for location. • Check to make sure range is level. • Temperatures often vary between a new oven and an old one. As ovens age, the oven temperature often "drifts" and may become hotter or cooler. See pages 17-18 for instructions on adjusting the oven temperature (select models). Important: It is not recommended to adjust the temperature if only one or two recipes are in question. • Use correct pan. Dark pans produce dark browning. Shiny pans produce light browning. • Check rack positions and pan placement. Stagger pans when using two racks. Allow 1-2 inches between pans and oven wall. • Check the use of foil in the oven. Never use foil to cover an entire oven rack. Place a small piece of foil on the rack below the pan to catch spillovers. Food is not broiling properly or smokes excessively. • Check oven rack positions. Food may be too close to flame. • Aluminum foil was incorrectly used. Never line the broiler insert with foil. • Trim excess fat from meat before broiling. • A soiled broiler pan was used. • Preheat oven for 2-3 minutes before placing food in the oven. • Broil with the oven door closed. Oven will not self-clean. (select models) • Check to make sure the cycle is not set for a delayed start. See page 5. • Check if door is closed. • Check if control is in Sabbath Mode. See page 17. • Oven may be over 400° F. Oven temperature must be below 400° F to program a clean cycle. Oven did not clean properly. (select models) • Longer cleaning time may be needed. • Excessive spillovers, especially sugary and/or acidic foods, were not removed prior to the self-clean cycle. Oven door will not unlock after self-clean cycle (select models). • Oven interior is still hot. Allow about one hour for the oven to cool after the completion of a self-clean cycle. The door can be opened when "LOCK" is not displayed. • The control and door may be locked. See pages 5 and 14 to unlock. Moisture collects on oven window or steam comes from oven vent. • This is normal when cooking foods high in moisture. • Excessive moisture was used when cleaning the window. There is a strong odor or light smoke when oven is turned on. • This is normal for a new range and will disappear after a few uses. Initiating a clean cycle will "burn off" the odors more quickly. • Turning on a ventilation fan will help remove the smoke and/or odor. • Excessive food soils on the oven bottom. Use a self-clean cycle. Fault Codes (select models). • BAKE or LOCK may flash rapidly in the display to alert you if there is an error or a problem. If BAKE or LOCK appear in the display, press the CANCEL pad. If BAKE or LOCK continue to flash, disconnect power to the appliance. Wait a few minutes, and then reconnect power. If the flashing still continues, disconnect power to the appliance and call an authorized servicer. • If the oven is heavily soiled, excessive flareups may result in a fault code during cleaning. Press the CANCEL pad and allow the oven to cool completely, wipe out excess soil, then reset the clean cycle. If the fault code reappears, contact an authorized servicer. Noises may be heard. • The oven makes several low level noises. You may hear the oven relays as they go on and off. This is normal. • As the oven heats and cools, you may hear sounds of metal parts expanding and contracting. This is normal and will not damage your appliance. There are no beeps and no display. • Oven may be in Sabbath Mode. See page 17. "SAb" flashing and then displayed continuously. • Oven is in Sabbath Mode. To cancel, press and hold the Clock pad for five seconds. 9
-
 1
1 -
2
-
3
-
4
-
 5
5 -
 6
6 -
 7
7 -
 8
8 -
 9
9 -
 10
10 -
 11
11 -
 12
12 -
 13
13 -
 14
14 -
 15
15 -
16
-
17
-
18
-
19
-
20
-
21
-
22
-
23
-
24
-
25
-
26
-
27
-
28
-
29
-
30
-
31
-
32
-
33
-
34
-
35
-
36
-
37
-
38
-
39
-
40
-
41
-
42
-
43
-
44
-
45
-
46
-
47
-
48
-
49
-
50
-
51
-
52
-
53
-
54
-
55
-
56
-
57
-
58
-
59
-
60
-
61
-
62
-
63
-
64
-
65
-
66
-
67
-
68
 |
 |