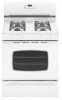
Maytag MGR5752BDW Use and Care Guide - Page 7
Cleaning Procedures - gas range
 |
View all Maytag MGR5752BDW manuals
Add to My Manuals
Save this manual to your list of manuals |
Page 7 highlights
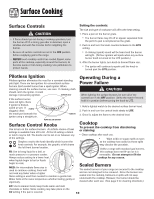
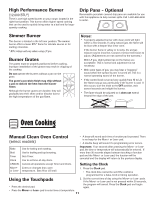
Some soil may leave a light gray, powdery ash. Remove it with a damp cloth. If soil remains after wiping, that means the clean cycle was not long enough. The soil will be removed during the next clean cycle. If oven racks were left in the oven and do not slide smoothly after a clean cycle, wipe racks and rack supports with a small amount of vegetable oil to make them easier to move. Fine lines may appear in the porcelain because it went through heating and cooling. This is normal and will not affect performance. A white discoloration may appear after cleaning if acidic or sugary foods were not wiped up before the self-clean cycle. This discoloration is normal and will not affect performance. Notes: damaged the surface burner will not light. Burner Grates • Wash grates with warm, soapy water and a nonabrasive, plastic scrubbing pad. For stubborn soils, clean with a soap-filled, nonabrasive pad or a sponge and Cooktop Cleaning Creme (Part #20000001).** • For burned on soils, remove grates, place on newspapers and carefully spray with commercial oven cleaner. (Do not spray surrounding surfaces.) Place in plastic bags for several hours or overnight. Wearing rubber gloves, remove from bags. Wash, rinse, dry and replace on cooktop. Clock and Control Pad Area • To activate "Control Lock" for cleaning, see page 14. • Wipe with a damp cloth and dry. Do not use abrasive cleaning agents as they may scratch the finish. • Glass cleaners may be used if sprayed on a cloth first. DO NOT spray directly on control pad and display area. • If the oven door is left open, "DOOR" will flash in the display and a signal will beep until the door is closed and the Clean pad is pressed again. • If more than five seconds elapse between pressing the Clean pad and the More+ or Less- pad, the program will automatically return to the previous display. Control Knobs • Remove knobs in the OFF position by pulling forward. • Wash, rinse and dry. Do not use abrasive cleaning agents as they may scratch the finish. • Turn on each burner to be sure the knobs have been correctly replaced. • The oven door will be damaged if the oven door is forced to open when "LOCK" is still displayed. Cleaning Procedures CAUTION • Be sure appliance is off and all parts are cool before handling or cleaning. This is to avoid damage and possible burns. • To prevent staining or discoloration, clean appliance after each use. • If a part is removed, be sure it is correctly replaced. Broiler Pan and Insert Never cover insert with aluminum foil as this prevents the fat from draining to the pan below. • Place soapy cloth over insert and pan; let soak to loosen soil. • Wash in warm soapy water. Use scouring pad to remove stubborn soil. • Broiler pan and insert can be cleaned in dishwasher. Cooktop and Control Panel - Porcelain Enamel Porcelain enamel is glass fused on metal and may crack or chip with misuse. It is acid resistant, not acid proof. All spillovers, especially acidic or sugary spillovers, should be wiped up immediately with a dry cloth. • When cool, wash with soapy water, rinse and dry. • Never wipe off a warm or hot surface with a damp cloth. This may cause cracking or chipping. • Never use oven cleaners, abrasive or caustic cleaning agents on exterior finish of range. Side Panels, Storage Drawer, Lower Broiler Door (select models) and Door Handles - Painted Enamel • When cool, wash with warm soapy water, rinse and dry. Never wipe a warm or hot surface with a damp cloth as this may damage the surface and may cause a steam burn. • For stubborn soil, use mildly abrasive cleaning agents such as baking soda paste or Bon Ami*. Do not use abrasive cleaners such as steel wool pads or oven cleaners. These products will scratch or permanently damage the surface. Important: Use a dry towel or cloth to wipe up spills, especially acidic or sugary spills. Surface may discolor or dull if soil is not immediately removed. This is especially important for white surfaces. Sealed Gas Burners • Clean frequently. Allow burner to cool. Clean with soap and plastic scouring pad. For stubborn soils, use a non-abrasive cleaner and a cloth. Try to prevent the cleaner from seeping into the gas ports as this will affect the flame. If the cleaner does enter the ports, clean with a soft bristle brush or a straight pin especially the port below the ignitor. Do not enlarge or distort holes. Oven Window and Door - Glass • Avoid using excessive amounts of water which may seep under or behind glass, causing staining. Wash with soap and water. Rinse with clear water and dry. Glass cleaner can be used if sprayed on a cloth first. • Do not use abrasive materials such as scouring pads, steel wool or powdered cleaners as they will scratch glass. • Be careful not to get water into burner ports. • Use care when cleaning the ignitor. If the ignitor is wet or * Brand names are registered trademarks of the respective manufacturers. ** To order call 1-877-232-6771 USA or 1-800-688-8408 Canada. 6
-
 1
1 -
 2
2 -
 3
3 -
 4
4 -
 5
5 -
 6
6 -
 7
7 -
 8
8 -
 9
9 -
 10
10 -
 11
11 -
 12
12 -
13
-
14
-
15
-
16
-
17
-
18
-
19
-
20
-
21
-
22
-
23
-
24
-
25
-
26
-
27
-
28
-
29
-
30
-
31
-
32
-
33
-
34
-
35
-
36
-
37
-
38
-
39
-
40
-
41
-
42
-
43
-
44
-
45
-
46
-
47
-
48
-
49
-
50
-
51
-
52
-
53
-
54
-
55
-
56
-
57
-
58
-
59
-
60
-
61
-
62
-
63
-
64
-
65
-
66
-
67
-
68
 |
 |