McAfee PSMCDE-AB-AA User Guide - Page 33
Primary and Secondary Actions, Content Scanning, Prevent Upload/Download of the Item
 |
View all McAfee PSMCDE-AB-AA manuals
Add to My Manuals
Save this manual to your list of manuals |
Page 33 highlights
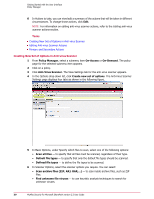
Getting Started with the User Interface Policy Manager • PUPs NOTE: If you select the primary action as Replace item with an alert, you get an option to create your Alert message. Primary and Secondary Actions Primary actions for on-access scan • Allow through - Allows the item to continue to the next scanning phase or to its final destination. • Prevent Upload/Download of the Item - Prevents the item from being uploaded to or downloaded from the server. Primary actions for on-demand scan • Allow through - Allows the item to continue to the next scanning phase or to its final destination. • Replace item with an alert - Replaces the item with an alert message. • Remove embedded item - Removes the item from the document library. Secondary actions for both on-access and on-demand scan • Log to Detected Items - Records the detection in a log. • Quarantine - Takes a copy of the item and stores it in the quarantine database. NOTE: We recommend you to always select the Quarantine option. This will help you acquire a quarantined item later if required. Content Scanning McAfee Security for Microsoft SharePoint can identify the textual data in a document for scanning. You can create content rules to specify banned content and assign them to the policies. 1 From Policy Manager, select a submenu item On-Access or On-Demand. The policy page for the selected submenu item appears. 2 Click on a policy. 3 Click Content Scanning. The View Settings tab for the content scanner appears. 4 In Activation, select Enable to enable the content scanner settings for this policy. 5 In Options, select or deselect the following as required: • Include document and database formats in content scanning • Scan the text of all attachments 6 Select an existing alert from the drop-down list or click Create to create a new alert. NOTE: For more information about creating a new alert, refer to the Creating a new alert section. If the alert text is not shown and you would like to review it, click View/Hide to display the text. If the alert text is displayed, click View/Hide to hide it. NOTE: You cannot customize default alert messages because they are read-only. 7 In Content Scanner rules and associated actions, click: McAfee Security for Microsoft SharePoint version 2.5 User Guide 33
-
 1
1 -
2
-
3
-
4
-
5
-
6
-
7
-
8
-
9
-
10
-
11
-
12
-
13
-
14
-
15
-
16
-
17
-
18
-
19
-
20
-
21
-
22
-
23
-
24
-
25
-
26
-
27
-
 28
28 -
 29
29 -
 30
30 -
 31
31 -
 32
32 -
 33
33 -
 34
34 -
 35
35 -
 36
36 -
 37
37 -
 38
38 -
39
-
40
-
41
-
42
-
43
-
44
-
45
-
46
-
47
-
48
-
49
-
50
-
51
-
52
-
53
-
54
-
55
-
56
-
57
-
58
-
59
-
60
-
61
-
62
-
63
-
64
-
65
-
66
-
67
-
68
-
69
-
70
-
71
-
72
-
73
-
74
 |
 |
