Netgear FVS336G FVS336G Reference Manual - Page 45
Network Configuration > LAN Setup, LAN Setup, IP Address - prosafe setup vpn
 |
UPC - 606449052015
View all Netgear FVS336G manuals
Add to My Manuals
Save this manual to your list of manuals |
Page 45 highlights
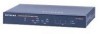
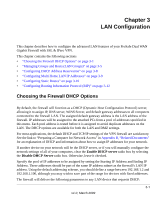
ProSafe Dual WAN Gigabit Firewall with SSL & IPsec VPN FVS336G Reference Manual 1. Go to Network Configuration > LAN Setup to display the LAN Setup tab page. Figure 3-1 2. In the LAN TCP/IP Setup section, configure the following settings: • IP Address. The LAN address of your VPN firewall (factory default: 192.168.1.1). Note: If you change the LAN IP address of the firewall while connected through the browser, you will be disconnected. You must then open a new connection to the new IP address and log in again. For example, if you change the default IP address 192.168.1.1 to 10.0.0.1, you must now enter https://10.0.0.1 in your browser to reconnect to the Web Configuration Manager. • IP Subnet Mask. The subnet mask specifies the network number portion of an IP address. Your VPN firewall will automatically calculate the subnet mask based on the IP address that you assign. Unless you are implementing subnetting, use 255.255.255.0 as the subnet mask. 3. In the DHCP section, select Enable or Disable DHCP Server. By default, the VPN firewall will function as a DHCP server, providing TCP/IP configuration settings for all computers connected to the VPN firewall's LAN. If another device on your network will be the DHCP server, or if you will manually configure all devices, click Disable DHCP Server. If the DHCP server is enabled, enter the following parameters: • Domain Name. (Optional) The DHCP will assign the entered domain to DHCP clients. LAN Configuration 3-3 v1.0, March 2009
-
 1
1 -
2
-
3
-
4
-
5
-
6
-
7
-
8
-
9
-
10
-
11
-
12
-
13
-
14
-
15
-
16
-
17
-
18
-
19
-
20
-
21
-
22
-
23
-
24
-
25
-
26
-
27
-
28
-
29
-
30
-
31
-
32
-
33
-
34
-
35
-
36
-
37
-
38
-
39
-
 40
40 -
 41
41 -
 42
42 -
 43
43 -
 44
44 -
 45
45 -
 46
46 -
 47
47 -
 48
48 -
 49
49 -
 50
50 -
51
-
52
-
53
-
54
-
55
-
56
-
57
-
58
-
59
-
60
-
61
-
62
-
63
-
64
-
65
-
66
-
67
-
68
-
69
-
70
-
71
-
72
-
73
-
74
-
75
-
76
-
77
-
78
-
79
-
80
-
81
-
82
-
83
-
84
-
85
-
86
-
87
-
88
-
89
-
90
-
91
-
92
-
93
-
94
-
95
-
96
-
97
-
98
-
99
-
100
-
101
-
102
-
103
-
104
-
105
-
106
-
107
-
108
-
109
-
110
-
111
-
112
-
113
-
114
-
115
-
116
-
117
-
118
-
119
-
120
-
121
-
122
-
123
-
124
-
125
-
126
-
127
-
128
-
129
-
130
-
131
-
132
-
133
-
134
-
135
-
136
-
137
-
138
-
139
-
140
-
141
-
142
-
143
-
144
-
145
-
146
-
147
-
148
-
149
-
150
-
151
-
152
-
153
-
154
-
155
-
156
-
157
-
158
-
159
-
160
-
161
-
162
-
163
-
164
-
165
-
166
-
167
-
168
-
169
-
170
-
171
-
172
-
173
-
174
-
175
-
176
-
177
-
178
-
179
-
180
-
181
-
182
-
183
-
184
-
185
-
186
-
187
-
188
-
189
-
190
-
191
-
192
-
193
-
194
-
195
-
196
-
197
-
198
-
199
-
200
-
201
-
202
-
203
-
204
-
205
-
206
-
207
-
208
-
209
-
210
-
211
-
212
-
213
-
214
-
215
-
216
-
217
-
218
-
219
-
220
-
221
-
222
-
223
-
224
-
225
-
226
-
227
-
228
-
229
-
230
-
231
-
232
-
233
-
234
-
235
-
236
-
237
-
238
-
239
-
240
-
241
 |
 |
