Netgear GA311 GA311 User Manual - Page 25
Moving the GA311 to a Different Slot in Windows NT 4.0, Updating the Driver Software in Windows NT 4.0 - driver windows 7
 |
UPC - 606449033274
View all Netgear GA311 manuals
Add to My Manuals
Save this manual to your list of manuals |
Page 25 highlights
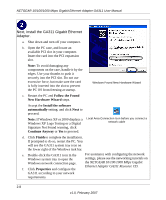
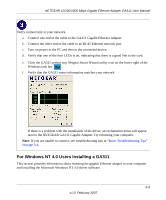
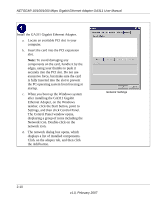
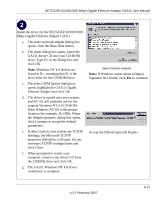
NETGEAR 10/100/1000 Mbps Gigabit Ethernet Adapter GA311 User Manual Moving the GA311 to a Different Slot in Windows NT 4.0 Before moving your GA311 Gigabit Ethernet Adapter to a different slot in the same system, you must first remove the card driver software. After removing the driver software, you can move the card to a different slot and reinstall the driver software. To remove the driver software: 1. Start your Windows NT 4.0 system and log in. You must have Network Administrator privileges to remove the driver software. 2. On the Windows taskbar, click the Start button, point to Settings, and then click Control Panel. 3. Double-click the Network icon. The Network dialog box opens. 4. Click on the Adapter tab. Any previously installed driver is listed in the Network Adapters list. 5. Click on the network card you want to remove, and then click Remove. Repeat step 5 for each network card that you want to remove. 6. Click Close. 7. When prompted to restart your computer, click No. 8. Shut down your computer. Install the network card in a new slot and then install the network drivers by following the instructions in "For Windows NT 4.0 Users Installing a GA311" on page 2-9. Updating the Driver Software in Windows NT 4.0 To replace an old driver software with a newer version: 1. Start your Windows NT 4.0 system and log in. You must have Network Administrator privileges to install the driver software. 2. On the Windows taskbar, click the Start button, point to Settings, and then click Control Panel. 3. Double-click the Network icon. 4. Click on the Adapters tab. Any previously installed software drivers are listed in the Network Adapters list. 5. Click on the adapter that you want to update. 6. Click Update. The Select Network Adapter dialog box opens. v1.0, February 2007 2-13
-
 1
1 -
2
-
3
-
4
-
5
-
6
-
7
-
8
-
9
-
10
-
11
-
12
-
13
-
14
-
15
-
16
-
17
-
18
-
19
-
 20
20 -
 21
21 -
 22
22 -
 23
23 -
 24
24 -
 25
25 -
 26
26 -
 27
27 -
 28
28 -
 29
29 -
 30
30 -
31
-
32
-
33
-
34
-
35
-
36
-
37
-
38
-
39
-
40
-
41
-
42
-
43
-
44
-
45
-
46
-
47
-
48
-
49
-
50
-
51
-
52
 |
 |
