Netgear GS748AT GS724AT/GS748AT Software Administration Manual - Page 41
System > SNMP > SNMPv1/v2, Community Configuration, Management Station
 |
UPC - 606449059793
View all Netgear GS748AT manuals
Add to My Manuals
Save this manual to your list of manuals |
Page 41 highlights
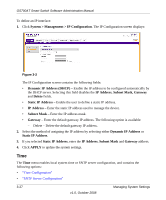
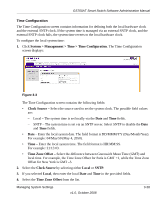
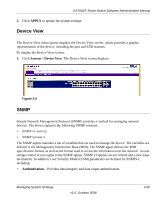
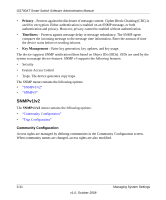
GS700AT Smart Switch Software Administration Manual To configure SNMP communities: 1. Click System > SNMP > SNMPv1/v2 > Community Configuration. The Community Configuration screen displays: Figure 3-6 The SNMPv1/v2 Community Configuration screen contains the following fields: • Management Station IP - Enter the management station IP address for which the Basic SNMP community is defined. • Management Station IP Mask - Enter the management station IP mask for which the Basic SNMP community is defined. • Community String - Enter the SNMP community string used to authenticate the management station to the device. • Access Mode - Select the access rights of the community. The possible field values are: - Read Only - Management access is restricted to read-only. Changes cannot be made to the device configuration and to the community. - Read Write - Management access is read-write. Changes can be made to the device configuration but not to the community. - SNMP Admin - User has access to all device configuration options, as well as permissions to modify the community. 2. Select the community entry. 3. Enter the Management Station and Community String in the provided fields in the first row. 4. Select the Access Mode from the list in the provided field in the first row. 5. Click APPLY to update the device. Managing System Settings v1.0, October 2008 3-32
-
 1
1 -
2
-
3
-
4
-
5
-
6
-
7
-
8
-
9
-
10
-
11
-
12
-
13
-
14
-
15
-
16
-
17
-
18
-
19
-
20
-
21
-
22
-
23
-
24
-
25
-
26
-
27
-
28
-
29
-
30
-
31
-
32
-
33
-
34
-
35
-
 36
36 -
 37
37 -
 38
38 -
 39
39 -
 40
40 -
 41
41 -
 42
42 -
 43
43 -
 44
44 -
 45
45 -
 46
46 -
47
-
48
-
49
-
50
-
51
-
52
-
53
-
54
-
55
-
56
-
57
-
58
-
59
-
60
-
61
-
62
-
63
-
64
-
65
-
66
-
67
-
68
-
69
-
70
-
71
-
72
-
73
-
74
-
75
-
76
-
77
-
78
-
79
-
80
-
81
-
82
-
83
-
84
-
85
-
86
-
87
-
88
-
89
-
90
-
91
-
92
-
93
-
94
-
95
-
96
-
97
-
98
-
99
-
100
-
101
-
102
-
103
-
104
-
105
-
106
-
107
-
108
-
109
-
110
-
111
-
112
-
113
-
114
-
115
-
116
-
117
-
118
-
119
-
120
-
121
-
122
-
123
-
124
-
125
-
126
-
127
-
128
-
129
-
130
-
131
-
132
-
133
-
134
-
135
-
136
-
137
-
138
-
139
-
140
-
141
-
142
-
143
-
144
-
145
-
146
-
147
-
148
-
149
-
150
-
151
-
152
-
153
-
154
-
155
-
156
-
157
-
158
-
159
-
160
-
161
-
162
-
163
-
164
-
165
-
166
-
167
-
168
-
169
-
170
-
171
-
172
-
173
-
174
-
175
-
176
-
177
-
178
-
179
-
180
-
181
-
182
-
183
-
184
-
185
-
186
-
187
-
188
-
189
-
190
-
191
-
192
-
193
-
194
-
195
-
196
-
197
-
198
-
199
-
200
 |
 |
