Netgear HR314 HR314 Reference Manual - Page 28
Connecting the Power Adapter, Verifying Connections
 |
UPC - 606449024241
View all Netgear HR314 manuals
Add to My Manuals
Save this manual to your list of manuals |
Page 28 highlights
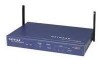
Reference Manual for the Model HR314 802.11a Hi-Speed Wireless Router • The SSID should be Wireless (note the capitalization). • WEP encryption is disabled. • Your IP address must be in the range of 192.168.0.3 to 192.168.0.254, with a netmask of 255.255.255.0 See Chapter 5, "Wireless" for full details on setting up wireless connections. Connecting the Power Adapter To connect the router to the power adapter: 1. Plug the connector of the power adapter into the power adapter outlet on the rear panel of the router. 2. Plug the other end of the adapter into a standard wall outlet. 3. Verify that the Power LED on the router is lit. Verifying Connections After applying power to the router, complete the following steps to verify the connections to it: 1. When power is first applied, verify that the POWER LED is on. 2. Verify that the TEST LED turns on within a few seconds. 3. After approximately 10 seconds, verify that: a. The TEST LED has turned off. b. The WIRELESS LINK/ACT LED is lit. c. The LOCAL LINK/ACT LEDs are lit for any local ports that are connected. d. The INTERNET LINK/ACT LED is lit. If a LINK/ACT LED is lit, a link has been established to the connected device. 4. If any LOCAL port is connected to a 100 Mbps device, verify that the 100 LED for that port is lit. The router is now properly attached to the network. Next, you need to prepare your network to access the Internet through the router. See the following chapter. 2-6 Setting Up the Hardware
-
 1
1 -
2
-
3
-
4
-
5
-
6
-
7
-
8
-
9
-
10
-
11
-
12
-
13
-
14
-
15
-
16
-
17
-
18
-
19
-
20
-
21
-
22
-
 23
23 -
 24
24 -
 25
25 -
 26
26 -
 27
27 -
 28
28 -
 29
29 -
 30
30 -
 31
31 -
 32
32 -
 33
33 -
34
-
35
-
36
-
37
-
38
-
39
-
40
-
41
-
42
-
43
-
44
-
45
-
46
-
47
-
48
-
49
-
50
-
51
-
52
-
53
-
54
-
55
-
56
-
57
-
58
-
59
-
60
-
61
-
62
-
63
-
64
-
65
-
66
-
67
-
68
-
69
-
70
-
71
-
72
-
73
-
74
-
75
-
76
-
77
-
78
-
79
-
80
-
81
-
82
-
83
-
84
-
85
-
86
-
87
-
88
-
89
-
90
-
91
-
92
-
93
-
94
-
95
-
96
-
97
-
98
-
99
-
100
-
101
-
102
-
103
-
104
-
105
-
106
-
107
-
108
-
109
-
110
-
111
-
112
-
113
-
114
-
115
-
116
-
117
-
118
-
119
-
120
-
121
-
122
-
123
 |
 |
