Netgear WPNT511 WPNT511 User Manual - Page 20
For Windows 2000 SP4 Users Installing a WPNT511, The Smart Wizard Settings opens.
 |
UPC - 606449044799
View all Netgear WPNT511 manuals
Add to My Manuals
Save this manual to your list of manuals |
Page 20 highlights
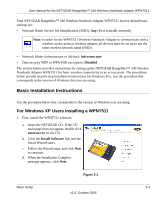
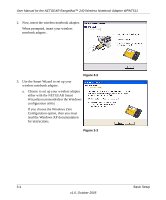
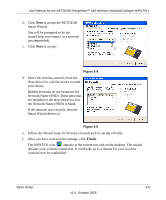
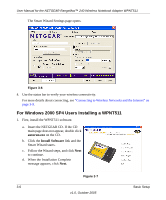
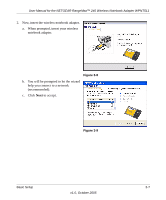
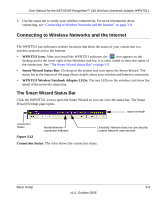
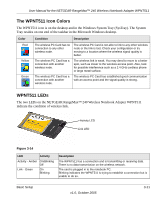
User Manual for the NETGEAR RangeMax™ 240 Wireless Notebook Adapter WPNT511 The Smart Wizard Settings page opens. Figure 3-6 4. Use the status bar to verify your wireless connectivity. For more details about connecting, see "Connecting to Wireless Networks and the Internet" on page 3-9. For Windows 2000 SP4 Users Installing a WPNT511 1. First, install the WPNT511 software. a. Insert the NETGEAR CD. If the CD main page does not appear, double click autorun.exe on the CD. b. Click the Install Software link and the Smart Wizard starts. c. Follow the Wizard steps, and click Next to continue. d. When the Installation Complete message appears, click Next. Figure 3-7 3-6 Basic Setup v1.0, October 2005
-
 1
1 -
2
-
3
-
4
-
5
-
6
-
7
-
8
-
9
-
10
-
11
-
12
-
13
-
14
-
 15
15 -
 16
16 -
 17
17 -
 18
18 -
 19
19 -
 20
20 -
 21
21 -
 22
22 -
 23
23 -
 24
24 -
 25
25 -
26
-
27
-
28
-
29
-
30
-
31
-
32
-
33
-
34
-
35
-
36
-
37
-
38
-
39
-
40
-
41
-
42
-
43
-
44
-
45
-
46
-
47
-
48
-
49
-
50
-
51
-
52
-
53
-
54
-
55
-
56
 |
 |
User Manual for the NETGEAR RangeMax™ 240 Wireless Notebook Adapter WPNT511
3-6
Basic Setup
v1.0, October 2005
The Smart Wizard Settings page opens.
4.
Use the status bar to verify your wireless connectivity.
For more details about connecting, see
“Connecting to Wireless Networks and the Internet” on
page 3-9
.
For Windows 2000 SP4 Users Installing a WPNT511
1.
First, install the WPNT511 software.
Figure 3-6
a.
Insert the NETGEAR CD.
If the CD
main page does not appear, double click
autorun.exe
on the CD.
b.
Click the
Install Software
link and the
Smart Wizard starts.
c.
Follow the Wizard steps, and click
Next
to continue.
d.
When the Installation Complete
message appears, click
Next
.
Figure 3-7