Netgear WPNT511 WPNT511 User Manual - Page 30
Finding a Network, The Smart Wizard Status Bar
 |
UPC - 606449044799
View all Netgear WPNT511 manuals
Add to My Manuals
Save this manual to your list of manuals |
Page 30 highlights
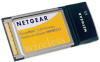
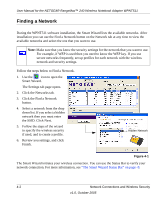
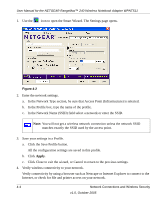
User Manual for the NETGEAR RangeMax™ 240 Wireless Notebook Adapter WPNT511 Finding a Network During the WPNT511 software installation, the Smart Wizard lists the available networks. After installation you can use the Find a Network button on the Network tab at any time to view the available networks and select the one that you want to use. Note: Make sure that you know the security settings for the network that you want to use. For example, if WEP is used then you need to know the WEP key. If you use secure networks frequently, set up profiles for each network with the wireless network and security settings. Follow the steps below to Find a Network. 1. Use the icon to open the Smart Wizard. The Settings tab page opens. 2. Click the Networks tab. 3. Click the Find a Network button. 4. Select a network from the drop down list. If you select a hidden network then you must enter the SSID. Click Next. 5. Follow the steps of the wizard to specify the wireless security if used, and to create a profile. 6. Review you settings, and click Finish. Hidden Network Figure 4-1 The Smart Wizard initiates your wireless connection. You can use the Status Bar to verify your network connection. For more information, see "The Smart Wizard Status Bar" on page -9. 4-2 Network Connections and Wireless Security v1.0, October 2005
-
 1
1 -
2
-
3
-
4
-
5
-
6
-
7
-
8
-
9
-
10
-
11
-
12
-
13
-
14
-
15
-
16
-
17
-
18
-
19
-
20
-
21
-
22
-
23
-
24
-
 25
25 -
 26
26 -
 27
27 -
 28
28 -
 29
29 -
 30
30 -
 31
31 -
 32
32 -
 33
33 -
 34
34 -
 35
35 -
36
-
37
-
38
-
39
-
40
-
41
-
42
-
43
-
44
-
45
-
46
-
47
-
48
-
49
-
50
-
51
-
52
-
53
-
54
-
55
-
56
 |
 |