Oki C942 C911dn/C931dn/C931DP/C941dn/C941DP/C942 Basic Users Guide - English - Page 36
Installation Procedure, Opening the Package and Installation
 |
View all Oki C942 manuals
Add to My Manuals
Save this manual to your list of manuals |
Page 36 highlights
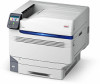
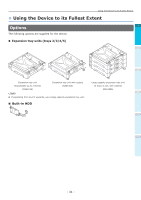
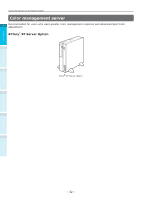
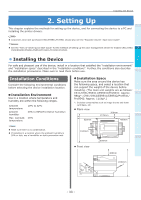
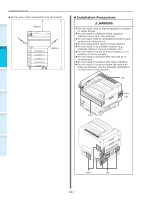
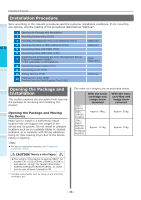
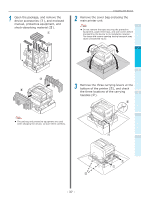
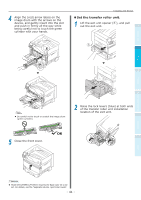
Before use Setting Up Printing Installing the Device Installation Procedure 1 Work according to the relevant procedures and the customer installation conditions. If not mounting any options, skip the reading of the procedures described as "Optional". 1 Opening the Package and Installation 2 Mounting Consumables (P.39) 3 Mounting the Expansion Tray Unit (Optional) (P.44) (Optional) 4 Mounting the Built-in HDD (Optional) (P.48) 2 5 Connecting Using LAN Cable (P.57) (Optional) 6 Connecting Using USB Cable (P.58) Installing and Connecting the Color Management Server 7 ("Server Installation Guide") *: Not applicable to C911/ES9411. (Sold separately) 8 Connecting Power Cables (P.51) 3 9 Connecting to PC (P.55) 10 Adding Options (P.76) (Optional) 11 Printing from Trays (P.89) Printing from the Multi-Purpose Tray (P.96) Opening the Package and 4 Installation This section explains the procedure from opening the package to removing and installing the product. Opening the Package and Moving the Device Make sure to install in a sufficiently robust location that can support the weight of the device and its options. Do not install in unstable locations such as on unsteady tables or slanted locations, or in locations with strong vibrations. Doing so risks causing injury due to the device falling or toppling. Memo For device installation locations, see "Installation Conditions" (P.33). CAUTION There is a risk of injury. The weight of the device is approx. 98kg* for models C911/C931/ES9411/ES9431/Pro9431, and approx. 111kg* for model C941/C942/ ES9541/ES9542/Pro9541/Pro9542, so make sure to use at least 4 people to lift. *: Includes consumables such as image drums and toner cartridges, etc. The main unit weights are as described below. C911/ ES9411 C931/ ES9431/ Pro9431 C941/ C942/ ES9541/ ES9542/ Pro9541/ Pro9542 With the toner cartridge and image drum mounted Approx. 98kg Approx. 111kg With the toner cartridge and image drum removed Approx. 82kg Approx. 91kg Basic Device Operations Appendix Index - 36 -
-
 1
1 -
2
-
3
-
4
-
5
-
6
-
7
-
8
-
9
-
10
-
11
-
12
-
13
-
14
-
15
-
16
-
17
-
18
-
19
-
20
-
21
-
22
-
23
-
24
-
25
-
26
-
27
-
28
-
29
-
30
-
 31
31 -
 32
32 -
 33
33 -
 34
34 -
 35
35 -
 36
36 -
 37
37 -
 38
38 -
 39
39 -
 40
40 -
 41
41 -
42
-
43
-
44
-
45
-
46
-
47
-
48
-
49
-
50
-
51
-
52
-
53
-
54
-
55
-
56
-
57
-
58
-
59
-
60
-
61
-
62
-
63
-
64
-
65
-
66
-
67
-
68
-
69
-
70
-
71
-
72
-
73
-
74
-
75
-
76
-
77
-
78
-
79
-
80
-
81
-
82
-
83
-
84
-
85
-
86
-
87
-
88
-
89
-
90
-
91
-
92
-
93
-
94
-
95
-
96
-
97
-
98
-
99
-
100
-
101
-
102
-
103
-
104
-
105
-
106
-
107
-
108
-
109
-
110
-
111
-
112
-
113
-
114
-
115
-
116
-
117
-
118
-
119
-
120
-
121
-
122
-
123
-
124
-
125
-
126
-
127
-
128
-
129
-
130
-
131
-
132
-
133
-
134
-
135
-
136
-
137
-
138
-
139
-
140
-
141
 |
 |