Oki C942 C911dn/C931dn/C931DP/C941dn/C941DP/C942 Basic Users Guide - English - Page 48
Mounting the Built-in HDD (Optional), Built-in HDD
 |
View all Oki C942 manuals
Add to My Manuals
Save this manual to your list of manuals |
Page 48 highlights
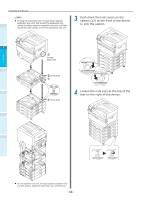
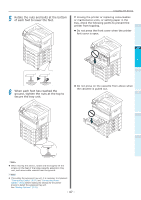
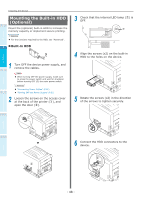
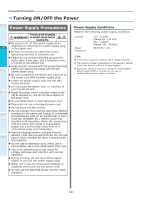
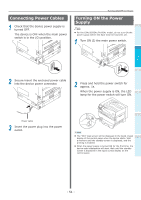
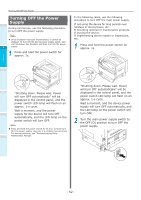
Before use Setting Up Printing Installing the Device Mounting the Built-in HDD (Optional) 1 Mount the (optional) built-in HDD to increase the memory capacity or implement secure printing. Reference For the functions required by the HDD, see "Advanced". 2 „„Built-in HDD 1 Turn OFF the device power supply, and remove the cables. 3 Note When turning OFF the power supply, make sure to press the power switch and wait for shutdown before turning OFF (O) the main power switch. Reference "Connecting Power Cables" (P.51) 4 "Turning OFF the Power Supply" (P.52) 2 Loosen the screws on the access cover at the back of the printer ( ), and open the door ( ). 3 Check that the internal LED lamp ( ) is OFF. 4 Align the screws (x2) on the built-in HDD to the holes on the device. 5 Rotate the screws (x2) in the direction of the arrows to tighten securely. 6 Connect the HDD connectors to the device. Basic Device Operations Appendix Index - 48 -
-
 1
1 -
2
-
3
-
4
-
5
-
6
-
7
-
8
-
9
-
10
-
11
-
12
-
13
-
14
-
15
-
16
-
17
-
18
-
19
-
20
-
21
-
22
-
23
-
24
-
25
-
26
-
27
-
28
-
29
-
30
-
31
-
32
-
33
-
34
-
35
-
36
-
37
-
38
-
39
-
40
-
41
-
42
-
 43
43 -
 44
44 -
 45
45 -
 46
46 -
 47
47 -
 48
48 -
 49
49 -
 50
50 -
 51
51 -
 52
52 -
 53
53 -
54
-
55
-
56
-
57
-
58
-
59
-
60
-
61
-
62
-
63
-
64
-
65
-
66
-
67
-
68
-
69
-
70
-
71
-
72
-
73
-
74
-
75
-
76
-
77
-
78
-
79
-
80
-
81
-
82
-
83
-
84
-
85
-
86
-
87
-
88
-
89
-
90
-
91
-
92
-
93
-
94
-
95
-
96
-
97
-
98
-
99
-
100
-
101
-
102
-
103
-
104
-
105
-
106
-
107
-
108
-
109
-
110
-
111
-
112
-
113
-
114
-
115
-
116
-
117
-
118
-
119
-
120
-
121
-
122
-
123
-
124
-
125
-
126
-
127
-
128
-
129
-
130
-
131
-
132
-
133
-
134
-
135
-
136
-
137
-
138
-
139
-
140
-
141
 |
 |