Oki MC160MFP User Guide - Page 193
horizontal and place it where it will not, Do not leave the imaging cartridge
 |
View all Oki MC160MFP manuals
Add to My Manuals
Save this manual to your list of manuals |
Page 193 highlights
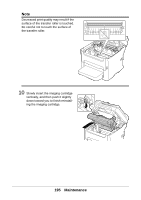
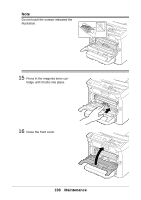
8 Grab the handle and lift it up slightly to the back, and then slowly pull the imaging cartridge out vertically. Note Do not touch the PC drum and the transfer belt on the imaging cartridge. Position the removed imaging cartridge horizontally as shown in the illustration at the right. Be sure to keep the imaging cartridge horizontal and place it where it will not become dirty. Do not leave the imaging cartridge removed for more than 15 minutes, and do not place the removed imaging cartridge in a location where it would be exposed to direct light (such as sunlight). 193 Maintenance
-
 1
1 -
2
-
3
-
4
-
5
-
6
-
7
-
8
-
9
-
10
-
11
-
12
-
13
-
14
-
15
-
16
-
17
-
18
-
19
-
20
-
21
-
22
-
23
-
24
-
25
-
26
-
27
-
28
-
29
-
30
-
31
-
32
-
33
-
34
-
35
-
36
-
37
-
38
-
39
-
40
-
41
-
42
-
43
-
44
-
45
-
46
-
47
-
48
-
49
-
50
-
51
-
52
-
53
-
54
-
55
-
56
-
57
-
58
-
59
-
60
-
61
-
62
-
63
-
64
-
65
-
66
-
67
-
68
-
69
-
70
-
71
-
72
-
73
-
74
-
75
-
76
-
77
-
78
-
79
-
80
-
81
-
82
-
83
-
84
-
85
-
86
-
87
-
88
-
89
-
90
-
91
-
92
-
93
-
94
-
95
-
96
-
97
-
98
-
99
-
100
-
101
-
102
-
103
-
104
-
105
-
106
-
107
-
108
-
109
-
110
-
111
-
112
-
113
-
114
-
115
-
116
-
117
-
118
-
119
-
120
-
121
-
122
-
123
-
124
-
125
-
126
-
127
-
128
-
129
-
130
-
131
-
132
-
133
-
134
-
135
-
136
-
137
-
138
-
139
-
140
-
141
-
142
-
143
-
144
-
145
-
146
-
147
-
148
-
149
-
150
-
151
-
152
-
153
-
154
-
155
-
156
-
157
-
158
-
159
-
160
-
161
-
162
-
163
-
164
-
165
-
166
-
167
-
168
-
169
-
170
-
171
-
172
-
173
-
174
-
175
-
176
-
177
-
178
-
179
-
180
-
181
-
182
-
183
-
184
-
185
-
186
-
187
-
 188
188 -
 189
189 -
 190
190 -
 191
191 -
 192
192 -
 193
193 -
 194
194 -
 195
195 -
 196
196 -
 197
197 -
 198
198 -
199
-
200
-
201
-
202
-
203
-
204
-
205
-
206
-
207
-
208
-
209
-
210
-
211
-
212
-
213
-
214
-
215
-
216
-
217
-
218
-
219
-
220
-
221
-
222
-
223
-
224
-
225
-
226
-
227
-
228
-
229
-
230
-
231
-
232
-
233
-
234
-
235
-
236
-
237
-
238
-
239
-
240
-
241
-
242
-
243
-
244
-
245
-
246
-
247
-
248
-
249
-
250
-
251
-
252
-
253
-
254
-
255
-
256
-
257
-
258
-
259
-
260
-
261
-
262
-
263
-
264
-
265
-
266
-
267
-
268
 |
 |

193
Maintenance
8
Grab the handle and lift it up slightly
to the back, and then slowly pull the
imaging cartridge out vertically.
Note
Do not touch the PC drum and the transfer belt on the imaging cartridge.
Position the removed imaging cartridge
horizontally as shown in the illustration
at the right.
Be sure to keep the imaging cartridge
horizontal and place it where it will not
become dirty.
Do not leave the imaging cartridge
removed for more than 15 minutes, and
do not place the removed imaging
cartridge in a location where it would be
exposed to direct light (such as
sunlight).