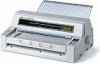
Oki ML8480FB ML8480FB User's Guide - Page 14
Quick Reference: Control Panel Functions, Enter the Menu, Print the Menu, Change Print Modes - manual
 |
View all Oki ML8480FB manuals
Add to My Manuals
Save this manual to your list of manuals |
Page 14 highlights
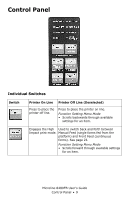
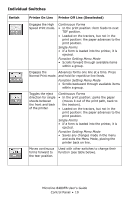
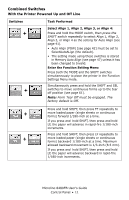
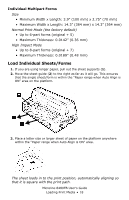
Quick Reference: Control Panel Functions Note Unless otherwise specified, these instructions assume that the printer is selected (on line). Enter the Menu 1. Press SEL. 2. Press both the MODE and the SHIFT switches simultaneously. Print the Menu 1. With the printer in the Manual Mode, turn it off. 2. Press and hold SELECT and MODE while turning the printer on. 3. When prompted, load a sheet of paper (minimum letter or A4) on the platform. Change Print Modes With the printer on line: 1. Press LF to engage the Normal Print Mode. 2. Press MODE to engage the High Impact Print Mode. 3. Press FF to engage the High Speed (Draft) Print Mode. Change the Printhead Gap 1. Press SEL. 2. Press and hold the SHIFT switch, then press the LOAD switch repeatedly to scroll through the various settings for the printhead gap. 3. Press SEL Change Paper Paths 1. Press SEL. 2. Press MODE repeatedly to change the paper path. The printer automatically reinitializes in the new path. Move Continuous Forms to the Print Position 1. Press SEL. 2. Press FF. Park Continuous Forms 1. Press SEL. 2. Press LOAD. Move Continuous Forms to the Tear Off Position Note Form Tear Off must be activated (see page 61). 1. Press SEL. 2. Press and hold the SHIFT and SEL switches to move continuous forms up to the tear off position. Change Align x Setting 1. Press SEL. 2. Press and hold the MODE switch, then press the SHIFT switch repeatedly to select Align 1, Align 2, Align 3, or Align 4 Microline 8480FB User's Guide Control Panel • 14
-
 1
1 -
2
-
3
-
4
-
5
-
6
-
7
-
8
-
 9
9 -
 10
10 -
 11
11 -
 12
12 -
 13
13 -
 14
14 -
 15
15 -
 16
16 -
 17
17 -
 18
18 -
 19
19 -
20
-
21
-
22
-
23
-
24
-
25
-
26
-
27
-
28
-
29
-
30
-
31
-
32
-
33
-
34
-
35
-
36
-
37
-
38
-
39
-
40
-
41
-
42
-
43
-
44
-
45
-
46
-
47
-
48
-
49
-
50
-
51
-
52
-
53
-
54
-
55
-
56
-
57
-
58
-
59
-
60
-
61
-
62
-
63
-
64
-
65
-
66
-
67
-
68
-
69
-
70
-
71
-
72
-
73
-
74
-
75
-
76
-
77
-
78
-
79
-
80
-
81
-
82
-
83
-
84
-
85
-
86
-
87
-
88
-
89
-
90
-
91
-
92
-
93
-
94
-
95
-
96
-
97
-
98
-
99
-
100
-
101
-
102
-
103
-
104
 |
 |