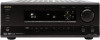
Onkyo TX-DS595 Owner Manual
Onkyo TX-DS595 Manual
 |
View all Onkyo TX-DS595 manuals
Add to My Manuals
Save this manual to your list of manuals |
Onkyo TX-DS595 manual content summary:
- Onkyo TX-DS595 | Owner Manual - Page 1
AV Receiver TX-DS595 Instruction Manual Thank you for purchasing the Onkyo AV Receiver. Please read this manual thoroughly before making connections and plugging in the unit. Following the instructions in this manual will enable you to obtain optimum performance and listening enjoyment from your new - Onkyo TX-DS595 | Owner Manual - Page 2
that are covered by the operating instructions as an improper adjustment of other controls may result in damage and will often require extensive work by a qualified technician to restore the appliance to its normal operation, E. If the appliance has been dropped or damaged in any way, and F. When - Onkyo TX-DS595 | Owner Manual - Page 3
plugging in the unit. For British models Replacement and mounting of an AC plug on the power supply cord of this unit should be performed only by qualified service personnel. IMPORTANT The wires in the mains lead are coloured in accordance with the following code: Blue : Neutral Brown : Live As the - Onkyo TX-DS595 | Owner Manual - Page 4
I IntelliVolume I Powerful programmed/learning remote with macros and mode-key LEDs * TX-DS595. Declaration of Conformity AM loop antenna × 1 FM indoor antenna × 1 (connector will vary depending on model specifications) RC-447M Remote controller ONKYO product described in this instruction manual - Onkyo TX-DS595 | Owner Manual - Page 5
SPEAKERS B AV RECEIVER MODEL NO. TX-DS595 R L CAUTION: SEE INSTRUCTION MANUAL FOR CORRECT SETTING. 6 OHMS MIN. / SPEAKER 4 OHMS MIN. / SPEAKER SET BEFORE POWER ON IMPEDANCE SELECTOR VOLTAGE SELECTOR 120V 220-230V Using the remote controller Point the remote controller toward the remote - Onkyo TX-DS595 | Owner Manual - Page 6
POWER ON OFF PHONES DISPLAY RT/PTY/TP FM MODE PRESET MEMORY TUNING A SPEAKERS B CH LEVEL DSP/MODE ADJ SETUP PRESET RETURN PUSH TO ENTER SMART SCAN NAVIGATOR AUDIO SELECTOR DVD VIDEO 1 VIDEO 2 VIDEO 3 VCR TAPE FM AM PHONO C D MASTER VOLUME BASS TREBLE AV RECEIVER TX-DS595 - Onkyo TX-DS595 | Owner Manual - Page 7
instructions, see page indicated in brackets [ ]. POWER switch [16] Turns on and off the main power supply for the TX-DS595. STANDBY indicator [16] Lights when the TX-DS595 is in the standby state and flashes when a signal is received from the remote controller. STANDBY/ON button [16] Press to turn - Onkyo TX-DS595 | Owner Manual - Page 8
into or sent by the remote controller. It also warns the user when an error is made or battery power is low. ON/STDBY button [16] ON: Turns on the TX-DS595. STDBY: Places the TX-DS595 in the standby state. Be aware that pressing the STDBY button only places the TXDS595 in standby and does not - Onkyo TX-DS595 | Owner Manual - Page 9
of how to calibrate the speaker levels, see page 20. MENU: When in the DVD mode, this button displays the DVD menu. MUTING button [26] Activates the mute function. ZONE 2/SEARCH/ENTER button ZONE 2: Not used with the TX-DS595. SEARCH: When in the DVD mode, for finding the specific section on a disc - Onkyo TX-DS595 | Owner Manual - Page 10
AC OUTLETS connectors [14] FRONT SPEAKERS A R L CENTER SPEAKER SURROUND SPEAKERS R L FRONT SPEAKERS B AV RECEIVER MODEL NO. TX-DS595 R L CAUTION: SEE INSTRUCTION MANUAL FOR CORRECT SETTING. 6 OHMS MIN. / SPEAKER 4 OHMS MIN. / SPEAKER SET BEFORE POWER ON IMPEDANCE SELECTOR AC OUTLETS - Onkyo TX-DS595 | Owner Manual - Page 11
2 VIDEO IN IN FM 75 REMOTE CONTROL PHONO CD OUT TAPE IN L TX-DS595. Refer to the diagram above for the following connection examples. 1. Connecting a turntable (PHONO) Using an RCA-type audio connection cable, connect the output terminal on the turntable to the PHONO input jacks on the TXDS595 - Onkyo TX-DS595 | Owner Manual - Page 12
MONITOR DVD OUT IN VIDEO 1 OUT IN VIDEO 2 VIDEO 3 IN IN VIDEO REMOTE CONTROL NO CD OUT TAPE IN FRONT SURR CENTER L OPTICAL 1 2 COAXIAL 1 R of how you can connect your video components to the TX-DS595. Refer to the diagram above for the following connection examples. The flow of the - Onkyo TX-DS595 | Owner Manual - Page 13
. • The RC-447M remote controller does not support turntables. • If a component has two z terminals, you can use either one to connect to the TX-DS595. The other one can be used to daisy chain with another component. • With Onkyo DVD players, you can enter the pre-program code so that you can - Onkyo TX-DS595 | Owner Manual - Page 14
: Install a subwoofer with a built-in power amplifier for powerful bass sounds. The placement of the subwoofer does not affect the final quality of the sound image too much, so you can install it with the room layout in mind. Refer to the speaker's instruction manual for more details. 14 AC OUTLET - Onkyo TX-DS595 | Owner Manual - Page 15
INPUT 2 DIGITAL INPUT FRONT SPEAKERS A R L CENTER SPEAKER SURROUND SPEAKERS R L FRONT SPEAKERS B AV RECEIVER MODEL NO. TX-DS595 R L CAUTION: SEE INSTRUCTION MANUAL FOR CORRECT SETTING. 6 OHMS MIN. / SPEAKER 4 OHMS MIN. / SPEAKER SET BEFORE POWER ON IMPEDANCE SELECTOR AC OUTLETS - Onkyo TX-DS595 | Owner Manual - Page 16
ON button to turn on the TX-DS595. The display and four jog dial indicators will light up and the STANDBY indicator will turn off. If you press the STANDBY/ON button again, the receiver returns to Standby mode. STANDBY/ON STANDBY Turn off Turning the power on from the remote controller: Before you - Onkyo TX-DS595 | Owner Manual - Page 17
until the clearest signal is received. Fix it with push pins or similar implements in the position that will cause the least amount of distortion position where you receive the clearest sound. Put it as far away as possible from the TX-DS595, televisions, speaker cables, and power cords. When - Onkyo TX-DS595 | Owner Manual - Page 18
to power lines. Keep it well away from power lines, transformers, . ANTENNA AM FM 75 To receiver To TV (or VCR) Connecting If you are using the TX-DS595 worldwide model in a region transformer wire A from slit B and insert it into slit C. 3. Prepare the coaxial cable as shown in the diagram - Onkyo TX-DS595 | Owner Manual - Page 19
and what size they are. 1. Press the SETUP button. TX-DS595 Remote controller SETUP If anything other than "1. SPEAKER SETUP" appears, turn the jog dial or press the and cursor buttons on the remote controller until "1. SPEAKER SETUP" appears. DSP/MODE ADJ PUSH TO ENTER The display changes as - Onkyo TX-DS595 | Owner Manual - Page 20
or the cursor button on the remote controller again. The test sound will now be heard from a different speaker. DSP/MODE ADJ PUSH TO ENTER 5. Turn the jog dial or press the or cursor buttons on the remote controller to adjust the volume of the test sound from this speaker to the same level that - Onkyo TX-DS595 | Owner Manual - Page 21
POWER ON OFF PHONES DISPLAY RT/PTY/TP FM MODE PRESET MEMORY TUNING A SPEAKERS B CH LEVEL DSP/MODE ADJ SETUP PRESET RETURN PUSH TO ENTER SMART SCAN NAVIGATOR AUDIO SELECTOR DVD VIDEO 1 VIDEO 2 VIDEO 3 VCR TAPE FM AM PHONO C D MASTER VOLUME BASS TREBLE AV RECEIVER TX-DS595 - Onkyo TX-DS595 | Owner Manual - Page 22
POWER ON OFF PHONES DISPLAY RT/PTY/TP FM MODE PRESET MEMORY TUNING A SPEAKERS B CH LEVEL DSP/MODE ADJ SETUP PRESET RETURN PUSH TO ENTER SMART SCAN NAVIGATOR AUDIO SELECTOR DVD VIDEO 1 VIDEO 2 VIDEO 3 VCR TAPE FM AM PHONO C D MASTER VOLUME BASS TREBLE AV RECEIVER TX-DS595 - Onkyo TX-DS595 | Owner Manual - Page 23
services will be broadcasted periodically. Notes: • In some cases, the characters displayed on the display of the TX- DS595 may not be exactly the same as the ones broadcast by the radio station. Also, unusual characters may appear on the display if the TX-DS595 receives TXDS595. sales charts works - Onkyo TX-DS595 | Owner Manual - Page 24
POWER ON OFF PHONES DISPLAY RT/PTY/TP FM MODE PRESET MEMORY TUNING A SPEAKERS B CH LEVEL DSP/MODE ADJ SETUP PRESET RETURN PUSH TO ENTER SMART SCAN NAVIGATOR AUDIO SELECTOR DVD VIDEO 1 VIDEO 2 VIDEO 3 VCR TAPE FM AM PHONO C D MASTER VOLUME BASS TREBLE AV RECEIVER TX-DS595 - Onkyo TX-DS595 | Owner Manual - Page 25
POWER ON OFF PHONES DISPLAY DIMMER FM MODE PRESET MEMORY TUNING A SPEAKERS B CH LEVEL DSP/MODE ADJ SETUP PRESET RETURN PUSH TO ENTER SMART SCAN NAVIGATOR AUDIO SELECTOR DVD VIDEO 1 VIDEO 2 VIDEO 3 VCR TAPE FM AM PHONO C D MASTER VOLUME BASS TREBLE AV RECEIVER TX-DS595 - Onkyo TX-DS595 | Owner Manual - Page 26
function only affects the front left and right speakers. For multichannel sources, these dials will not work if the tone control is set to "OFF." (Refer to page 27.) Temporarily turning off the sound (Remote controller only) To turn off the sound momentarily, such as when interrupted by a phone call - Onkyo TX-DS595 | Owner Manual - Page 27
. Note that the calibration settings will return to the original settings when the TX-DS595 is put in standby. 1. Press the CH LEVEL button and select the desired speaker. CH LEVEL 2. Turn the jog dial to adjust the volume level. DSP/MODE ADJ When using the remote controller: 1. Press the RCVR - Onkyo TX-DS595 | Owner Manual - Page 28
mode can be used with music compact discs and other stereo sources. You can press the SURR button on the remote controller to switch between MOVIE and MUSIC. The initial setting is MOVIE. This setting can be made for each input source. If no surround speakers are connected, then the surround sound - Onkyo TX-DS595 | Owner Manual - Page 29
. Multichannel (MULTICH): This setting will not appear if AM or FM TX-DS595 DVD VIDEO 1 VIDEO 2 VIDEO 3 VCR TAPE FM AM PHONO C D Remote controller SETUP 2. Press the SETUP button. Turn the jog dial or press the and cursor buttons on the remote controller to display "2. INPUT SETUP." DSP/MODE - Onkyo TX-DS595 | Owner Manual - Page 30
TX-DS595 DVD VIDEO 1 VIDEO 2 VIDEO 3 VCR TAPE FM AM PHONO C D Remote controller 2. Press the SETUP button. Turn the jog dial or press the and cursor buttons on the remote controller to display "2. INPUT SETUP." SETUP DSP/MODE Mode Direct G Stereo G Surround The listening modes that can be - Onkyo TX-DS595 | Owner Manual - Page 31
1. Select the desired input source. TX-DS595 DVD VIDEO 1 VIDEO 2 VIDEO 3 TAPE FM AM PHONO C D VCR Remote controller 2. Press the SETUP button. SETUP Turn the jog dial or press the and cursor buttons on the remote controller to display "2. INPUT SETUP." DSP/MODE ADJ PUSH TO ENTER 3. Press - Onkyo TX-DS595 | Owner Manual - Page 32
the TX-DS595 to be set every time that the power is turned on. This prevents the TX-DS595 from being turned on while it is set to an extremely high volume and suddenly output very loud sounds. 1. Press the SETUP button. Turn the jog dial or press the and cursor buttons on the remote controller to - Onkyo TX-DS595 | Owner Manual - Page 33
POWER ON OFF PHONES DISPLAY RT/PTY/TP FM MODE PRESET MEMORY TUNING A SPEAKERS B CH LEVEL DSP/MODE ADJ SETUP PRESET RETURN PUSH TO ENTER SMART SCAN NAVIGATOR AUDIO SELECTOR DVD VIDEO 1 VIDEO 2 VIDEO 3 VCR TAPE FM AM PHONO C D MASTER VOLUME BASS TREBLE AV RECEIVER TX-DS595 - Onkyo TX-DS595 | Owner Manual - Page 34
. Then simply press the desired operation button and the component will operate accordingly. For example, if you wish to select the CD input source at the TX-DS595 with the remote controller, first press the RCVR MODE button to select the TX-DS595 and then press the CD (INPUT SELECTOR) button. RCVR - Onkyo TX-DS595 | Owner Manual - Page 35
to the TX-DS595 (see page 13). 1. Press the CD MODE button. The CD MODE button lights green. 2. Press the desired operation button. The buttons shaded in the figure to the left are the operation buttons that can be used to control an Onkyo compact disc player. Operation buttons: ON: Turns on and - Onkyo TX-DS595 | Owner Manual - Page 36
TX-DS595 (see page 13). 1. Press the DVD MODE button. The DVD MODE button lights green. 2. Press the desired operation button. The buttons shaded in the figure to the left are the operation buttons that can be used to control an Onkyo DVD player. Operation buttons: ON: Turns the specific section on - Onkyo TX-DS595 | Owner Manual - Page 37
pre-programming code (see page 38). The other method is learning the commands from the other brand's remote control directly into this remote controller (see page 42). When in the SAT, CABLE and VCR mode, you may use the following buttons: VOL : Adjusts the volume at the TX-DS595 MUTING: Activates - Onkyo TX-DS595 | Owner Manual - Page 38
- Onkyo TX-DS595 | Owner Manual - Page 39
-programming code Pre-programmong codes Note: If more than one code is given in the table, try the code one by one until you reach the code for your component (i.e. if the first code does not work, then try the next). DVD BRAND DENON HITACHI JVC KENWOOD MAGNAVOX MARANTZ MITSUBISHI ONKYO PANASONIC - Onkyo TX-DS595 | Owner Manual - Page 40
into them. ON: Turns on and off the cable tuner unit (same as STDBY button on the remote controller) CH : Moves up and down the preset channel numbers 0,1 to 9: Numeric keys ENTER: Confirm You may also use the following buttons: VOL : Adjusts the volume at the TX-DS595 MUTING: Activates the muting - Onkyo TX-DS595 | Owner Manual - Page 41
button on the remote controller) CH : Moves up and down the preset channel numbers TV/VCR: Switches the AV input for the VCR : Play : Stop : Rewind : Fast Forward : Pause 0,1 to 9, +10: Numeric keys You may also use the following buttons: VOL : Adjusts the volume at the TX-DS595 MUTING: Activates - Onkyo TX-DS595 | Owner Manual - Page 42
commands you program here to operate the compact disc player. After programming which MODE button to use, you will then transfer the separate commands from the other remote controller over to the RC-447M remote controller one at a time. Each command is then programmed to a different button on the - Onkyo TX-DS595 | Owner Manual - Page 43
restore the Onkyo preset codes after you program new codes, you must first erase the new codes (see page 44). • The remote controller has 408 memory slots (8 modes × 51 buttons). Some remote controllers may have more commands that can be remembered by the remote controller. In such cases, it will be - Onkyo TX-DS595 | Owner Manual - Page 44
command you wish to erase. When you press the button, the SEND/LEARN indicator turns off. When you release the button, the lamp lights again. 3. Press and release SEND/LEARN indicator flashes three times quickly and the remote controller exits the erasing mode. Resume from Step 1. • If you perform an - Onkyo TX-DS595 | Owner Manual - Page 45
controller at the TX-DS595 and press the CD MODE button. 2. Press the MODE MACRO, and verify that the devices operate properly. It may take a while for the macro to finish transmitting, so be sure to continue pointing the remote controller at the device until the SEND/LEARN indicator turns off - Onkyo TX-DS595 | Owner Manual - Page 46
will no longer work in the macro. In this case, it will be necessary for you to reprogram the direct macro in order to avoid incorrect operation. • The codes programmed into a direct macro will been programmed properly. 1. Point the remote controller at the TX-DS595 and press the DIRECT MACRO button. - Onkyo TX-DS595 | Owner Manual - Page 47
remote controller exits the erasing mode. Resume from Step 1. • Be aware that if you press a button other than MODE MACRO button in Step 2, then you will press the MODE button, it lights green and the SEND/LEARN indicator lights. When you press the DIRECT MACRO button, the indicator turns off. When - Onkyo TX-DS595 | Owner Manual - Page 48
and the remote controller returns to its factory presets. Notes: • Proceed to Step 3 immediately after Step 2; otherwise, the batteries will be consumed quickly. • If you press any button other than the ENTER button in Step 3, nothing will be erased. In this case, resume from Step 1. Macro mode - Onkyo TX-DS595 | Owner Manual - Page 49
40 dB 40 dB 40 dB 0.7% GENERAL Power Supply: Power Consumption: Dimensions (W × H × D): Weight: AC REMOTE CONTROLLER Transmitter: Signal range: Power supply: Infrared Approx. 5 meters, 16 ft. Two "AA" batteries (1.5 V × 2) Specifications and features are subject to change without notice. Power - Onkyo TX-DS595 | Owner Manual - Page 50
fuse is blown. © Contact your Onkyo Service Center. Power turns on but no sound. • "MUTING" is displayed. © Press the MUTING button on the remote controller to turn it off. • Bad connections or wiring. © Check connections, speaker cables, etc. • Amplifier protection circuitry has been activated - Onkyo TX-DS595 | Owner Manual - Page 51
should correct the situation. * To reset the surround mode and other settings to the factory default settings, hold down the PRESET MEMORY button with the TX-DS595 turned on and then press the STANDBY/ON button. "CLEAR" appears in the front display and the TXDS595 enters the standby state. OTHER - Onkyo TX-DS595 | Owner Manual - Page 52
SN 29343023 Sales & Product Planning Div. : 2-1, Nisshin-cho, Neyagawa-shi, OSAKA 572-8540, JAPAN Tel: 072-831-8111 Fax: 072-833-5222 ONKYO U.S.A. CORPORATION 18 Park Way, Upper Saddle River, N.J. 07458, U.S.A. Tel: 201-785-2600 Fax: 201-785-2650 E-mail: [email protected] ONKYO EUROPE ELECTRONICS
-
 1
1 -
 2
2 -
 3
3 -
 4
4 -
 5
5 -
 6
6 -
 7
7 -
8
-
9
-
10
-
11
-
12
-
13
-
14
-
15
-
16
-
17
-
18
-
19
-
20
-
21
-
22
-
23
-
24
-
25
-
26
-
27
-
28
-
29
-
30
-
31
-
32
-
33
-
34
-
35
-
36
-
37
-
38
-
39
-
40
-
41
-
42
-
43
-
44
-
45
-
46
-
47
-
48
-
49
-
50
-
51
-
52
 |
 |

Contents
Thank you for purchasing the Onkyo AV Receiver.
Please read this manual thoroughly before making
connections and plugging in the unit. Following the
instructions in this manual will enable you to obtain
optimum performance and listening enjoyment from
your new AV Receiver. Please retain this manual for
future reference.
TX-DS595
Appendix
Specifications
................................................
49
Troubleshooting guide
...................................
50
Remote controller
Using remote controller
.................................
34
Learning a pre-programming code
................
38
Operating your programmed
remote controller
......................................
40
Programming the commands of remote controllers
for other devices into the remote controller
.....
42
Using a Macro function
.................................
45
Setup and operation
Speaker setup
.................................................
19
Listening to Radio Broadcasts
.......................
21
Listening to RDS broadcasts
(European models only)
..........................................
23
Enjoying music or videos with TX-DS595 ... 25
Using listening mode
.....................................
28
Input Setup
.....................................................
29
Preference
......................................................
32
Recording
.......................................................
33
Before using
Inportant Safeguards
........................................
2
Precautions
.......................................................
3
Features
............................................................
4
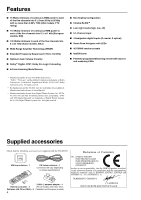
Supplied accessories
........................................
4
Before using this unit
......................................
5
AV Receiver
Instruction Manual
Facilities and connections
Front panel facilities
........................................
6
Remote controller
............................................
8
Connections
...................................................
10
Connecting speakers
......................................
14
Connecting the power
....................................
16
Connecting antennas
......................................
17