Onkyo TX-DS595 Owner Manual - Page 29
Input Setup
 |
View all Onkyo TX-DS595 manuals
Add to My Manuals
Save this manual to your list of manuals |
Page 29 highlights
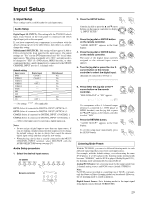
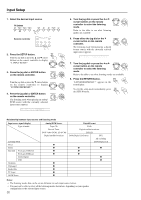
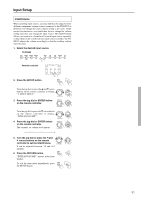
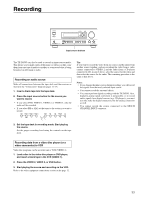
Input Setup 2. Input Setup These settings can be set differently for each input source. Audio Setup Digital Input (D. INPUT): This setting tells the TX-DS595 which input source button on the front panel is connected with which digital input jack on the rear panel. If you have connected your components in accordance with the default settings (given in the table below), then there is no need to change this setting. Multichannel (MULTICH): This setting will not appear if AM or FM is selected at the front panel for the input source. The initial settings are "Yes" for the DVD input source and "No" for all other input sources. This setting is normally set to "NO," and only needs to be changed to "YES" if a DVD player, MPEG decoder, or other component that has a multi channel port is connected to the MULTI CHANNEL INPUT port for 5.1-channel audio. Default setting Input source DVD VIDEO 1 VIDEO 2 VIDEO 3 VIDEO 4 TAPE FM AM PHONO CD Digital input COAX 1 COAX 2 ---OPT 2 ------- ---OPT 1 Multichannel Yes No No No No No No No ----: No setting : Not applicable OPT1: Select if connected to DIGITAL INPUT (OPTICAL) 1. OPT2: Select if connected to DIGITAL INPUT (OPTICAL) 2. COAX1: Select if connected to DIGITAL INPUT (COAXIAL) 1. COAX2: Select if connected to DIGITAL INPUT (COAXIAL) 2. ----: Select if the input source is not from a digital input jack. Notes: • Do not assign a digital input to more than one input source. If you are making a digital connection that requires you to change the default settings, be sure to always first cancel the current digital input setting and then assign the new setting. • When playing a device that is actually connected to the MULTI CHANNEL INPUT terminal, select MULTICH with the AUDIO SELECTOR button (see page 27). Audio Setup procedure 1. Select the desired input source. TX-DS595 DVD VIDEO 1 VIDEO 2 VIDEO 3 VCR TAPE FM AM PHONO C D Remote controller SETUP 2. Press the SETUP button. Turn the jog dial or press the and cursor buttons on the remote controller to display "2. INPUT SETUP." DSP/MODE ADJ PUSH TO ENTER 3. Press the jog dial or ENTER button on the remote controller. DSP/MODE ADJ "AUDIO SETUP?" appears in the front PUSH TO ENTER display. 4. Press the jog dial or ENTER button on the remote controller. DSP/MODE ADJ The name of the digital input currently PUSH TO ENTER assigned to the selected input source appears. 5. Turn the jog dial or press the or cursor button on the remote controller to select the digital input. (Example: If connected to COAX 1.) DSP/MODE ADJ PUSH TO ENTER 6. Press either the jog dial or the cursor button on the remote controller. "MULTICH=YES" or "NO" appears. DSP/MODE ADJ PUSH TO ENTER If a component with a 5.1-channel output terminal is connected (i.e., DVD player or MPEG decoder), turn the jog dial or press the and buttons on the remote controller to select "YES." DSP/MODE ADJ PUSH TO ENTER 7. Press the RETURN button. RETURN "AUDIO SETUP?" appears in the front display. To exit the setup mode immediately, press SETUP the SETUP button. Listening Mode Preset With the TX-DS595, you can set a different listening mode for each different signal type that comes from each input source. For example, with the default settings, even when using the same DVD player, if a CD is played, the listening mode automatically becomes "STEREO," and if a DVD is played (Dolby Digital 3/2.1), the listening mode automatically becomes Dolby D. Analog/PCM Source: Set a listening mode for the input signal from 2-channel analog sources and PCM source (default: STEREO.) Note: For PCM sources recorded at a sampling rate of 96 kHz or greater, only the Stereo or Direct listening modes can be selected. However, the set listening mode is stored in memory. Digital format Source: Set a listening mode for the input signal from digital sources (default: SURROUND). 29
-
 1
1 -
2
-
3
-
4
-
5
-
6
-
7
-
8
-
9
-
10
-
11
-
12
-
13
-
14
-
15
-
16
-
17
-
18
-
19
-
20
-
21
-
22
-
23
-
 24
24 -
 25
25 -
 26
26 -
 27
27 -
 28
28 -
 29
29 -
 30
30 -
 31
31 -
 32
32 -
 33
33 -
 34
34 -
35
-
36
-
37
-
38
-
39
-
40
-
41
-
42
-
43
-
44
-
45
-
46
-
47
-
48
-
49
-
50
-
51
-
52
 |
 |
