Onkyo TX-DS656 Owner Manual - Page 27
Input, source, selection, surround, setup
 |
View all Onkyo TX-DS656 manuals
Add to My Manuals
Save this manual to your list of manuals |
Page 27 highlights
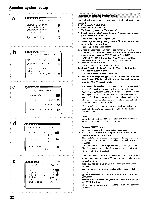
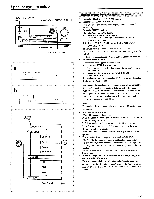
Input source selection and surround setup 7 5,6 5 6 OO O e ® 0 SPEAKERS 2 MAIN Using the front panel 1. Press the POWER (or SYSTEM) button. The STAND-BY indicator on the front panel goes out and the display lights up. Note: If the SPEAKERS MAIN indicator is not lit on the display, press the SPEAKERS MAIN button on the unit's front panel to make it appear on the display. 2. Select the desired input source using the input selector buttons. Input selector button DVD VIDEO-1 VCR-1 VIDEO-2 VCR-2/TV VIDEO-3 CAM TAPE-1 MD TAPE-2 MONITOR FM AM PHONO CD Selected input source DVD player Video Cassette Recorder Video Cassette Recorder, TV Video camera MD recorder, DAT deck, cassette tape deck Cassette tape deck B uilt-in tuner Built-in tuner Turntable CD player If the selected input source is connected to one of the DIGITAL INPUT connectors of the TX-DS656... Press the DIGITAL AUDIO SELECTOR button. Rotate the SMART SCAN CONTROLLER to select the DIGITAL INPUT connector to which the input source is connected, then press the ENTER button. For details, "Selecting the digital/analog audio input" on page 30. 3. Start playing the selected input source. If you have selected "FM" or "AM" in 2... Select the desired broadcasting station using the SMART SCAN CONTROLLER. For details, see "Tuning in a broadcasting station" on page 32. 4. Adjust the sound volume using the MASTER VOLUME control knob. Turn the knob clockwise to increase the sound volume; turn it counterclockwise to decrease the sound volume. Turning the MASTER VOLUME control knob adjusts the volume of the front, center, and surround speakers and the PRE OUT outputs simultaneously. If no sound is output... Check if "TAPE-2 MONITOR" is shown on the display. If it is lit, the TAPE-2 function is enabled and sound is not output when an input source other than "TAPE-2" is selected. In this case, press the TAPE-2 MONITOR button to clear the "TAPE-2 MONITOR" display. For details, see "Using the TAPE-2 MONITOR function" on page 44. 5. Press the SURROUND button and then rotate the SMART SCAN CONTROLLER to select the desired surround mode. To have stereo sound output... Set the Surround Mode item to "STEREO". If you have set the System Setup's Subwoofer parameter to YES, you can still specify whether or not you wish to use the subwoofer when Surround mode is STEREO. Set this parameter to YES if you wish to use the subwoofer in STEREO mode. If you have set the System Setup's Subwoofer parameter to NO, this parameter will not appear. The surround mode once set will be recalled automatically every time the same input source is selected. (The previously set surround parameters will also be recalled.) For details, see "Selecting a surround mode" on page 39. 6. Press the PARAMETER button and then rotate the SMART SCAN CONTROLLER to display "Surround Setup". SMART SCAN CONTROLLER ( Note: "Surround Setup" will not appear if.the Dolby Pro Logic mode is set. 7. Press the ENTER button to select the desired surround mode parameter and then enter the setting using the SMART SCAN CONTROLLER. For details, see "Changing the surround mode parameters" on page 40. 27
-
 1
1 -
2
-
3
-
4
-
5
-
6
-
7
-
8
-
9
-
10
-
11
-
12
-
13
-
14
-
15
-
16
-
17
-
18
-
19
-
20
-
21
-
 22
22 -
 23
23 -
 24
24 -
 25
25 -
 26
26 -
 27
27 -
 28
28 -
 29
29 -
 30
30 -
 31
31 -
 32
32 -
33
-
34
-
35
-
36
-
37
-
38
-
39
-
40
-
41
-
42
-
43
-
44
-
45
-
46
-
47
-
48
-
49
-
50
-
51
-
52
-
53
-
54
-
55
 |
 |
