Onkyo TX-DS656 Owner Manual - Page 43
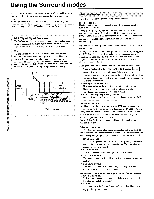
Picture, VIDEO, Surround
 |
View all Onkyo TX-DS656 manuals
Add to My Manuals
Save this manual to your list of manuals |
Page 43 highlights
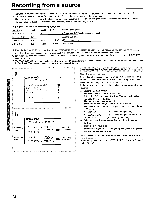
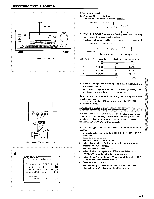
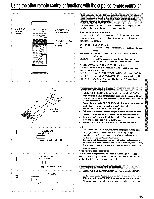
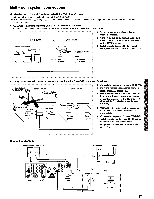
Recording from a source Display ENTER 1142.3-A O0 (c)„ Source selector buttons O 00 Video camera/TV game machine ONKYO ** Input Selector ** Picture = VIDEO-3 RA Sound = CD TAPE-2 Moni. = OFF RI Input Mode=Digital-2 Surround Mode= LIVE Using the front panel 1. Press the REC OUT button. The REC OUT indicator flashes for 8 seconds. SPEAKERS MAIN ""I I SURROUND MOOS Flashing 2. While the REC OUT indicator is flashing, select the recording source using the source selector buttons. The REC OUT indicator and the selected recording source name flash. SPEAKERS MAIN V- 1 IsuRRommom HALL Indication D V1 V2 V3 Playback source Recording source Video recording source DVD VIDEO-1 VIDEO-2 VIDEO-3 Indication CD T1 T2 TU PH Audio recording source CD TAPE-1 TAPE-2 FM or AM PHONO 3. Start recording on the recording equipment, then start playing the selected source. Now the recording source will not change even if you change the input source by using the source selector buttons. To set the source selected as the recording source using the source selector buttons... In step 1, press the REC OUT button again while the REC OUT indicator is flashing. Adding sound to video camera images You can add music from CDs or other source to video images from a video camera. The following explanation assumes that you are adding sound from a CD player to images from a video camera connected to the VIDEO-3/VIDEO CAM INPUT connectors. In the following procedure, use the remote controller unless otherwise specified. 1. Connect a video camera to the VIDEO 3/VIDEO CAM INPUT connector. 2. Press the ENTER button. The Menu appears on the TV screen. 3. Select "Input Selector" using the A or V cursor button, then press the MP- cursor button. The Input Selector screen appears. 4. Select "Picture" using the A or V button and then select "VIDEO-3" using the or IP- cursor button. 5. Select "Sound" using the A or V button and then select "CD" using the -011 or ► cursor button. (a) 6. Press the ENTER button. 7. Start recording on the video cassette recorder, then start playback on the CD player and the video camera. 43
-
 1
1 -
2
-
3
-
4
-
5
-
6
-
7
-
8
-
9
-
10
-
11
-
12
-
13
-
14
-
15
-
16
-
17
-
18
-
19
-
20
-
21
-
22
-
23
-
24
-
25
-
26
-
27
-
28
-
29
-
30
-
31
-
32
-
33
-
34
-
35
-
36
-
37
-
 38
38 -
 39
39 -
 40
40 -
 41
41 -
 42
42 -
 43
43 -
 44
44 -
 45
45 -
 46
46 -
 47
47 -
 48
48 -
49
-
50
-
51
-
52
-
53
-
54
-
55
 |
 |
