Onkyo TX-NR5008 Owner Manual - Page 66
Lock Setup, Using the Audio Settings, Auto Power Down, Network, Firmware Update, Tone Control Settings
 |
View all Onkyo TX-NR5008 manuals
Add to My Manuals
Save this manual to your list of manuals |
Page 66 highlights
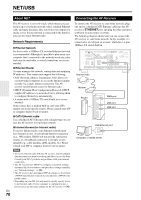
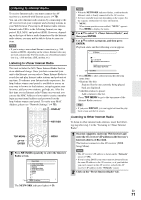
Auto Power Down ■ Auto Power Down ` Off: Auto Power Down disabled. ` On: Auto Power Down enabled. When "Auto Power Down" is set to "On", AV receiver will automatically perform STANDBY operation if there is no operation for 30 minutes with no audio and no video signal input. "Auto Power Down" will display on the display and OSD from 30 seconds before the Auto Power Down functions. Default setting: On (European and Asian models), Off (North American models) Note • Depending on some sources, the auto power-down function may activate during playback. • The Auto Power Down function does not work when Zone 2 or Zone 3 is on. Network See "Network Settings" (➔ 76). Firmware Update See "Firmware Update" for update procedure (➔ 112). Note • Perform the firmware update only when an announcement is posted on the Onkyo web site. See the Onkyo web site for latest information. • It takes about 60 minutes to complete the firmware update. • (TX-NR5008) When updating a firmware from a USB mass storage device, the AV receiver searches the device which is connected earlier during power on. If two devices have been connected at the time of power on, the AV receiver will search the device on the front panel. ■ Version The current version of the firmware is displayed. ■ Receiver ` via NET: You can update the firmware via Internet. Check the network connection before update. ` via USB: You can update the firmware from a USB mass storage device. You can update the AV receiver's firmware. Do not shutdown the power of the AV receiver while update. ■ Universal Port ` via NET: You can update the firmware via Internet. Check the network connection before update. ` via USB: You can update the firmware from a USB mass storage device. You can update the Onkyo dock's firmware. Do not shutdown the power of the AV receiver while update. En 66 Note • This update shall not be performed when no dock is connected to UNIVERSAL PORT jack. Lock Setup With this preference, you can protect your settings by locking the setup menus. Main menu Lock Setup ■ Setup ` Locked: Setup menus locked. ` Unlocked: Setup menus not locked. When the setup menus are locked, you cannot change any setting. Using the Audio Settings You can change various audio settings from the Home menu (➔ 30). 1 Press RECEIVER followed by HOME. 2 Use R/X to select "Audio", and then use R/X/F/S to make the desired selection. Note • These settings are disabled when the "Audio TV Out" setting is set to "On" (➔ 64) and an input selector other than HDMI is selected. Tone Control Settings You can adjust the bass for the front, front wide, front high, center, surround, surround back and subwoofer speakers and treble for the front, front wide, front high, center, surround and surround back speakers, except when the Direct, Pure Audio or THX listening mode is selected. ■ Bass ` -10dB to 0dB to +10dB in 2 dB steps. You can boost or cut low-frequency sounds output. ■ Treble ` -10dB to 0dB to +10dB in 2 dB steps. You can boost or cut high-frequency sounds output. Operating on the AV receiver 1 Press TONE on the AV receiver repeatedly to select either "Bass" or "Treble". 2 Use Up S and Down F on the AV receiver to adjust.
-
 1
1 -
2
-
3
-
4
-
5
-
6
-
7
-
8
-
9
-
10
-
11
-
12
-
13
-
14
-
15
-
16
-
17
-
18
-
19
-
20
-
21
-
22
-
23
-
24
-
25
-
26
-
27
-
28
-
29
-
30
-
31
-
32
-
33
-
34
-
35
-
36
-
37
-
38
-
39
-
40
-
41
-
42
-
43
-
44
-
45
-
46
-
47
-
48
-
49
-
50
-
51
-
52
-
53
-
54
-
55
-
56
-
57
-
58
-
59
-
60
-
 61
61 -
 62
62 -
 63
63 -
 64
64 -
 65
65 -
 66
66 -
 67
67 -
 68
68 -
 69
69 -
 70
70 -
 71
71 -
72
-
73
-
74
-
75
-
76
-
77
-
78
-
79
-
80
-
81
-
82
-
83
-
84
-
85
-
86
-
87
-
88
-
89
-
90
-
91
-
92
-
93
-
94
-
95
-
96
-
97
-
98
-
99
-
100
-
101
-
102
-
103
-
104
-
105
-
106
-
107
-
108
-
109
-
110
-
111
-
112
-
113
-
114
-
115
-
116
 |
 |