Onkyo TX-NR5008 Owner Manual - Page 82
Setting the Powered Zone 2/3, Connecting Your Zone 3 Speakers to an, Amp in Zone 3, Zone 3 12V Trigger
 |
View all Onkyo TX-NR5008 manuals
Add to My Manuals
Save this manual to your list of manuals |
Page 82 highlights
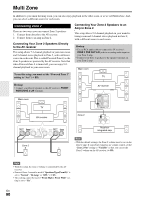
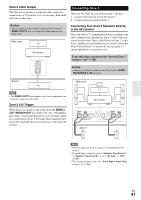
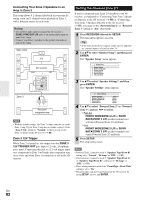
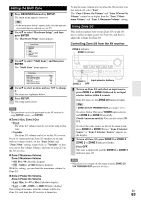
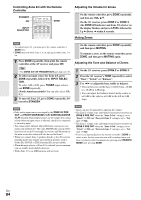
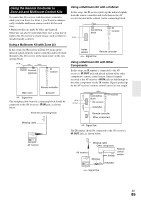
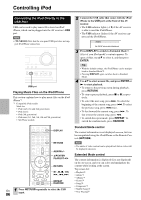
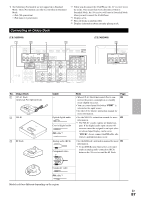
Connecting Your Zone 3 Speakers to an Amp in Zone 3 This setup allows 9.2-channel playback in your main listening room and 2-channel stereo playback in Zone 3, with a different source in each room. Hookup • Use an RCA audio cable to connect the AV receiver's ZONE 3 PRE OUT L/R jacks to an analog audio input on your Zone 3 amp. • Connect your Zone 3 speakers to the speaker terminals on your Zone 3 amp. Main room TV AV receiver Setting the Powered Zone 2/3 If you've connected your Zone 2/3 speakers to the AV receiver, as explained in "Connecting Your Zone 2 Speakers Directly to the AV receiver" (➔ 80) or "Connecting Your Zone 3 Speakers Directly to the AV receiver" (➔ 81), you must set the "Powered Zone 2" or "Powered Zone 3" setting to "Act" (Activated). 1 Press RECEIVER followed by SETUP. The main menu appears onscreen. Tip • If the main menu doesn't appear, make sure the appropri- ate external input is selected on your TV. 2 Use R/X to select "Speaker Setup", and then press ENTER. The "Speaker Setup" menu appears. 2. Speaker Setup 1. Speaker Settings 2. Speaker Configuration 3. Speaker Distance 4. Level Calibration 5. Equalizer Settings 6. THX Audio Setup 3 Use R/X to select "Speaker Settings", and then press ENTER. The "Speaker Settings" menu appears. Zone 3 IN R L Receiver/ integrated amp Note • With the default settings, the Zone 3 volume must be set on the Zone 3 amp. If your Zone 3 amp has no volume control, set the "Zone 3 Out" setting to "Variable" so that you can set the Zone 3 volume on the AV receiver (➔ 83). Zone 3 12V Trigger When Zone 3 is turned on, the output from the ZONE 3 12V TRIGGER OUT goes high (+12 volts, 25 milliamperes max). Connecting this jack to a 12-volt trigger input on a component in Zone 3 will make that component turn on or off as and when Zone 3 is turned on or off on the AV receiver. 2-1. Speaker Settings Speaker Impedance Speakers Type(Front A) Speakers Type(Front B) Powered Zone 2 Powered Zone 3 6ohms Normal Not Use Not Act Not Act 4 Use R/X to select "Powered Zone 2" or "Powered Zone 3", and use F/S to select: `Not Act: FRONT WIDE/ZONE 2 L/R or SURR BACK/ZONE 3 L/R speaker terminals not activated (Powered Zone 2/3 disabled). ` Act: FRONT WIDE/ZONE 2 L/R or SURR BACK/ZONE 3 L/R speaker terminals acti- vated (Powered Zone 2/3 enabled). 5 Press SETUP. The setup menu closes. Note • Powered Zone 2 cannot be used if "Speakers Type(Front B)" setting set to "Normal", "Bi-Amp" or "BTL" (➔ 51). • Powered Zone 3 cannot be used if "Speakers Type(Front A)" or "Speakers Type(Front B)" setting set to "Bi-Amp" or "BTL" (➔ 51). • These setting cannot be used if the "Front High + Front Wide" setting is set to "Yes". • This procedure can also be performed on the AV receiver by using SETUP, arrows, and ENTER. En 82
-
 1
1 -
2
-
3
-
4
-
5
-
6
-
7
-
8
-
9
-
10
-
11
-
12
-
13
-
14
-
15
-
16
-
17
-
18
-
19
-
20
-
21
-
22
-
23
-
24
-
25
-
26
-
27
-
28
-
29
-
30
-
31
-
32
-
33
-
34
-
35
-
36
-
37
-
38
-
39
-
40
-
41
-
42
-
43
-
44
-
45
-
46
-
47
-
48
-
49
-
50
-
51
-
52
-
53
-
54
-
55
-
56
-
57
-
58
-
59
-
60
-
61
-
62
-
63
-
64
-
65
-
66
-
67
-
68
-
69
-
70
-
71
-
72
-
73
-
74
-
75
-
76
-
 77
77 -
 78
78 -
 79
79 -
 80
80 -
 81
81 -
 82
82 -
 83
83 -
 84
84 -
 85
85 -
 86
86 -
 87
87 -
88
-
89
-
90
-
91
-
92
-
93
-
94
-
95
-
96
-
97
-
98
-
99
-
100
-
101
-
102
-
103
-
104
-
105
-
106
-
107
-
108
-
109
-
110
-
111
-
112
-
113
-
114
-
115
-
116
 |
 |
