Onkyo TX-NR5008 Owner Manual - Page 83
Setting the Multi Zone, Using Zone 2/3, Controlling Zone 2/3 from the AV receiver
 |
View all Onkyo TX-NR5008 manuals
Add to My Manuals
Save this manual to your list of manuals |
Page 83 highlights
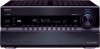
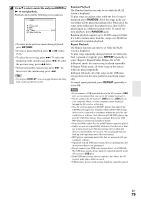
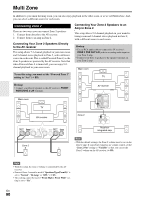
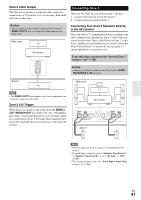
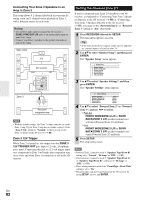
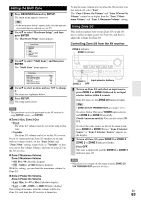
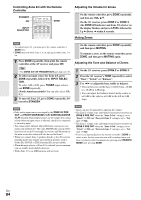
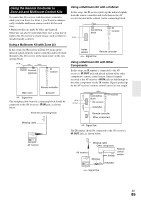
Setting the Multi Zone 1 Press RECEIVER followed by SETUP. The main menu appears onscreen. Tip • If the main menu doesn't appear, make sure the appropri- ate external input is selected on your TV. 2 Use R/X to select "Hardware Setup", and then press ENTER. The "Hardware Setup" menu appears. 7. Hardware Setup 1. Remote ID 2. Multi Zone 3. Tuner 4. HDMI 5. Auto Power Down 6. Network 7. Firmware Update 3 Use R/X to select "Multi Zone", and then press ENTER. The "Multi Zone" menu appears. To use the same volume level as when the AV receiver was last turned off, select "Last". The "Zone 2 Power On Volume" and "Zone 3 Power On Volume" cannot be set higher than the "Zone 2 Maximum Volume" and "Zone 3 Maximum Volume" setting. Using Zone 2/3 This section explains how to turn Zone 2/3 on and off, how to select an input source for Zone 2/3, and how to adjust the volume for Zone 2/3. Controlling Zone 2/3 from the AV receiver ZONE 3 indicator ZONE 2 indicator 7-2. Multi Zone Zone 2 Out Zone 2 Maximum Volume Zone 2 Power On Volume Zone 3 Out Zone 3 Maximum Volume Zone 3 Power On Volume Fixed Off Last Fixed Off Last 4 Use R/X to select an item, and use F/S to change it. The items are explained below. 5 Press SETUP. The setup menu closes. Note • This procedure can also be performed on the AV receiver by using SETUP, arrows, and ENTER. ■ Zone 2 Out, Zone 3 Out ` Fixed: The Zone 2/3 volume must be set on the amp in that zone. ` Variable: The Zone 2/3 volume can be set on the AV receiver. If you've connected your Zone 2/3 speakers to an amp with no volume control, set the "Zone 2 Out" and "Zone 3 Out" setting, respectively, to "Variable" so that you can set the volume, balance, and tone of Zone 2/3 on the AV receiver. ■ Zone 2 Maximum Volume, Zone 3 Maximum Volume `Off, 50 to 99 (Absolute display) `Off, -32dB to +17dB (Relative display) With this setting, you can limit the maximum volume for Zone 2/3. ■ Zone 2 Power On Volume, Zone 3 Power On Volume `Last, Min, 1 to 99 or Max (Absolute display) `Last, -2dB, -81dB to +18dB (Relative display) This setting determines what the volume will be for Zone 2/3 each time the AV receiver is turned on. ZONE 3 Input selector buttons ZONE 2 OFF 1 To turn on Zone 2/3 and select an input source, press ZONE 2 or ZONE 3 followed by an input selector button within 8 seconds. Zone 2/3 turns on, the ZONE 2/3 indicator lights. Tip • ZONE 2/3 12V TRIGGER OUT goes high (+12 V). To select AM or FM, press TUNER input selector and ZONE 2 or ZONE 3 repeatedly. (North American models) You can also select SIRIUS. To select the same source as that of the main room, press ZONE 2 or ZONE 3 twice. "Zone 2 Selector: Source" or "Zone 3 Selector: Source" appears on the display. 2 To turn off Zone 2/3, press ZONE 2 or ZONE 3. ZONE 2 or ZONE 3 indicator flashes. Press OFF. The zone is turned off, and the ZONE 2 or ZONE 3 indicator goes off. Note • When Zone 2/3 is turned off, the output from the ZONE 2/3 12V TRIGGER OUT goes low (0 volts). En 83
-
 1
1 -
2
-
3
-
4
-
5
-
6
-
7
-
8
-
9
-
10
-
11
-
12
-
13
-
14
-
15
-
16
-
17
-
18
-
19
-
20
-
21
-
22
-
23
-
24
-
25
-
26
-
27
-
28
-
29
-
30
-
31
-
32
-
33
-
34
-
35
-
36
-
37
-
38
-
39
-
40
-
41
-
42
-
43
-
44
-
45
-
46
-
47
-
48
-
49
-
50
-
51
-
52
-
53
-
54
-
55
-
56
-
57
-
58
-
59
-
60
-
61
-
62
-
63
-
64
-
65
-
66
-
67
-
68
-
69
-
70
-
71
-
72
-
73
-
74
-
75
-
76
-
77
-
 78
78 -
 79
79 -
 80
80 -
 81
81 -
 82
82 -
 83
83 -
 84
84 -
 85
85 -
 86
86 -
 87
87 -
 88
88 -
89
-
90
-
91
-
92
-
93
-
94
-
95
-
96
-
97
-
98
-
99
-
100
-
101
-
102
-
103
-
104
-
105
-
106
-
107
-
108
-
109
-
110
-
111
-
112
-
113
-
114
-
115
-
116
 |
 |