Optoma GT5600 EH340UST User Manual - Page 41
Setup HDMI link settings menu, Setup test pattern menu, Setup projector ID menu, Setup options menu
 |
View all Optoma GT5600 manuals
Add to My Manuals
Save this manual to your list of manuals |
Page 41 highlights
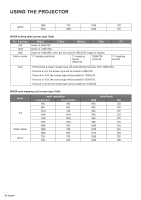
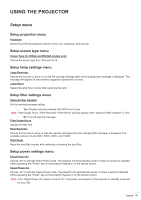
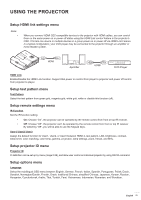
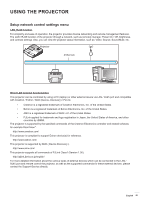
USING THE PROJECTOR Setup HDMI link settings menu Note: ‡‡ When you connect HDMI CEC-compatible devices to the projector with HDMI cables, you can control them on the same power on or power off status using the HDMI Link control feature in the projector's OSD. This lets one device or multiple devices in a group power on or power off via HDMI Link Feature. In a typical configuration, your DVD player may be connected to the projector through an amplifier or home theater system. HDMI Apmlifier HDMI DVD Player HDMI Link Enable/Disable the HDMI Link function. Support that power on control from player to projector and power off control from projector to player. Setup test pattern menu Test Pattern Select the test pattern from green grid, magenta grid, white grid, white or disable this function (off). Setup remote settings menu IR Function Set the IR function setting. ‡‡ On: Choose "On", the projector can be operated by the remote control from front or top IR receiver. ‡‡ Off: Choose "Off", the projector can't be operated by the remote control from front or top IR receiver. By selecting "Off", you will be able to use the Keypad keys. User1/ User2/ User3 Assign the default function for User1, User2, or User3 between HDMI 2, test pattern, LAN, brightness, contrast, sleep timer, color matching, color temp, gamma, projection, lamp settings, zoom, freeze, and MHL. Setup projector ID menu Projector ID ID definition can be set up by menu (range 0-99), and allow user control an individual projector by using RS232 command. Setup options menu Language Select the multilingual OSD menu between English, German, French, Italian, Spanish, Portuguese, Polish, Dutch, Swedish, Norwegian/Danish, Finnish, Greek, traditional Chinese, simplified Chinese, Japanese, Korean, Russian, Hungarian, Czechoslovak, Arabic, Thai, Turkish, Farsi, Vietnamese, Indonesian, Romanian, and Slovakian. English 41
-
 1
1 -
2
-
3
-
4
-
5
-
6
-
7
-
8
-
9
-
10
-
11
-
12
-
13
-
14
-
15
-
16
-
17
-
18
-
19
-
20
-
21
-
22
-
23
-
24
-
25
-
26
-
27
-
28
-
29
-
30
-
31
-
32
-
33
-
34
-
35
-
 36
36 -
 37
37 -
 38
38 -
 39
39 -
 40
40 -
 41
41 -
 42
42 -
 43
43 -
 44
44 -
 45
45 -
 46
46 -
47
-
48
-
49
-
50
-
51
-
52
-
53
-
54
-
55
-
56
-
57
-
58
-
59
-
60
-
61
-
62
-
63
-
64
-
65
-
66
-
67
-
68
-
69
-
70
-
71
-
72
-
73
-
74
-
75
 |
 |