Panasonic AG HPX170 Memory Card Camera Recorder - Page 20
Viewfinder, Using the viewfinder
 |
UPC - 086753091052
View all Panasonic AG HPX170 manuals
Add to My Manuals
Save this manual to your list of manuals |
Page 20 highlights
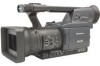
Viewfinder This camera has two viewfinders; one is a miniature LCD in the viewfinder and the other is a retractable 3.5-inch LCD. Use the viewfinder that best suits the application and shooting conditions. • The brightness and hue may differ between the images appearing on the viewfinder and LCD monitor and those displayed on a TV monitor. To see how the final images will appear, check them on a TV monitor. • Images are always displayed on the viewfinder. Using the viewfinder 1 Set the POWER switch to ON and check that images appear in the viewfinder. • Keep the LCD monitor closed. POWER ON OFF 2 Adjust the viewfinder's angle so that the screen is positioned where it is easiest to see. • You can move the view finder out to about 90 degrees perpendicular to the camera. 3 Adjust the diopter adjustment lever so that you can see the characters on the viewfinder screen clearly. Viewfinder diopter dial Fitting the eye cup Attach the eye cup by aligning the projections on the eye cup holder and eye cup and fitting them together. • Turning the eye cup after attaching it may cause the eye cup holder to come off. If the eyecup holder does come off, see "Cleaning the Viewfinder" (page 119) for details on how to refit it. Eye cup holder Eye cup Projection Eye piece Do not point the eye piece at the sun or other strong light source. • Light concentrated by the lens could damage internal components and poses a fire hazard. 20
-
 1
1 -
2
-
3
-
4
-
5
-
6
-
7
-
8
-
9
-
10
-
11
-
12
-
13
-
14
-
 15
15 -
 16
16 -
 17
17 -
 18
18 -
 19
19 -
 20
20 -
 21
21 -
 22
22 -
 23
23 -
 24
24 -
 25
25 -
26
-
27
-
28
-
29
-
30
-
31
-
32
-
33
-
34
-
35
-
36
-
37
-
38
-
39
-
40
-
41
-
42
-
43
-
44
-
45
-
46
-
47
-
48
-
49
-
50
-
51
-
52
-
53
-
54
-
55
-
56
-
57
-
58
-
59
-
60
-
61
-
62
-
63
-
64
-
65
-
66
-
67
-
68
-
69
-
70
-
71
-
72
-
73
-
74
-
75
-
76
-
77
-
78
-
79
-
80
-
81
-
82
-
83
-
84
-
85
-
86
-
87
-
88
-
89
-
90
-
91
-
92
-
93
-
94
-
95
-
96
-
97
-
98
-
99
-
100
-
101
-
102
-
103
-
104
-
105
-
106
-
107
-
108
-
109
-
110
-
111
-
112
-
113
-
114
-
115
-
116
-
117
-
118
-
119
-
120
-
121
-
122
-
123
-
124
-
125
-
126
-
127
-
128
 |
 |
