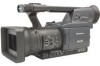
Panasonic AG HPX170 Memory Card Camera Recorder - Page 55
Saving scene files and other settings on SD memory cards
 |
UPC - 086753091052
View all Panasonic AG HPX170 manuals
Add to My Manuals
Save this manual to your list of manuals |
Page 55 highlights
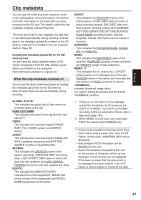
Shooting Saving scene files and other settings on SD memory cards You can save up to four scene file settings or other settings as files on an SD memory card, and you can also load them from the card. • The data in all the scene files, F1 to F6, is rewritten. • Insert the SD memory card into the unit. (Page 29) If you have saved a scene file 1 Set the unit's POWER switch to ON. 2 Select SCENE FILE on the setting menu CARD FUNCTIONS screen, select YES and press the Operation lever. (or push it in the q direction) For all other settings, select USER FILE. • For menu operations (Page 94) • You can also use the menu buttons on the remote control. (Page 14) CARD FUNCTIONS SCENE FILE USER FILE SD CARD FORMAT LCD BACKLIGHT LCD SET EVF SET SELF SHOOT NORMAL ---- ---- MIRROR PUSH MENU TO RETURN 3 Push the Operation lever in the w or q direction to select a file number (1 to 4). SCENE FILE (SD CARD) FILE SELECT READ WRITE FILE 1 FILE 2 FILE 3 FILE 4 TITLE RELOAD 1 ---- ---- NO FILE NO FILE NO FILE NO FILE ---- PUSH MENU TO RETURN 4 Push the Operation lever in the e or r direction to select WRITE and press it again. SCENE FILE (SD CARD) FILE SELECT READ WRITE FILE 1 FILE 2 FILE 3 FILE 4 TITLE RELOAD 1 ---- YES NO FILE NO FILE NO FILE NO FILE ---- PUSH MENU TO RETURN 5 Push the Operation lever in the w direction to display the screen below, then select YES and press the Operation lever again. • In the following example, TITLE 1 is the filename. (To change the filename, see page 56.) SCENE FILE (SD CARD) WRITE FILE 1 YES -- - PUSH STILL NO TITLE EDIT TITLE 1 +/- : PUSH q / g SEL : PUSH t / y PUSH MENU TO RETURN The message shown below appears to indicate that the change in scene file settings has been completed. NOW WRITING... WRITE OK (Continued on the next page) 55
-
 1
1 -
2
-
3
-
4
-
5
-
6
-
7
-
8
-
9
-
10
-
11
-
12
-
13
-
14
-
15
-
16
-
17
-
18
-
19
-
20
-
21
-
22
-
23
-
24
-
25
-
26
-
27
-
28
-
29
-
30
-
31
-
32
-
33
-
34
-
35
-
36
-
37
-
38
-
39
-
40
-
41
-
42
-
43
-
44
-
45
-
46
-
47
-
48
-
49
-
 50
50 -
 51
51 -
 52
52 -
 53
53 -
 54
54 -
 55
55 -
 56
56 -
 57
57 -
 58
58 -
 59
59 -
 60
60 -
61
-
62
-
63
-
64
-
65
-
66
-
67
-
68
-
69
-
70
-
71
-
72
-
73
-
74
-
75
-
76
-
77
-
78
-
79
-
80
-
81
-
82
-
83
-
84
-
85
-
86
-
87
-
88
-
89
-
90
-
91
-
92
-
93
-
94
-
95
-
96
-
97
-
98
-
99
-
100
-
101
-
102
-
103
-
104
-
105
-
106
-
107
-
108
-
109
-
110
-
111
-
112
-
113
-
114
-
115
-
116
-
117
-
118
-
119
-
120
-
121
-
122
-
123
-
124
-
125
-
126
-
127
-
128
 |
 |
