Panasonic AG HPX170 Memory Card Camera Recorder - Page 29
Using SD/SDHC memory cards, Installing and removing the SD memory card, Formatting SD memory card, - ag hpx170p j
 |
UPC - 086753091052
View all Panasonic AG HPX170 manuals
Add to My Manuals
Save this manual to your list of manuals |
Page 29 highlights
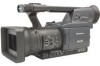
Using SD/SDHC memory cards You can use SD and SDHC memory cards (the term "SD memory card" is used for both hereafter) to save and load SCENE files and USER files, and to upload clip meta data. (Page 55) Installing and removing the SD memory card Installation 1 Lift up the viewfinder, press the side of the card slot cover (A), and slide the cover (B) to open it. 2 Insert the card while making sure it is oriented in the proper direction. THUMBNAIL OPERATION PROPERTY META DATA EXIT DELETE FORMAT SLOT1 REPAIR CLIP SLOT2 RE-CONNECTIONSD CARD EXCH.THUMBNAEILXIT EXIT 5 Select YES on the confirmation screen. • The selected SD memory card is formatted. • You can also format from the SD CARD FORMAT option on the CARD FUNCTIONS screen. (Page 110) • With SDHC cards, 32 KB of capacity will have been used. Shooting Access lamp 2 3 Close the card slot cover. Removal 1 Open the card slot cover, and check that the access lamp is not lit. 2 Press the card further into the unit, grasp the card, and then remove. 3 Close the card slot cover. Formatting SD memory card 1 Set the POWER switch to ON. (Page 19) 2 Press the mode button and set it to MCR mode (the MCR lamp lights). 3 Press the MENU button. 4 On the menu, select OPERATION, FORMAT and then SD CARD. (Page 68) • Select EXIT to cancel the formatting. Cautions in using SD memory cards • SD memory cards used with the AG-HPX170P should conform to SD or SDHC standards. Be sure to format cards using the AG-HPX170P. SD memory cards with the following capacity can be used for the AG-HPX170P. SD (from 8 MB to 2 GB): 8 MB 16 MB 32 MB 64 MB 128 MB 256 MB 512 MB 1 GB 2 GB SDHC (4 GB to 16 GB): 4 GB 8 GB 16 GB For the latest information not available in the Operating Instructions, visit the P2 Support Desk at the following Web sites. https://eww.pavc.panasonic.co.jp/pro-av/ • SD memory cards must not be used or stored in an environment where they may be Exposed to high temperatures/humidities; Exposed to water droplets; or Electrically charged. • Be sure always close the cover when using an SD memory card. • See also "Checkpoints for using memory cards" on page 122. 29
-
 1
1 -
2
-
3
-
4
-
5
-
6
-
7
-
8
-
9
-
10
-
11
-
12
-
13
-
14
-
15
-
16
-
17
-
18
-
19
-
20
-
21
-
22
-
23
-
 24
24 -
 25
25 -
 26
26 -
 27
27 -
 28
28 -
 29
29 -
 30
30 -
 31
31 -
 32
32 -
 33
33 -
 34
34 -
35
-
36
-
37
-
38
-
39
-
40
-
41
-
42
-
43
-
44
-
45
-
46
-
47
-
48
-
49
-
50
-
51
-
52
-
53
-
54
-
55
-
56
-
57
-
58
-
59
-
60
-
61
-
62
-
63
-
64
-
65
-
66
-
67
-
68
-
69
-
70
-
71
-
72
-
73
-
74
-
75
-
76
-
77
-
78
-
79
-
80
-
81
-
82
-
83
-
84
-
85
-
86
-
87
-
88
-
89
-
90
-
91
-
92
-
93
-
94
-
95
-
96
-
97
-
98
-
99
-
100
-
101
-
102
-
103
-
104
-
105
-
106
-
107
-
108
-
109
-
110
-
111
-
112
-
113
-
114
-
115
-
116
-
117
-
118
-
119
-
120
-
121
-
122
-
123
-
124
-
125
-
126
-
127
-
128
 |
 |
