Panasonic AG HPX170 Memory Card Camera Recorder - Page 54
Using scene files continued
 |
UPC - 086753091052
View all Panasonic AG HPX170 manuals
Add to My Manuals
Save this manual to your list of manuals |
Page 54 highlights
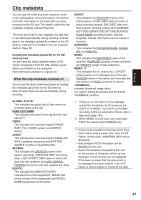
Using scene files (continued) 6 When the screen shown below appears, use the Operation lever to enter a 6- character file name. Set the same as user information. (Page 61) • Characters that can be set Space, A to Z, 0 to 9 When the filename has been set, you can erase all characters using the RESET button on the camera or the remote control. BARS SHUTTER SPEES SELECT CH1 SELECT CH2 SELECT INPUT1 INPUT2 INT(L) INPUT1 INPUT2 COUNTER INT(R) INPUT2 ON ON OFF OFF AUDIO RESET/TC SET MIC POWER+48V ZEBRAREC OIS LCD EVF DTL WFM OSD START/ DATE/ PHOTO STOP TIME SHOT COUNTER RESET TITLE ZOOM MULTI/ P-IN-P REC A.DUB - VOL + /REW PLAY FF/ Camera or Remote control NAME EDIT SW POSITION F1 +/- : PUSH q / g SEL : PUSH t / y PUSH MENU TO RETURN 7 After you finish setting the filename, press the MENU button. 8 Push the Operation lever in the r direction to select LOAD/SAVE/INIT. SCENE FILE F1: LOAD/SAVE/INIT OPERATION TYPE FRAME RATE SYNCRO SCAN DETAIL LEVEL V DETAIL LEVEL DETAIL CORING CHROMA LEVEL ---- VIDEO CAM DEFAULT 1/48.0 0 0 0 0 PUSH MENU TO RETURN 9 Press the Operation lever, push it in the r direction to select SAVE and press it again. SCENE FILE F1: LOAD/SAVE/INIT OPERATION TYPE FRAME RATE SYNCRO SCAN DETAIL LEVEL V DETAIL LEVEL DETAIL CORING CHROMA LEVEL ---- LOAD SAVE INITIAL 0 0 0 0 PUSH MENU TO RETURN 10 Press the Operation lever to select YES when the screen shown below appears. (To return to the menu level above, press the MENU button.) SCENE FILE F1: SAVE? YES -- - PUSH STILL NO PUSH MENU TO RETURN The message below appears, and the changes to the scene file are complete. SAVE PROCESSING... SAVE COMPLETED ! 11 Press MENU twice to exit the menus. • To return to a previously saved setting after a change in scene file settings, select LOAD in step 9 and do steps 10 and 11. • To return the scene file settings to the factory settings, select INITIAL in step 9, then do steps 10 to 11. 54
-
 1
1 -
2
-
3
-
4
-
5
-
6
-
7
-
8
-
9
-
10
-
11
-
12
-
13
-
14
-
15
-
16
-
17
-
18
-
19
-
20
-
21
-
22
-
23
-
24
-
25
-
26
-
27
-
28
-
29
-
30
-
31
-
32
-
33
-
34
-
35
-
36
-
37
-
38
-
39
-
40
-
41
-
42
-
43
-
44
-
45
-
46
-
47
-
48
-
 49
49 -
 50
50 -
 51
51 -
 52
52 -
 53
53 -
 54
54 -
 55
55 -
 56
56 -
 57
57 -
 58
58 -
 59
59 -
60
-
61
-
62
-
63
-
64
-
65
-
66
-
67
-
68
-
69
-
70
-
71
-
72
-
73
-
74
-
75
-
76
-
77
-
78
-
79
-
80
-
81
-
82
-
83
-
84
-
85
-
86
-
87
-
88
-
89
-
90
-
91
-
92
-
93
-
94
-
95
-
96
-
97
-
98
-
99
-
100
-
101
-
102
-
103
-
104
-
105
-
106
-
107
-
108
-
109
-
110
-
111
-
112
-
113
-
114
-
115
-
116
-
117
-
118
-
119
-
120
-
121
-
122
-
123
-
124
-
125
-
126
-
127
-
128
 |
 |
