Panasonic KV-S3105C Operating Instructions - Page 50
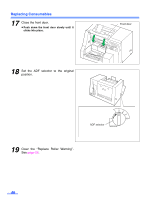
Be sure not to open the, front door or turn off the power., Caution
 |
View all Panasonic KV-S3105C manuals
Add to My Manuals
Save this manual to your list of manuals |
Page 50 highlights
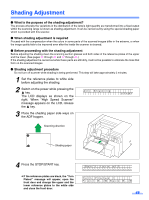
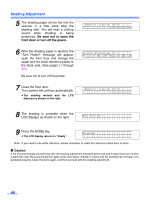
Shading Adjustment 5 The shading paper will be fed into the scanner in a little while after the shading start. You will hear a clicking sound while shading is being performed. Be sure not to open the front door or turn off the power. 6 After the shading paper is ejected, the "Turn Plates!" message will appear, open the front door and change the upper and the lower reference plates to the black side. (See pages 34 through 35.) Be sure not to turn off the power. 7 Close the front door. The scanner will continue automatically. ≥ The shading restarts and the LCD displays as shown on the right. Don ' t t u r n o f f Tu r n P l a t es ! F r o n t : W- > B > B a c k : W- > B Don ' t t u r n o f f 8 The shading is complete when the LCD displays as shown on the right. NO E r r o r 9 Press the HOME key. ≥ The LCD display returns to "Ready". Read y Note: If you need to use white reference, please remember to rotate the reference plates back to white. ¥ Caution If the scanned images are still lined after the shading adjustment has been performed and if these lines are not eliminated even after the scanning section glass areas have been cleaned, it means that the shading has not been compensated properly. Clean the parts again, and then proceed with the shading adjustment. 50
-
 1
1 -
2
-
3
-
4
-
5
-
6
-
7
-
8
-
9
-
10
-
11
-
12
-
13
-
14
-
15
-
16
-
17
-
18
-
19
-
20
-
21
-
22
-
23
-
24
-
25
-
26
-
27
-
28
-
29
-
30
-
31
-
32
-
33
-
34
-
35
-
36
-
37
-
38
-
39
-
40
-
41
-
42
-
43
-
44
-
 45
45 -
 46
46 -
 47
47 -
 48
48 -
 49
49 -
 50
50 -
 51
51 -
 52
52 -
 53
53 -
 54
54 -
 55
55 -
56
-
57
-
58
-
59
-
60
-
61
 |
 |
