Panasonic KX-TDA600 Installation Manual - Page 75
Expansion, Shelf 3, Wall Bracket
 |
UPC - 037988851775
View all Panasonic KX-TDA600 manuals
Add to My Manuals
Save this manual to your list of manuals |
Page 75 highlights
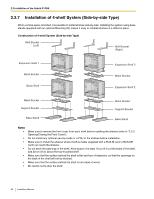
2.2 Installation of the Hybrid IP-PBX 2. Check that the shelves are standing exactly vertically. If the upper shelves are leaning slightly to one side, move Expansion Shelf 3 to adjust the position. (Since the wall brackets are attached loosely to Expansion Shelf 3, it should be possible to adjust the position of the shelves.) Then, tighten the screws connecting the wall brackets to Expansion Shelf 3. Wall Bracket Expansion Shelf 3 Wall Floor Shelf installation is complete. Next, it is necessary to connect the shelves. Installation Manual 75
-
 1
1 -
2
-
3
-
4
-
5
-
6
-
7
-
8
-
9
-
10
-
11
-
12
-
13
-
14
-
15
-
16
-
17
-
18
-
19
-
20
-
21
-
22
-
23
-
24
-
25
-
26
-
27
-
28
-
29
-
30
-
31
-
32
-
33
-
34
-
35
-
36
-
37
-
38
-
39
-
40
-
41
-
42
-
43
-
44
-
45
-
46
-
47
-
48
-
49
-
50
-
51
-
52
-
53
-
54
-
55
-
56
-
57
-
58
-
59
-
60
-
61
-
62
-
63
-
64
-
65
-
66
-
67
-
68
-
69
-
 70
70 -
 71
71 -
 72
72 -
 73
73 -
 74
74 -
 75
75 -
 76
76 -
 77
77 -
 78
78 -
 79
79 -
 80
80 -
81
-
82
-
83
-
84
-
85
-
86
-
87
-
88
-
89
-
90
-
91
-
92
-
93
-
94
-
95
-
96
-
97
-
98
-
99
-
100
-
101
-
102
-
103
-
104
-
105
-
106
-
107
-
108
-
109
-
110
-
111
-
112
-
113
-
114
-
115
-
116
-
117
-
118
-
119
-
120
-
121
-
122
-
123
-
124
-
125
-
126
-
127
-
128
-
129
-
130
-
131
-
132
-
133
-
134
-
135
-
136
-
137
-
138
-
139
-
140
-
141
-
142
-
143
-
144
-
145
-
146
-
147
-
148
-
149
-
150
-
151
-
152
-
153
-
154
-
155
-
156
-
157
-
158
-
159
-
160
-
161
-
162
-
163
-
164
-
165
-
166
-
167
-
168
-
169
-
170
-
171
-
172
-
173
-
174
-
175
-
176
-
177
-
178
-
179
-
180
-
181
-
182
-
183
-
184
-
185
-
186
-
187
-
188
-
189
-
190
-
191
-
192
-
193
-
194
-
195
-
196
-
197
-
198
-
199
-
200
-
201
-
202
-
203
-
204
-
205
-
206
-
207
-
208
-
209
-
210
-
211
-
212
-
213
-
214
-
215
-
216
-
217
-
218
-
219
-
220
-
221
-
222
-
223
-
224
-
225
-
226
-
227
-
228
-
229
-
230
-
231
-
232
 |
 |

2.2 Installation of the Hybrid IP-PBX
Installation Manual
75
2.
Check that the shelves are standing exactly vertically. If the upper shelves are leaning slightly to one
side, move Expansion Shelf 3 to adjust the position. (Since the wall brackets are attached loosely to
Expansion Shelf 3, it should be possible to adjust the position of the shelves.)
Then, tighten the screws connecting the wall brackets to Expansion Shelf 3.
Shelf installation is complete. Next, it is necessary to connect the shelves.
Floor
Wall
Expansion
Shelf 3
Wall Bracket