Panasonic KX-TDA600 Installation Manual - Page 98
Installing/Replacing the Power Supply Unit
 |
UPC - 037988851775
View all Panasonic KX-TDA600 manuals
Add to My Manuals
Save this manual to your list of manuals |
Page 98 highlights
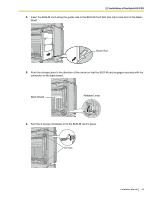
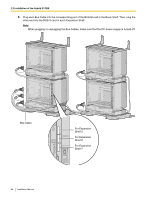
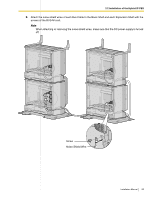
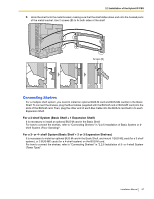
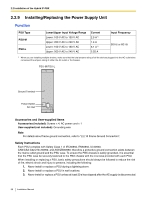
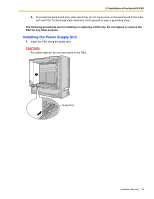
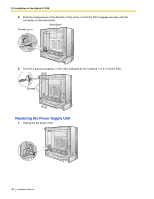
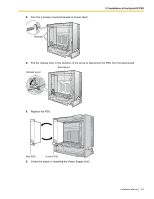
2.2 Installation of the Hybrid IP-PBX 2.2.9 Installing/Replacing the Power Supply Unit Function PSU Type PSU-M PSU-L Lower/Upper Input Voltage Range Lower: 100 V AC to 130 V AC Upper: 200 V AC to 240 V AC Lower: 100 V AC to 130 V AC Upper: 200 V AC to 240 V AC Current 2.5 A*1 1.4 A 5.1 A*1 2.55 A Input Frequency 50 Hz or 60 Hz *1 When you are installing multiple shelves, make sure that the total ampere rating of all the devices plugged into the AC outlet does not exceed the ampere rating of either the AC outlet or the breaker. PSU-M/PSU-L Ground Terminal Power Switch AC Inlet Accessories and User-supplied Items Accessories (included): Screws × 4, AC power cord × 1 User-supplied (not included): Grounding wire Note For details about frame ground connection, refer to "2.2.10 Frame Ground Connection". Safety Instructions Each PSU complies with Safety Class 1 of IEC60950, EN60950, UL60950, CAN/CSA-C22.2 No.60950, and AS/NZS60950; therefore a protective ground connection exists between the mains outlet ground and the PSU case. To ensure the PBX chassis is safely grounded, it is essential that the PSU case be securely fastened to the PBX chassis with the 4 screws provided with each PSU. When installing or replacing a PSU, basic safety precautions should always be followed to reduce the risk of fire, electric shock and injury to persons, including the following: 1. Never install or replace a PSU during a lightning storm. 2. Never install or replace a PSU in wet locations. 3. Never install or replace a PSU unless at least 20 s has elapsed after the AC supply is disconnected. 98 Installation Manual
-
 1
1 -
2
-
3
-
4
-
5
-
6
-
7
-
8
-
9
-
10
-
11
-
12
-
13
-
14
-
15
-
16
-
17
-
18
-
19
-
20
-
21
-
22
-
23
-
24
-
25
-
26
-
27
-
28
-
29
-
30
-
31
-
32
-
33
-
34
-
35
-
36
-
37
-
38
-
39
-
40
-
41
-
42
-
43
-
44
-
45
-
46
-
47
-
48
-
49
-
50
-
51
-
52
-
53
-
54
-
55
-
56
-
57
-
58
-
59
-
60
-
61
-
62
-
63
-
64
-
65
-
66
-
67
-
68
-
69
-
70
-
71
-
72
-
73
-
74
-
75
-
76
-
77
-
78
-
79
-
80
-
81
-
82
-
83
-
84
-
85
-
86
-
87
-
88
-
89
-
90
-
91
-
92
-
 93
93 -
 94
94 -
 95
95 -
 96
96 -
 97
97 -
 98
98 -
 99
99 -
 100
100 -
 101
101 -
 102
102 -
 103
103 -
104
-
105
-
106
-
107
-
108
-
109
-
110
-
111
-
112
-
113
-
114
-
115
-
116
-
117
-
118
-
119
-
120
-
121
-
122
-
123
-
124
-
125
-
126
-
127
-
128
-
129
-
130
-
131
-
132
-
133
-
134
-
135
-
136
-
137
-
138
-
139
-
140
-
141
-
142
-
143
-
144
-
145
-
146
-
147
-
148
-
149
-
150
-
151
-
152
-
153
-
154
-
155
-
156
-
157
-
158
-
159
-
160
-
161
-
162
-
163
-
164
-
165
-
166
-
167
-
168
-
169
-
170
-
171
-
172
-
173
-
174
-
175
-
176
-
177
-
178
-
179
-
180
-
181
-
182
-
183
-
184
-
185
-
186
-
187
-
188
-
189
-
190
-
191
-
192
-
193
-
194
-
195
-
196
-
197
-
198
-
199
-
200
-
201
-
202
-
203
-
204
-
205
-
206
-
207
-
208
-
209
-
210
-
211
-
212
-
213
-
214
-
215
-
216
-
217
-
218
-
219
-
220
-
221
-
222
-
223
-
224
-
225
-
226
-
227
-
228
-
229
-
230
-
231
-
232
 |
 |
