Panasonic NV-GS500 Operating Instructions - Page 11
Setting date and time
 |
View all Panasonic NV-GS500 manuals
Add to My Manuals
Save this manual to your list of manuals |
Page 11 highlights
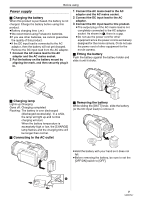
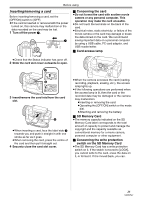
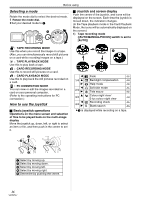
Before using ≥Set the [OFF/ON] switch to [OFF] when not using the movie camera. ≥The Status indicator goes off when the power turns off. ª How to turn the power on and off with the LCD monitor/viewfinder When the power switch is set to [ON], the power can be turned on and off with the LCD monitor and the viewfinder when the unit is in Tape Recording Mode or Card Recording Mode. OFF ON 1 Open the LCD monitor out or extend the viewfinder to use. (-12-) 3 Open the LCD monitor or extend the viewfinder to turn the power on and use the movie camera again. OFF ON ≥The Status indicator lights red and the power turns on. Setting date and time When the movie camera is turned on for the first time, [SET DATE AND TIME] will appear. ≥The LCD monitor or viewfinder will be activated. 2 Close the LCD monitor and retract the viewfinder. OFF ON ≥Select [YES] and press the centre of the joystick. Do steps 2 and 3 below to set the date/ time. If the screen shows the incorrect date/time, then adjust it. ≥Set to Tape Recording Mode or Card Recording Mode. 1 Set [BASIC] >> [CLOCK SET] >> [YES]. (-18-) ≥The power will not turn off unless the LCD monitor is closed and the viewfinder is retracted. ≥The Status indicator automatically goes off and the power turns off. (If quick start is set to [ON] (-13-), the unit goes into quick start standby mode and the Status indicator lights green.) ≥The power does not turn off even if the LCD monitor is closed and the viewfinder is retracted while recording on a tape. 2 Move the joystick left or right in order to select the item to be set. Then move the joystick up or down to set the desired value. ≥The year will change as follows: 2000, 2001, ..., 2089, 2000, ... ≥The 24-hour clock is used. 3 Press the joystick to determine the setting. ≥The clock function starts at [00] seconds. ª About date/time ≥The date and time function are driven by a builtin lithium battery. ≥Make sure to check the time before recording because the built-in clock is not very accurate. 11 VQT0T47
-
 1
1 -
2
-
3
-
4
-
5
-
 6
6 -
 7
7 -
 8
8 -
 9
9 -
 10
10 -
 11
11 -
 12
12 -
 13
13 -
 14
14 -
 15
15 -
 16
16 -
17
-
18
-
19
-
20
-
21
-
22
-
23
-
24
-
25
-
26
-
27
-
28
-
29
-
30
-
31
-
32
-
33
-
34
-
35
-
36
-
37
-
38
-
39
-
40
-
41
-
42
-
43
-
44
-
45
-
46
-
47
-
48
-
49
-
50
-
51
-
52
-
53
-
54
-
55
-
56
-
57
-
58
-
59
-
60
-
61
-
62
-
63
-
64
-
65
-
66
-
67
-
68
-
69
-
70
-
71
-
72
 |
 |
