Panasonic NV-GS500 Operating Instructions - Page 54
Menus related to recording
 |
View all Panasonic NV-GS500 manuals
Add to My Manuals
Save this manual to your list of manuals |
Page 54 highlights
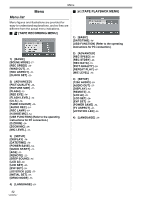
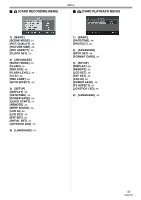
Menu Menus related to recording ª [H.SHOE MIC] Set to [LOWCUT] and this reduces low sound noise and wind noise hitting the stereo zoom microphone (VW-VMH3E; optional) mounted on the smart accessory shoe. ª [DATE/TIME] This switches between date and time indications. ≥The movie camera automatically records the date and time of picture taking on the tape. ≥You can also show or change the date/time indication by repeatedly pressing the [DATE/TIME] button on the remote control. ª [AUDIO REC] Switches the audio (PCM audio) recording systems. [12bit]: Records audio in "12 bit 32 kHz 4 tracks". (The original audio signals can be kept after the other audio signals are dubbed.) [16bit]: Records audio in "16 bit 48 kHz 2 tracks". Audio can be recorded in higher quality. (If audio signals are dubbed, then the original audio signals will be erased.) ª [REC LAMP] Set to [ON] and this turns the recording lamp on during recording, which indicates that recording is underway. Set to [OFF] and this does not turn on the lamp even when recording is underway. ª [DISPLAY] Set to [ON] and the display mode can be switched to all functions. Set to [OFF] and it can be switched to minimum display. ª [BEEP SOUND] Set to [ON] and confirmation/alarm beeps are issued as follows. 1 Beep ≥When you start recording ≥When you turn on the power ≥When the unit goes from quick start standby mode to recording pause 2 Beeps ≥When you pause recording ≥When you turn off the power ≥When the unit goes into quick start standby mode 2 Beeps for 4 times ≥When a cassette with its erasure prevention tab set to [SAVE] is inserted, condensation occurs (-62-), and at other times. Check the sentence displayed on the screen. (-57-) ª [POWER SAVE] [OFF]: When about 5 minutes passed without any operation, the standby mode automatically will be set. In the standby mode, [;] blinks and it takes time more than usual to start recording after you press the recording start/stop button. [5 MINUTES]:When about 5 minutes passed without any operation, the movie camera automatically turns off to protect the tape or to prevent the battery from running down. When you use the movie camera, turn it on again. ≥In the following cases, the power may not turn off even when setting [POWER SAVE] >> [5 MINUTES]. ≥When connecting to the AC outlet (When using the AC adaptor) ≥When connecting the USB cable or the DV cable to a personal computer or other equipment ≥When in PC Connection Mode 54 VQT0T47
-
 1
1 -
2
-
3
-
4
-
5
-
6
-
7
-
8
-
9
-
10
-
11
-
12
-
13
-
14
-
15
-
16
-
17
-
18
-
19
-
20
-
21
-
22
-
23
-
24
-
25
-
26
-
27
-
28
-
29
-
30
-
31
-
32
-
33
-
34
-
35
-
36
-
37
-
38
-
39
-
40
-
41
-
42
-
43
-
44
-
45
-
46
-
47
-
48
-
 49
49 -
 50
50 -
 51
51 -
 52
52 -
 53
53 -
 54
54 -
 55
55 -
 56
56 -
 57
57 -
 58
58 -
 59
59 -
60
-
61
-
62
-
63
-
64
-
65
-
66
-
67
-
68
-
69
-
70
-
71
-
72
 |
 |
