Panasonic NV-GS500 Operating Instructions - Page 9
Power supply
 |
View all Panasonic NV-GS500 manuals
Add to My Manuals
Save this manual to your list of manuals |
Page 9 highlights
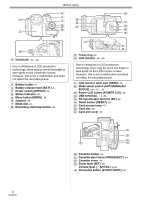
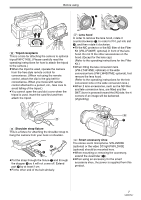
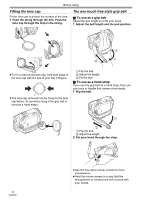
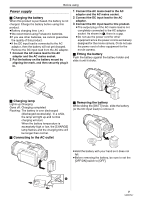
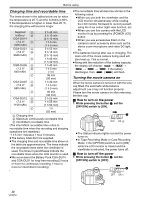
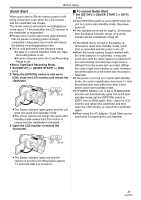
Before using Power supply ª Charging the battery When this product is purchased, the battery is not charged. Charge the battery before using this product. ≥Battery charging time (-10-) ≥We recommend using Panasonic batteries. ≥If you use other batteries, we cannot guarantee the quality of this product. ≥If the DC input lead is connected to the AC adaptor, then the battery will not get charged. Remove the DC input lead from the AC adaptor. 1 Connect the AC mains lead to the AC adaptor and the AC mains socket. 2 Put the battery on the battery mount by aligning the mark, and then securely plug it in. 1 Connect the AC mains lead to the AC adaptor and the AC mains socket. 2 Connect the DC input lead to the AC adaptor. 3 Connect the DC input lead to this product. ≥The output plug of the AC mains lead is not completely connected to the AC adaptor socket. As shown in 1, there is a gap. ≥Do not use the power cord for other equipment since the power cord is exclusively designed for the movie camera. Or do not use the power cord of other equipment for the movie camera. ª Fitting the battery Push the battery against the battery holder and slide it until it clicks. ª Charging lamp Lights up: Charging Goes off: Charging completed Flashing: The battery is over discharged (discharged excessively). In a while, the lamp will light up and normal charging will start. When the battery temperature is excessively high or low, the [CHARGE] lamp flashes and the charging time will be longer than normal. ª Connecting to the AC outlet ª Removing the battery While sliding the [BATT] lever, slide the battery (or the DC input lead) to remove it. BATT ≥Hold the battery with your hand so it does not fall. ≥Before removing the battery, be sure to set the [OFF/ON] switch to [OFF]. 1 9 VQT0T47
-
 1
1 -
2
-
3
-
 4
4 -
 5
5 -
 6
6 -
 7
7 -
 8
8 -
 9
9 -
 10
10 -
 11
11 -
 12
12 -
 13
13 -
 14
14 -
15
-
16
-
17
-
18
-
19
-
20
-
21
-
22
-
23
-
24
-
25
-
26
-
27
-
28
-
29
-
30
-
31
-
32
-
33
-
34
-
35
-
36
-
37
-
38
-
39
-
40
-
41
-
42
-
43
-
44
-
45
-
46
-
47
-
48
-
49
-
50
-
51
-
52
-
53
-
54
-
55
-
56
-
57
-
58
-
59
-
60
-
61
-
62
-
63
-
64
-
65
-
66
-
67
-
68
-
69
-
70
-
71
-
72
 |
 |
