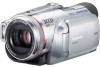
Panasonic NV-GS500 Operating Instructions - Page 25
Recording on a tape - connect to tv
 |
View all Panasonic NV-GS500 manuals
Add to My Manuals
Save this manual to your list of manuals |
Page 25 highlights
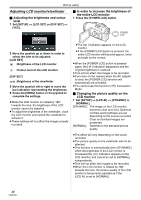
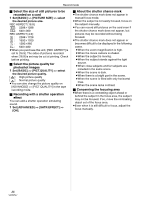
Record mode ≥In the LP mode, the picture quality will not be degraded in comparison with the SP mode, but mosaic noise may appear on the playback image or some functions may be disabled. ≥Playback on other digital video equipment or on digital video equipment without the LP mode. ≥Playback of the image on other digital video equipment recorded in the LP mode. ≥Slow/frame-by-frame playback. Recording on a tape Remove the lens cap. (-8-) (When the camera is turned on with the lens cap fitted, the automatic white balance adjustment may not function properly. Please turn the camera on after removing the lens cap.) When this unit is purchased, the aspect ratio is set to [16:9] for recording images compatible with a wide-screen TV. To make this unit compatible with regular TVs (4:3), change the [REC ASPECT] setting before recording the images (-35-) or change the [TV ASPECT] setting when watching them on the connected TV (-43-). ≥Set to Tape Recording Mode. 1 Press the recording start/stop button to start recording. 2 Press the recording start/stop button again to pause recording. ; PC ≥For the recording time on a tape, refer to -10-. ≥Carry out a recording check (-26-) to verify that the image is recorded properly. ≥In order to find the unrecorded section, carry out the blank search (-26-). ≥If you want to preserve the original sound recorded when audio dubbing (-49-), set [ADVANCED] >> [AUDIO REC] >> [12bit] to record images. ª On-screen display in the tape recording mode 1) ęç÷āú÷ 2) 3)¢ ø÷÷ 0.2 4)¢ 5)¢ 6)¢ ¢These are only displayed when you press the [PHOTO SHOT] button half way while a card is inserted. These are not displayed when using the remote control or a free style remote control. 1) Recording time elapse 2) Remaining tape indication 3) Still picture size 4) Card indication (-56-) 5) Number of recordable still pictures (When no picture can be recorded, this indication will flash in red.) 6) Quality of still pictures ª Concerning the remaining tape time indication on the screen ≥The remaining tape time is indicated in minutes. (When it reaches less than 3 minutes, the indication starts flashing.) ≥During a 15-second or shorter recording, the remaining tape time indication may not be displayed or the remaining tape time may not be displayed correctly. ≥In some cases, the remaining tape time indication may display remaining tape time that is 2 to 3 minutes shorter than the actual remaining tape time. 25 VQT0T47
-
 1
1 -
2
-
3
-
4
-
5
-
6
-
7
-
8
-
9
-
10
-
11
-
12
-
13
-
14
-
15
-
16
-
17
-
18
-
19
-
 20
20 -
 21
21 -
 22
22 -
 23
23 -
 24
24 -
 25
25 -
 26
26 -
 27
27 -
 28
28 -
 29
29 -
 30
30 -
31
-
32
-
33
-
34
-
35
-
36
-
37
-
38
-
39
-
40
-
41
-
42
-
43
-
44
-
45
-
46
-
47
-
48
-
49
-
50
-
51
-
52
-
53
-
54
-
55
-
56
-
57
-
58
-
59
-
60
-
61
-
62
-
63
-
64
-
65
-
66
-
67
-
68
-
69
-
70
-
71
-
72
 |
 |
