Panasonic NV-GS500 Operating Instructions - Page 32
Wind noise reduction function, Adjusting the Microphone Sensitivity, Level
 |
View all Panasonic NV-GS500 manuals
Add to My Manuals
Save this manual to your list of manuals |
Page 32 highlights
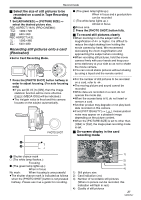
Record mode 3 Press the recording start/stop button. Start recording. (fade in) When you start recording, the image/audio disappears completely and the image/audio gradually appears. Wind noise reduction function This reduces the wind noise coming into the microphone when recording. ≥Set to Tape Recording Mode. 1 Set [BASIC] >> [WIND CUT] >> [ON]. Pause recording. (fade out) The image/audio gradually disappears. After the image/audio completely disappears, recording stops. ª To cancel fading Select the [ ] icon again. ≥The [FADE OFF] indication appears on the screen of the movie camera. ª To select the colour for fade in/out The colour which appears in fading pictures can be selected. 1 Set [ADVANCED] >> [FADE COLOUR] >> [WHITE] or [BLACK]. ≥While the fade in/fade out function is selected, it takes several seconds to display the image when you start recording images. Besides, it also takes several seconds to pause recording. ª To cancel the wind noise reduction function Set [BASIC] >> [WIND CUT] >> [OFF]. ≥The default setting is [ON]. ≥Reduces the wind noise depending on the wind strength. (If this function is activated in strong winds, the stereo effect may be reduced. When the wind weakens, the stereo effect will be restored.) Adjusting the Microphone Sensitivity Level When recording, the input level from the built-in microphone and the external microphone terminal can be adjusted. ≥Set to Tape Recording/Playback Mode. 1 Set [ADVANCED] >> [MIC LEVEL] >> [AUTO], [SETrAGC] or [SET]. AGC: Auto Gain Control [AUTO]: AGC is activated, and the recording level is adjusted automatically. [SETrAGC]:The desired recording level can be set. AGC will also be activated to reduce the amount of sound distortion. [SET]: AGC is not activated and so natural recording can be performed. Adjust in such a way that the sound will not be distorted at the maximum volume level. 2 Move the joystick left or right to increase or decrease the bars of the gain value. 32 VQT0T47
-
 1
1 -
2
-
3
-
4
-
5
-
6
-
7
-
8
-
9
-
10
-
11
-
12
-
13
-
14
-
15
-
16
-
17
-
18
-
19
-
20
-
21
-
22
-
23
-
24
-
25
-
26
-
 27
27 -
 28
28 -
 29
29 -
 30
30 -
 31
31 -
 32
32 -
 33
33 -
 34
34 -
 35
35 -
 36
36 -
 37
37 -
38
-
39
-
40
-
41
-
42
-
43
-
44
-
45
-
46
-
47
-
48
-
49
-
50
-
51
-
52
-
53
-
54
-
55
-
56
-
57
-
58
-
59
-
60
-
61
-
62
-
63
-
64
-
65
-
66
-
67
-
68
-
69
-
70
-
71
-
72
 |
 |
