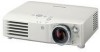
Panasonic PT AX100U Hd Home Cinema Projector
Panasonic PT AX100U - LCD Projector - HD 720p Manual
 |
UPC - 791871111383
View all Panasonic PT AX100U manuals
Add to My Manuals
Save this manual to your list of manuals |
Panasonic PT AX100U manual content summary:
- Panasonic PT AX100U | Hd Home Cinema Projector - Page 1
LCD Projector Operating Instructions Model No. PT-AX100U For assistance, please call: 1 - 888 - View - PTV (843 - 9788) or send e - mail to: [email protected] or visit us at www.panasonic.com (U.S.A) For assistance, please call: 787 - 750 - 4300 or visit us at http://panasonic - Panasonic PT AX100U | Hd Home Cinema Projector - Page 2
Panasonic LCD projector.The serial number of your product may be found on its bottom. You should note it in the space provided below and retain this booklet in case service is required. Model number: Serial number: PT-AX100U operating and maintenance (servicing) instructions in the literature - Panasonic PT AX100U | Hd Home Cinema Projector - Page 3
95/EC (Article 5); Panasonic Marketing Europe GmbH Hagenauer Str. 43 65203 Wiesbaden F.R.GERMANY WARNING: Not for use in a computer room as defined in the Standard for the Protection of Electronic Computer/Data Processing Equipment, ANSI/NFPA 75. Declaration of Conformity Model Number: PT-AX100U - Panasonic PT AX100U | Hd Home Cinema Projector - Page 4
Operating range 22 Input switching 22 Capturing an image 22 Switching the aspect ratio 23 Switching off the projector automatically 23 Resetting to the factory default settings 23 Turning on the button backlight 23 Switching the picture mode 23 Adjusting the image 24 Setting your own color - Panasonic PT AX100U | Hd Home Cinema Projector - Page 5
cleaning 37 Cleaning your projector 37 Before replacing the Lamp unit 38 When to replace the Lamp unit 38 Replacing the lamp unit 39 Troubleshooting 40 Appendix Technical Information 41 List of compatible signals 41 Serial terminal 42 Menu structure 45 Specifications 46 Dimensions 48 - Panasonic PT AX100U | Hd Home Cinema Projector - Page 6
use other than an authorized ceiling mount bracket. If foreign objects or water get inside the projector, or if the projector cord is used while damaged, electric shocks, short-circuits or fire may result. Ask an Authorized Service Center to carry keep them away from metallic objects. 6 - ENGLISH - Panasonic PT AX100U | Hd Home Cinema Projector - Page 7
Before replacing the lamp, be sure to disconnect the power cord plug from the wall outlet. Electric shocks or explosions can result if this is not done. Do not allow infants or pets to touch the remote control unit. The accessory remote control unit can be used to operate not only the projector but - Panasonic PT AX100U | Hd Home Cinema Projector - Page 8
dealer about the replacement of the lamp unit and check the inside of the projector. Ask an Authorized Service Center to clean inside the projector at least once a year. If dust is left to build up inside the projector without being cleaned out, it can result in fire or problems with operation. It - Panasonic PT AX100U | Hd Home Cinema Projector - Page 9
. The life of the lamp may be shortened or the projector may be turned off. See "TEMP indicator" on page 36. Do not set up the projector near high-voltage power lines or near motors. The projector may be subject to electromagnetic interference. If installing the projector to the ceiling, ask - Panasonic PT AX100U | Hd Home Cinema Projector - Page 10
or damaged. Lamp The lamp may need to be replaced earlier due to variables such as individual lamp characteristics, usage conditions and the installation environment, especially when the projector is subjected to continuous use for more than 10 hours or the power is frequently turned on and off - Panasonic PT AX100U | Hd Home Cinema Projector - Page 11
according to the polarity diagram | { indicated inside. { | NOTE: Do not drop the Remote control. Avoid contact with liquids or moisture. Remove the batteries if not using the Remote control for a long period of time. Do not use rechargeable batteries. Do not keep pressing the Remote - Panasonic PT AX100U | Hd Home Cinema Projector - Page 12
the projector. (page 19) POWER Turn the POWER on/off. (page 19) POWER Switch to cycle through the INPUT SELECT method options. (page 22) INPUT SELECT Display the menu on screen. Return to the previous menu in menu mode. (page 26) MENU Illuminates or flashes to indicate the status of the lamp unit - Panasonic PT AX100U | Hd Home Cinema Projector - Page 13
temperature inside. Lamp unit component Houses the replaceable lamp unit. Contact the projector dealer or an authorized service center for replacement. (page 37 damage or injury. This projector should only be used with the attached Power cord to ensure optimum performance and avoid damage to the - Panasonic PT AX100U | Hd Home Cinema Projector - Page 14
: m * The results above are approximate and may differ slightly from the actual measurements. NOTE: Do not use the projector at a raised or a horizontally tilted position as it may cause malfunction of the projector. Make sure the projector lens surface is parallel with the screen. You can tilt the - Panasonic PT AX100U | Hd Home Cinema Projector - Page 15
from front INSTALLATION: REAR/DESK J Mounting in the ceiling and projecting from rear INSTALLATION: FRONT/CEILING INSTALLATION: REAR/CEILING NOTE: A translucent screen is required for REAR projection. When mounting the projector in the ceiling, the optional ceiling mount bracket (ET-PKX100) is - Panasonic PT AX100U | Hd Home Cinema Projector - Page 16
% of the projection Up to about 25% of the projection Shifting lever right: Moving to screen's left Q Vertical shift You can place the projector where the projector lens is up to 63% vertically off-center from the screen and then adjust the image position with the Lens shift feature. Shifting the - Panasonic PT AX100U | Hd Home Cinema Projector - Page 17
Projection size Shift range Standard position Projection size NOTE: When the projector is located right in front of the screen and the Shift lever shift range, you cannot move the lever to the horizontal limit. When the projector is tilting and you adjust KEYSTONE, the center of the screen and the - Panasonic PT AX100U | Hd Home Cinema Projector - Page 18
connection to the projector Read and follow the operating and connecting instructions of each peripheral device. The peripheral devices must be turned off. Use cables that match may not project the image properly or other problems could be encountered. See "Serial terminal" on page 42. 18 - ENGLISH - Panasonic PT AX100U | Hd Home Cinema Projector - Page 19
Switch off the power to the projector when not in use. POWER indicator POWER indicator Basic Operation projector is cooling the lamp. The POWER is switched on again when cooling the lamp and recovering to projection mode. Recovery may take a while. NOTE: While the projector is cooling the lamp - Panasonic PT AX100U | Hd Home Cinema Projector - Page 20
CANCEL or press MENU/RETURN. 2. Press I to select OK and press POWER or ENTER. The power indicator lights up in ORANGE while cooling the lamp, then illuminates RED when it is ready to switch off the MAIN POWER. 3. Switch off the MAIN POWER on the back of the projector. - Panasonic PT AX100U | Hd Home Cinema Projector - Page 21
positioning" on page 16. 4. Adjust the focus and the projected image size. Turn the Focus ring and Zoom ring to adjust the image. You can confirm the PATTERN. Focus ring Zoom ring Unlock 3. Adjust the angle of the projector. Screw down the Front leg adjuster and adjust the angle vertically. NOTE - Panasonic PT AX100U | Hd Home Cinema Projector - Page 22
can switch the input method manually by pressing the INPUT the screen and press the required buttons to operate the projector. The signal will be reflected off the screen. The selected input method which is hilighted in yellow. See "INPUT GUIDE" on page 34. NOTE: If you select an unplugged input - Panasonic PT AX100U | Hd Home Cinema Projector - Page 23
by pressing DEFAULT button of the Remote control. Display the required sub menu or the menu items and press the button again. NOTE: Some menu items are not available to reset by pressing the DEFAULT button. Adjust each menu items manually. Turning on the button backlight In a dark room, you can - Panasonic PT AX100U | Hd Home Cinema Projector - Page 24
sampled and the sample box is displayed on the left of the cursor. The menu items are displayed on the upper part of the screen. CURSOR RETURN SELECT ENTER DEFAULT COLOR TINT BRIGHTNESS Sampled color 3. Select a menu item and the I H to adjust each item level. The result box is displayed on - Panasonic PT AX100U | Hd Home Cinema Projector - Page 25
profiles are loaded under the PICTURE MODE setting, you can keep them as you defined until the PROFILE is set to NORMAL. 1. Select the required PICTURE MODE and press ENTER. 2. Press the COLOR MANAGEMENT button and select the PROFILE menu. The profile settings of the selected PICTURE MODE will be - Panasonic PT AX100U | Hd Home Cinema Projector - Page 26
menu with F G I H buttons. Navigating through the MENU J Displaying the Main menu Press MENU button to display the Main menu and the operating guidance. 3. Press I H to adjust or set the selected item. For items using COLOR TEMPERATURE DYNAMIC IRIS LIGHT HARMONIZER ADVANCED MENU FAVORITE SAVE - Panasonic PT AX100U | Hd Home Cinema Projector - Page 27
IRIS ON LIGHT HARMONIZER AUTO ADVANCED MENU FAVOURITE SAVE FAVOURITE LOAD SIGNAL MODE2 J LANGUAGE menu signals only J POSITION menu See "POSITION Menu" on page 31. Sub-menu items Default setting V menu See "OPTION Menu" on page 34. Sub-menu items Default setting INPUT GUIDE DETAILED - Panasonic PT AX100U | Hd Home Cinema Projector - Page 28
images precisely, set as follows. 1. Press PICTURE ADJUSTMENT and select NATURAL. 2. Press DEFAULT to reset the other Sub-menu menu items 3. Press RETURN once to return to the Main menu and select OPTION 4. Switch the LAMP POWER to NORMAL NOTE: It may take for a while until the selected mode is - Panasonic PT AX100U | Hd Home Cinema Projector - Page 29
lamp and the lens iris on/off. • ON: Automatic adjustment • OFF: No adjustment LIGHT HARMONIZER LUMINANCE SENSOR detects the brightness of the room and keeps the LUMINANCE SENSOR. ADVANCED MENU From the ADVANCED MENU, you can perform more detailed image adjustment manually. J GAMMA You can - Panasonic PT AX100U | Hd Home Cinema Projector - Page 30
video signal is changed, the setting switches automatically. You can switch the setting manually to match the video data. Press I H to cycle through the options. of 2 signal groups. 1. Adjust the different items of the PICTURE menu. 2. Select FAVOURITE SAVE and press ENTER. 3. Select FAVOURITE 1, - Panasonic PT AX100U | Hd Home Cinema Projector - Page 31
than 150 MHz, the adjustment may not make a difference. See "Navigating through the MENU" on page 26. H - POSITION CLOCK PHASE If you require further adjustment for 1 125 (1 080)/24p, 750 (720)/50p and 750 (720)/60p signals using the COMPONENT connection. Move down Move up Settings ENGLISH - 31 - Panasonic PT AX100U | Hd Home Cinema Projector - Page 32
POSITION Menu ASPECT You can switch the aspect ratio manually when needed. J Aspect ratio options and press FG to adjust vertically. Adjusts to cinescope size not including letter box. Escape the menu mode and press FG to adjust vertically. 14:9 Adjusts to 14:9. Q COMPONENT signals Available - Panasonic PT AX100U | Hd Home Cinema Projector - Page 33
(720)/50p, 750 (720)/60p signals WSS KEYSTONE If the projector is aligned non-perpendicularly to the screen, or if the projection . The distortion of the Main menu screen is not correctable. The result off manually. OVER SCAN If the 4 edges of an image is partly dropped, you can use this - Panasonic PT AX100U | Hd Home Cinema Projector - Page 34
MENU" on page 26. INPUT GUIDE When the projector is turned on, the input terminals are detected and an input signal is selected automatically. You can switch on/off the system. Press I H to select an option. • ON: Active • OFF: Deactive NOTE: When no signal is detected, the last used - Panasonic PT AX100U | Hd Home Cinema Projector - Page 35
from front Setting on a desk/floor and projecting from rear Mounting in the ceiling and projecting from rear SLEEP You can check how long time has been the lamp used. NOTE: LAMP RUNTIME is a relevant matter for lamp replacement timing. See "Care and Replacement" on page 37. TEST PATTERN You can - Panasonic PT AX100U | Hd Home Cinema Projector - Page 36
1 800 hours (with LAMP POWER set to NORMAL). LAMP circuit failure or abnormal function. Lamp unit will run out soon and needs to be replaced. Replace the Lamp unit. See "Before replacing the Lamp unit" on page 38. The projector is switched off incorrectly. Let the LAMP cool down and turn on the - Panasonic PT AX100U | Hd Home Cinema Projector - Page 37
Do not use the projector without attaching the Air filter. J Replacing the Air filter The Air filter should be replaced when cleaning is ineffective and when replacing the Lamp unit. An replacement Air filter is provided with a replacement lamp unit, ET - LAX100. Contact an Authorized Service Center - Panasonic PT AX100U | Hd Home Cinema Projector - Page 38
replacement timing at 1 800 hours, and at 2 000 hours, the projector will be turned off. 1 800 or 2 000 hours is a rough guidance and might be shortened by the usage conditions, characteristics of the lamp unit, environmental conditions, and so on. You can check the duration of usage time using LAMP - Panasonic PT AX100U | Hd Home Cinema Projector - Page 39
the power cannot be turned on. Grip the handle when you remove the lamp unit. Some parts of the lamp unit are sharpened and may cause injury. J Resetting the LAMP RUNTIME If the lamp usage time has passed 2 000 hours (when LAMP POWER has been set to NORMAL), the projector will switch to standby - Panasonic PT AX100U | Hd Home Cinema Projector - Page 40
Troubleshooting Should any problem persist, contact your dealer. Problem Cause Power does not turn on. No picture appears. The picture SHUTTER function may be in use. The lens cover may still be attached to the lens. The lens focus may not have been set correctly. The projector may not be at the - Panasonic PT AX100U | Hd Home Cinema Projector - Page 41
PC A PC A PC A PC A PC A PC A PC 1. The "i" appearing after the resolution indicates an interlaced signal. 2. The following symbols are used to indicate picture quality. AA Maximum picture quality can be obtained. A Signals are converted by the image processing circuit before picture is - Panasonic PT AX100U | Hd Home Cinema Projector - Page 42
conforms to the RS-232C interface specification, so that the projector can be controlled by a personal computer which is connected to this connecter. J Connection DIN 8 pin (male) PC Serial terminal adapter (ET-ADSER: Optional) Serial terminal (male) NOTE: You must use only an RS-232C Serial - Panasonic PT AX100U | Hd Home Cinema Projector - Page 43
will be sent from the projector to the personal computer. J lamp has switched off, the lamp is not turned back on again straight away in order to protect the lamp. Parameter: VID = VIDEO IN RG1 = PC IN SVD = S-VIDEO IN YUV = COMPONENT IN HDM = HDMI IN The menu screen will be displayed. Use - Panasonic PT AX100U | Hd Home Cinema Projector - Page 44
=CINEMA1 CN3=VIVID CINEMA 1 = ON 0 = OFF 1 = ON 0 = OFF 1 = 60 min. 2 = 90 min. 3 = 120 min. 4 = 150 min. 5 = 180 min. 6 = 210 min. 7 = 240 min. (page 23) J Cable specifications (When connected to a a personal computer) Projector PC (DTE) Appendix 44 - ENGLISH - Panasonic PT AX100U | Hd Home Cinema Projector - Page 45
IRIS 29 H LIGHT HARMONIZER........... 29 H ADVANCED MENU 29 H FAVOURITE SAVE 30 H FAVOURITE LOAD 30 H SIGNAL MODE 30 H POSITION Menu KEYSTONE 33 H AUTO SETUP 33 H OPTION Menu 34 H INPUT GUIDE 34 H OSD DESIGN 34 H OSD POSITION CEILING REAR/DESK REAR/CEILING Sub-menu items vary according to - Panasonic PT AX100U | Hd Home Cinema Projector - Page 46
LCD panel Display method 3 transparent LCD panels (RGB) Drive method Active matrix method Lens Lamp Pixels 921 600 (1 280 x 720) x 3 panels Manual zoom (2 x)/Manual focus F 1.9 - 3.1, f 21.7 mm - 43.1 mm UHM lamp Front/Rear/Ceiling/Desk (Menu selection method) Appendix 46 - ENGLISH - Panasonic PT AX100U | Hd Home Cinema Projector - Page 47
Specifications S-VIDEO IN VIDEO IN Connectors PC IN Cabinet Dimensions Weight COMPONENT IN HDMI IN SERIAL Operating environment Certifications Remote control Options Power supply Operating range Weight Dimensions Ceiling bracket Projection screen Serial adapter Single - line, Mini DIN 4p Y: - Panasonic PT AX100U | Hd Home Cinema Projector - Page 48
Dimensions Units: mm (inch) 271.1 (10-21/32) 300 (11-5/8) 112 (4-13/32) 69 (2-11/16) 121 (4-3/4) 102.5 (4-1/32) 395 (15-17/32) Appendix 48 - ENGLISH - Panasonic PT AX100U | Hd Home Cinema Projector - Page 49
-Definition Multimedia Interface are trademarks or registered trademarks of HDMI Licensing LLC. The font used in the on-screen displays is a Ricoh bitmap font, which is manufactured and the correct method of disposal. These Operating Instructions are printed on recycled paper. ENGLISH - 49 Appendix - Panasonic PT AX100U | Hd Home Cinema Projector - Page 50
13 I INPUT Button on the projector 12 INPUT GUIDE 34 Remote control button 11 Selecting signal 21, 22 INSTALLATION 35 Projection method 15 K KEYSTONE 33 L LAMP Indicator 12 Indicator status 36, 38 LAMP POWER 35 LAMP RUNTIME 35 Lamp unit component 13 Replacing 38 LANGUAGE 27 Lens cover - Panasonic PT AX100U | Hd Home Cinema Projector - Page 51
Index M MAIN POWER On/Off 19 Switch 13 MENU Button on the projector 12 Main menu 26 Opening the menu 26 Remote control button 11 MPEG NR 30 N NR (Noise Reduction 30 O OPTION Operation 34 Sub-menu 27 OSD DESIGN 34 OSD POSITION 34 OVER SCAN 33 P PC IN Connecting 18 Terminal 13 PICTURE - Panasonic PT AX100U | Hd Home Cinema Projector - Page 52
-
 1
1 -
 2
2 -
 3
3 -
 4
4 -
 5
5 -
 6
6 -
 7
7 -
8
-
9
-
10
-
11
-
12
-
13
-
14
-
15
-
16
-
17
-
18
-
19
-
20
-
21
-
22
-
23
-
24
-
25
-
26
-
27
-
28
-
29
-
30
-
31
-
32
-
33
-
34
-
35
-
36
-
37
-
38
-
39
-
40
-
41
-
42
-
43
-
44
-
45
-
46
-
47
-
48
-
49
-
50
-
51
-
52
 |
 |
TQBJ0203
ENGLISH
LCD Projector
Operating Instructions
Model No.
PT-AX100U
Before operating this product, please read these instructions carefully and save this manual for
future use.
For assistance, please call: 1 - 888 - View - PTV (843 - 9788)
or send e - mail to: [email protected]
or visit us at www.panasonic.com
(U.S.A)
For assistance, please call: 787 - 750 - 4300
or visit us at http://panasonic.net
(Puerto Rico)