Panasonic PT AX100U Hd Home Cinema Projector - Page 12
Projector, Top and front view - remote
 |
UPC - 791871111383
View all Panasonic PT AX100U manuals
Add to My Manuals
Save this manual to your list of manuals |
Page 12 highlights
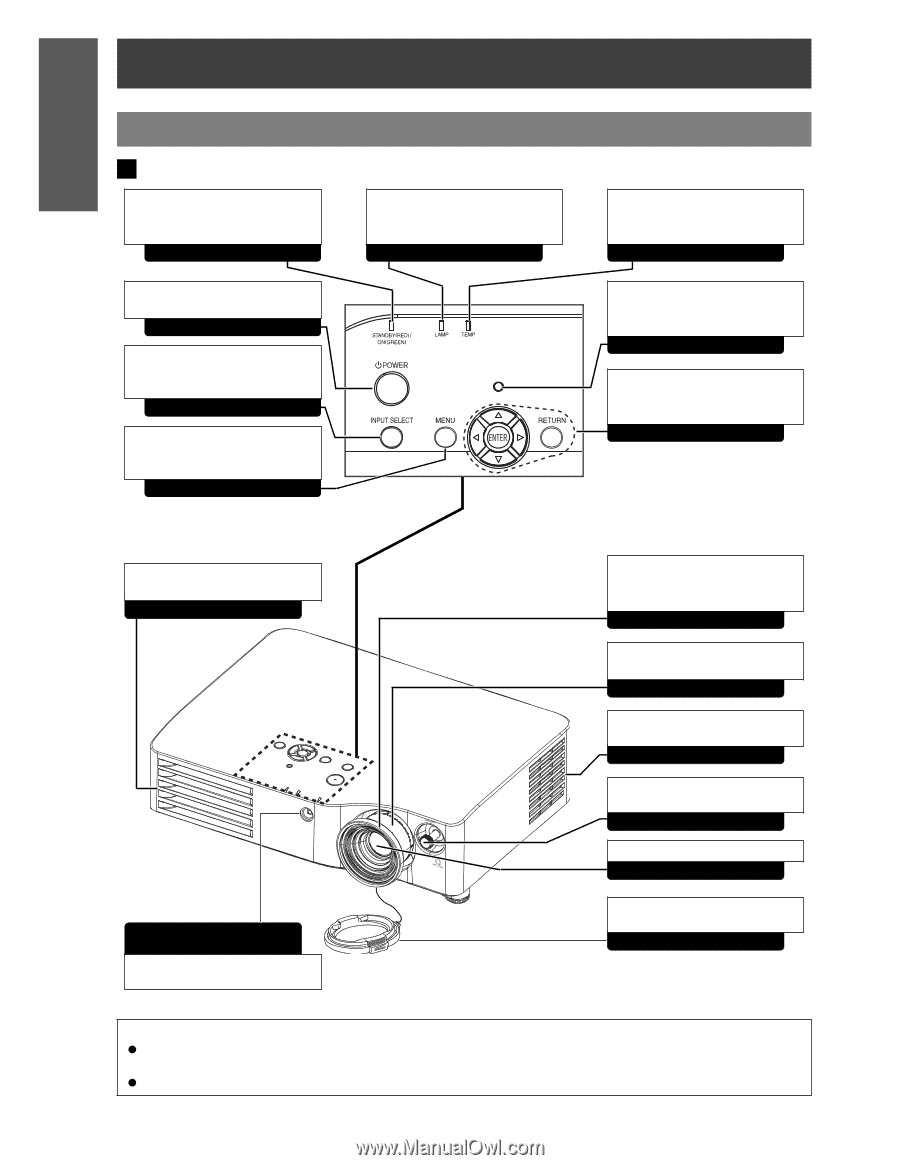
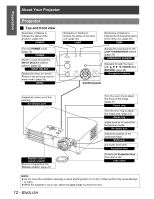
Preparation About Your Projector Projector J Top and front view Illuminates or flashes to indicate the status of the projector. (page 19) POWER Turn the POWER on/off. (page 19) POWER Switch to cycle through the INPUT SELECT method options. (page 22) INPUT SELECT Display the menu on screen. Return to the previous menu in menu mode. (page 26) MENU Illuminates or flashes to indicate the status of the lamp unit. (page 36) LAMP Illuminates or flashes to indicate the temperature status of the lamp unit. (page 36) TEMP Senses the luminance for the LIGHT HARMONIZER feature. (page 29) LUMINANCE SENSOR Navigate through the menu with F G H I, ENTER and RETURN. (page 26) Navigation buttons Control panel Heated air comes out of this opening. Air exhaust port Remote control signal receptor Receive a signal from the Remote control. (page 22) Turn the outer ring to adjust the focus of the image. (page 21) Focus ring Turn the inner ring to adjust the image size. (page 21) Zoom ring Intake fresh air to control the temperature inside. Air intake port Adjust the position of the projected image. Shift lever 2.0 power zoom lens. Projection lens Protects the Projection lens from dust or dirt. Lens cover NOTE: Do not cover the ventilation openings or place anything within 10 cm (4") of them as this may cause damage or injury. While the projector is not in use, attach the Lens cover to protect the lens. 12 - ENGLISH
-
 1
1 -
2
-
3
-
4
-
5
-
6
-
 7
7 -
 8
8 -
 9
9 -
 10
10 -
 11
11 -
 12
12 -
 13
13 -
 14
14 -
 15
15 -
 16
16 -
 17
17 -
18
-
19
-
20
-
21
-
22
-
23
-
24
-
25
-
26
-
27
-
28
-
29
-
30
-
31
-
32
-
33
-
34
-
35
-
36
-
37
-
38
-
39
-
40
-
41
-
42
-
43
-
44
-
45
-
46
-
47
-
48
-
49
-
50
-
51
-
52
 |
 |