Panasonic PT AX100U Hd Home Cinema Projector - Page 22
Remote control operation, Operating range, Input switching, Capturing an image - manual
 |
UPC - 791871111383
View all Panasonic PT AX100U manuals
Add to My Manuals
Save this manual to your list of manuals |
Page 22 highlights
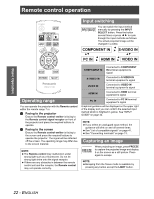
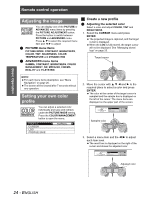
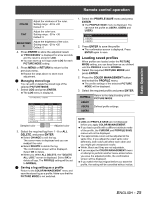
Basic Operation Remote control operation Input switching You can switch the input method manually by pressing the INPUT SELECT button. Press the button several times or press I H to cycle through the input methods as follows. The actual projected image will be changed in a while. COMPONENT IN I H S-VIDEO IN FG FG PC IN I H HDMI IN I H VIDEO IN Operating range You can operate the projector with the Remote control within the remote range 7 m. Q Facing to the projector Ensure the Remote control emitter is facing to the Remote control signal receptor on front of the projector and press the required buttons to operate. Q Facing to the screen Ensure the Remote control emitter is facing to the screen and press the required buttons to operate the projector. The signal will be reflected off the screen. The operating range may differ due to the screen material. NOTE: The Remote control may malfunction under strong light such as a fluorescent. Do not let strong light shine onto the signal receptor. If there are any obstacles in between the remote control unit and the receptor, the Remote control may not operate correctly. COMPONENT IN Connected to COMPONENT IN terminal equipment's signal S-VIDEO IN Connected to S-VIDEO IN terminal equipment's signal VIDEO IN Connected to VIDEO IN terminal equipment's signal HDMI IN Connected to HDMI terminal equipment's signal PC IN Connected to PC IN terminal equipment's signal Graphical guidance will be displayed on the upper right of the display and you can confirm the selected input method which is hilighted in yellow. See "INPUT GUIDE" on page 34. NOTE: If you select an unplugged input method, the guidance will blink on and off several times. See "List of compatible signals" on page 41. See "Connecting terminals" on page 13. Capturing an image When projecting an image, press FREEZE to capture the projected image and display it on the screen as a still picture. Press again to escape. NOTE: Escaping from the freeze mode is available by pressing any button except the LIGHT button. 22 - ENGLISH
-
 1
1 -
2
-
3
-
4
-
5
-
6
-
7
-
8
-
9
-
10
-
11
-
12
-
13
-
14
-
15
-
16
-
 17
17 -
 18
18 -
 19
19 -
 20
20 -
 21
21 -
 22
22 -
 23
23 -
 24
24 -
 25
25 -
 26
26 -
 27
27 -
28
-
29
-
30
-
31
-
32
-
33
-
34
-
35
-
36
-
37
-
38
-
39
-
40
-
41
-
42
-
43
-
44
-
45
-
46
-
47
-
48
-
49
-
50
-
51
-
52
 |
 |
