Panasonic PT AX100U Hd Home Cinema Projector - Page 29
Tint, Sharpness, Color Temperature, Dynamic Iris, Light Harmonizer, Advanced Menu, Reddish, Greenish
 |
UPC - 791871111383
View all Panasonic PT AX100U manuals
Add to My Manuals
Save this manual to your list of manuals |
Page 29 highlights
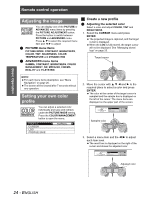
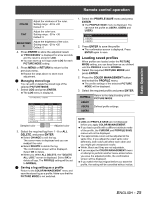
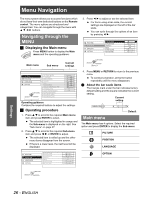
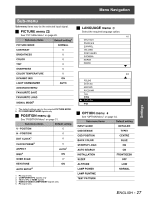
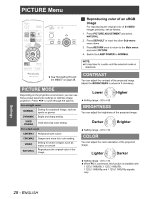
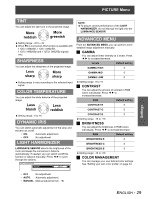
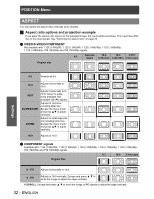
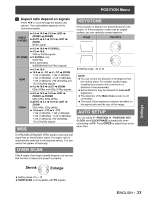
PICTURE Menu TINT You can adjust the skin tone in the projected image. More reddish More greenish Setting range: -32 to +32 When PC is connected, this function is available with 1 125 (1 080)/60i, 1 125 (1 080)/50i, 1 125 (1 080)/60p and 1 125 (1 080)/50p signals only. SHARPNESS You can adjust the sharpness of the projected image. Less sharp More sharp Setting range is vary according to the selected input signal COLOR TEMPERATURE You can adjust the white balance of the projected image. Less bluish Less reddish Setting range: -6 to +6 DYNAMIC IRIS You can switch automatic adjustment of the lamp and the lens iris on/off. • ON: Automatic adjustment • OFF: No adjustment LIGHT HARMONIZER LUMINANCE SENSOR detects the brightness of the room and keeps the luminance in balance automatically. If needed, you can switch on/off this function or adjust it manually. Press I H to cycle through the options. LIGHT HARMONIZER MODE MANUAL ADJUST AUTO • OFF No adjustment • AUTO: Automatic adjustment • MANUAL: Manual adjustment (0 - +8) NOTE: To assure correct performance of the LIGHT HARMONIZER, do not interrupt the light onto the LUMINANCE SENSOR. ADVANCED MENU From the ADVANCED MENU, you can perform more detailed image adjustment manually. J GAMMA You can adjust linear intensity at 3 levels. Press I H to increase/decrease. Levels Default setting GAMMA HIGH 0 GAMMA MID 0 GAMMA LOW 0 Setting range: -8 to +8 J CONTRAST You can adjust the amount of contrast in RGB colors individually. Press I H to increase/decrease. RGB Default setting CONTRAST R 0 CONTRAST G 0 CONTRAST B 0 Setting range: -16 to +16 J BRIGHTNESS You can adjust the brightness in RGB colors individually. Press I H to increase/decrease. RGB Default setting BRIGHTNESS R 0 BRIGHTNESS G 0 BRIGHTNESS B 0 Setting range: -16 to +16 J COLOR MANAGEMENT You can manage your own defined color settings. See "Setting your own color profile" on page 24. Settings ENGLISH - 29
-
 1
1 -
2
-
3
-
4
-
5
-
6
-
7
-
8
-
9
-
10
-
11
-
12
-
13
-
14
-
15
-
16
-
17
-
18
-
19
-
20
-
21
-
22
-
23
-
 24
24 -
 25
25 -
 26
26 -
 27
27 -
 28
28 -
 29
29 -
 30
30 -
 31
31 -
 32
32 -
 33
33 -
 34
34 -
35
-
36
-
37
-
38
-
39
-
40
-
41
-
42
-
43
-
44
-
45
-
46
-
47
-
48
-
49
-
50
-
51
-
52
 |
 |
