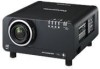
Panasonic PT-DW100U Dlp Projector - Multi Language - Page 121

Index

Page 121 highlights

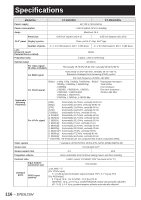
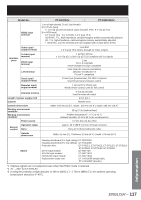
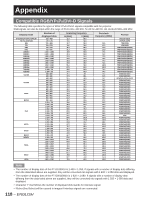
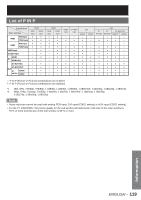
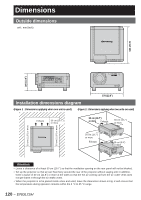
Index Be sure to read the "IMPORTANT SAFETY NOTICE" and the "Precautions with regard to safety". (pp. 4-9) A Accessories 10 Adjusting Brightness 50 Adjusting Color 50 Adjusting color matching 67-69 Adjusting Contrast 50 Adjusting the aspect ratio 57 Adjusting the clamp position 62 Adjusting the color temperature........51 Adjusting the feet 20 Adjusting the input resolution ...........61 Adjusting the zoom ratio 58 Adjusting Tint 51 Air filter cleaning 80-81 Altitude 76 Automatic adjustment 44, 70 Auto signal 70 AUX DVI EDID 72 B Back Color 71 Basic operations on menu screen ....48 Before asking for service 113 Blanking adjustment 61 C Changing the password 100 Changing the text 101 Cleaning and replacement of air filter 108-109 Clock phase adjustment 58 Compatible RGB/YPBPR/DVI-D Signals 118 Connecting the power cord 34 Connecting with personal computers 26 Connecting with VIDEO devices.......25 D Digital cinema reality 60 Direction 77 DVI-D input module 32 DVI EDID 71 Dynamic iris setting 53 E Edge blending adjustment ..........62-64 Effective range of remote control operation 17 F Frame delay 64 G Gamma setting 52 H HD/SD-SDI input module 31 How to adjust the lens 37-39 How to install and remove the projection lens 33 I Indication of monitor lamp 107 Installation dimensions diagram .....120 Installation Setting 76 Installing the input module..........27-28 K Keystone distortion correction ..........59 L Lamp relay 79 Lamp select 78 Lamp unit replacement 111 Large Screen Correction 69 List of P IN P 119 M Main menu 46 Maintenance 11 N Network connections 86 Network function 84-97 Noise reduction setting 53 Notes when installing the ceiling mount bracket 112 O On-screen display function 43 OSD memory 74 Output resolution 77 Outside dimensions 120 P P IN P 72-73 Position of on-screen indications......74 Power indicator lamp 34 Powering off the projector 36 Powering up the projector 35 Projection scheme 20 R Raster position 65 Registered signals 40-41 Registering the picture mode settings as presettings 54 Remote 2 terminal 106 RS-232C setting 79 S SD-SDI input module 30 Self-diagnosis display 114-115 Serial terminals 102-105 Setting a projector ID 75 Setting FUNC1 73 Setting projector ID number to remote control 18 Setting the date and time 81 Setting the password 99 Setting the text 100 Sharpness setting 52 Shift adjustment 56 Specifications 116-117 sRGB 55 Startup logo 82 Status function 43 Sub memory 41-42 Sub menu 46-47 Switching the input signal 43 Switching the picture mode 49 System format 54 System information 80 T Test pattern 83 U Using the PJLink™ protocol 98 Using the SHUTTER function...........43 W Wired remote control 18 ENGLISH - 121 Information

  • 1
  • 2
  • 3
  • 4
  • 5
  • 6
  • 7
  • 8
  • 9
  • 10
  • 11
  • 12
  • 13
  • 14
  • 15
  • 16
  • 17
  • 18
  • 19
  • 20
  • 21
  • 22
  • 23
  • 24
  • 25
  • 26
  • 27
  • 28
  • 29
  • 30
  • 31
  • 32
  • 33
  • 34
  • 35
  • 36
  • 37
  • 38
  • 39
  • 40
  • 41
  • 42
  • 43
  • 44
  • 45
  • 46
  • 47
  • 48
  • 49
  • 50
  • 51
  • 52
  • 53
  • 54
  • 55
  • 56
  • 57
  • 58
  • 59
  • 60
  • 61
  • 62
  • 63
  • 64
  • 65
  • 66
  • 67
  • 68
  • 69
  • 70
  • 71
  • 72
  • 73
  • 74
  • 75
  • 76
  • 77
  • 78
  • 79
  • 80
  • 81
  • 82
  • 83
  • 84
  • 85
  • 86
  • 87
  • 88
  • 89
  • 90
  • 91
  • 92
  • 93
  • 94
  • 95
  • 96
  • 97
  • 98
  • 99
  • 100
  • 101
  • 102
  • 103
  • 104
  • 105
  • 106
  • 107
  • 108
  • 109
  • 110
  • 111
  • 112
  • 113
  • 114
  • 115
  • 116
  • 117
  • 118
  • 119
  • 120
  • 121
  • 122
  • 123
  • 124
  • 125
  • 126
  • 127
  • 128
  • 129
  • 130
  • 131
  • 132

ENGLISH –
121
Information
Index
A
Accessories
......................................
10
Adjusting Brightness
.........................
50
Adjusting Color
.................................
50
Adjusting color matching
............
67–69
Adjusting Contrast
............................
50
Adjusting the aspect ratio
.................
57
Adjusting the clamp position
.............
62
Adjusting the color temperature
........
51
Adjusting the feet
..............................
20
Adjusting the input resolution
...........
61
Adjusting the zoom ratio
...................
58
Adjusting Tint
....................................
51
Air filter cleaning
.........................
80–81
Altitude
..............................................
76
Automatic adjustment
.................
44, 70
Auto signal
........................................
70
AUX DVI EDID
..................................
72
B
Back Color
........................................
71
Basic operations on menu screen
....
48
Before asking for service
................
113
Blanking adjustment
.........................
61
C
Changing the password
..................
100
Changing the text
...........................
101
Cleaning and replacement of
air filter
....................................
108–109
Clock phase adjustment
...................
58
Compatible RGB/YP
B
P
R
/DVI-D
Signals
............................................
118
Connecting the power cord
...............
34
Connecting with personal
computers
.........................................
26
Connecting with VIDEO devices
.......
25
D
Digital cinema reality
........................
60
Direction
...........................................
77
DVI-D input module
..........................
32
DVI EDID
..........................................
71
Dynamic iris setting
..........................
53
E
Edge blending adjustment
..........
62–64
Effective range of remote control
operation
...........................................
17
F
Frame delay
......................................
64
G
Gamma setting
.................................
52
H
HD/SD-SDI input module
..................
31
How to adjust the lens
................
37–39
How to install and remove the
projection lens
..................................
33
I
Indication of monitor lamp
..............
107
Installation dimensions diagram
.....
120
Installation Setting
............................
76
Installing the input module
..........
27–28
K
Keystone distortion correction
..........
59
L
Lamp relay
........................................
79
Lamp select
......................................
78
Lamp unit replacement
...................
111
Large Screen Correction
..................
69
List of P IN P
...................................
119
M
Main menu
........................................
46
Maintenance
.....................................
11
N
Network connections
........................
86
Network function
.........................
84–97
Noise reduction setting
.....................
53
Notes when installing the ceiling
mount bracket
.................................
112
O
On-screen display function
...............
43
OSD memory
....................................
74
Output resolution
..............................
77
Outside dimensions
........................
120
P
P IN P
.........................................
72–73
Position of on-screen indications
......
74
Power indicator lamp
........................
34
Powering off the projector
.................
36
Powering up the projector
.................
35
Projection scheme
............................
20
R
Raster position
..................................
65
Registered signals
......................
40–41
Registering the picture mode
settings as presettings
......................
54
Remote 2 terminal
..........................
106
RS-232C setting
...............................
79
S
SD-SDI input module
........................
30
Self-diagnosis display
.............
114–115
Serial terminals
.......................
102–105
Setting a projector ID
........................
75
Setting FUNC1
.................................
73
Setting projector ID number to
remote control
...................................
18
Setting the date and time
..................
81
Setting the password
........................
99
Setting the text
................................
100
Sharpness setting
.............................
52
Shift adjustment
................................
56
Specifications
.........................
116–117
sRGB
................................................
55
Startup logo
......................................
82
Status function
..................................
43
Sub memory
...............................
41–42
Sub menu
...................................
46–47
Switching the input signal
.................
43
Switching the picture mode
..............
49
System format
..................................
54
System information
...........................
80
T
Test pattern
......................................
83
U
Using the PJLink™ protocol
.............
98
Using the SHUTTER function
...........
43
W
Wired remote control
........................
18
Be sure to read the “IMPORTANT SAFETY NOTICE” and
the “Precautions with regard to safety”. (pp. 4-9)