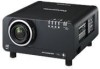
Panasonic PT-DW100U Dlp Projector - Multi Language - Page 72
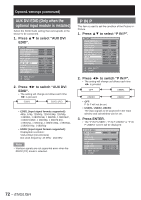
AUX DVI EDID Only when the, optional input module is installed, P IN P, Press, to select AUX DVI
 |
View all Panasonic PT-DW100U manuals
Add to My Manuals
Save this manual to your list of manuals |
Page 72 highlights
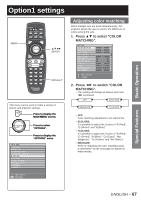
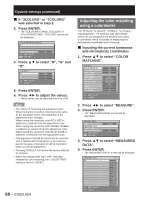
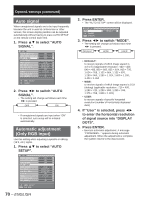
Option1 settings (continued) AUX DVI EDID (Only when the optional input module is installed) Select the EDID mode setting that corresponds to the device to be connected. 1. Press ▲▼ to select "AUX DVI EDID". OPTION1 COLOR MATCHING LARGE SCREEN CORRECTION AUTO SIGNAL AUTO SETUP BACK COLOR DVI EDID AUX DVI EDID P IN P FUNC1 OSD POSITION OSD MEMORY OFF OFF OFF BLUE EDID2(PC) EDID2(PC) OFF P IN P 2 ON MENU SELECT CHANGE 2. Press ◄► to switch "AUX DVI EDID". • The setting will change as follows each time ◄► is pressed. EDID1 EDID2 (PC) • EDID1 (Input signal formats supported) : 480p, 576p, 720/60p, 720/59.94p, 720/50p, 1 080/60i, 1 080/59.94i, 1 080/50i, 1 080/24sF, 1 080/23.98sF, 1 080/30p, 1 080/29.97p, 1 080/25p, 1 080/24p, 1 080/23.98p, 1 080/50p, 1 080/59.94p, 1 080/60p • EDID2 (Input signal formats supported) : Displayable resolution: VGA-UXGA (non-interlace) Dot clock frequency: 25 MHz - 162 MHz Note • Interlace signals are not supported even when the EDID2 (PC) mode is selected. P IN P This item is used to set the condition of the Picture-InPicture. 1. Press ▲▼ to select "P IN P". OPTION1 COLOR MATCHING LARGE SCREEN CORRECTION AUTO SIGNAL AUTO SETUP BACK COLOR DVI EDID AUX DVI EDID P IN P FUNC1 OSD POSITION OSD MEMORY OFF OFF OFF BLUE EDID2(PC) EDID2(PC) OFF P IN P 2 ON MENU SELECT CHANGE 2. Press ◄► to switch "P IN P". • The setting will change as follows each time ◄► is pressed. OFF USER1 USER3 USER2 • OFF: P IN P will not be set. • USER1, USER2, USER3: The input signals to be projected in the main window and sub-window can be set. 3. Press ENTER. • The "P IN P:USER1", "P IN P:USER2" or "P IN P:USER3" screen will be displayed. P IN P:USER1 MAIN WINDOW SIZE POSITION SUB WINDOW SIZE POSITION FRAME LOCK TYPE MENU SELECT CHANGE RGB1 VIDEO MAIN WINDOW MAIN WINDOW 72 - ENGLISH
-
 1
1 -
2
-
3
-
4
-
5
-
6
-
7
-
8
-
9
-
10
-
11
-
12
-
13
-
14
-
15
-
16
-
17
-
18
-
19
-
20
-
21
-
22
-
23
-
24
-
25
-
26
-
27
-
28
-
29
-
30
-
31
-
32
-
33
-
34
-
35
-
36
-
37
-
38
-
39
-
40
-
41
-
42
-
43
-
44
-
45
-
46
-
47
-
48
-
49
-
50
-
51
-
52
-
53
-
54
-
55
-
56
-
57
-
58
-
59
-
60
-
61
-
62
-
63
-
64
-
65
-
66
-
 67
67 -
 68
68 -
 69
69 -
 70
70 -
 71
71 -
 72
72 -
 73
73 -
 74
74 -
 75
75 -
 76
76 -
 77
77 -
78
-
79
-
80
-
81
-
82
-
83
-
84
-
85
-
86
-
87
-
88
-
89
-
90
-
91
-
92
-
93
-
94
-
95
-
96
-
97
-
98
-
99
-
100
-
101
-
102
-
103
-
104
-
105
-
106
-
107
-
108
-
109
-
110
-
111
-
112
-
113
-
114
-
115
-
116
-
117
-
118
-
119
-
120
-
121
-
122
-
123
-
124
-
125
-
126
-
127
-
128
-
129
-
130
-
131
-
132
 |
 |
