Panasonic PT-DW100U Dlp Projector - Multi Language - Page 15
Controls, Input select VIDEO, S-VIDEO, RGB1
 |
View all Panasonic PT-DW100U manuals
Add to My Manuals
Save this manual to your list of manuals |
Page 15 highlights
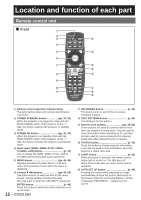
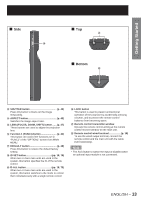
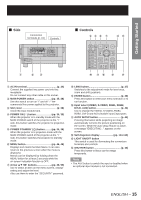
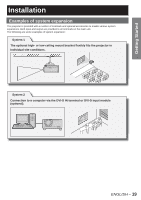
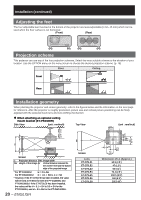
Getting Started ■ Side Connection terminals (p. 16) Controls ■ Controls &( ) * +- # $% . /0 1 2 # AC IN terminal p. 34) Connect the supplied line power cord into this receptacle. Do not connect any other cable to this socket. $ MAIN POWER switch pp. 35, 36) Use this switch to turn on "I" and off "○" the commercial line power applied to the projector. % Slot cover p. 28) Install the input module here. & POWER ON ( I ) button pp. 34, 35) When the projector is in standby mode with the MAIN POWER switch of the projector at the " l " side, this button switches the projector to projection mode. ( POWER STANDBY ( ) button.......... (pp. 34, 36) When the projector is in projection mode with the MAIN POWER switch of the projector at the " l " side, this button switches the projector to standby mode. ) MENU button pp. 46, 48) Displays and clears the Main Menu. It can also return to the previous screen when the menu is displayed. Menus can be displayed by holding down the MENU button for at least 3 seconds while the on-screen indication function is OFF. * Arrow buttons pp. 48, 99) Use to select an item on the menu screen, change setting and adjust the level. Also use them to enter the "SECURITY" password. + LENS button p. 37) Switches to the adjustment mode for lens focus, zoom and shift (position). - ENTER button p. 48) Press this button to enter your menu selection or to run function. . Input select (VIDEO, S-VIDEO, RGB1, RGB2, DVI-D, AUX) button p. 43) Use to change the VIDEO, S-VIDEO, RGB1, RGB2, DVI-D and AUX (module input) input ports. / AUTO SETUP button p. 44) Pressing this button while projecting an image automatically corrects the picture positioning on the screen. While the auto setup feature is active, a message "EXECUTING..." appears on the screen. 0 Self-diagnosis display pp. 114-115) 1 LIGHT ON/OFF button This switch is used for illuminating the connection terminals and controls. 2 SHUTTER button p. 43) Press this button to black out the image temporarily. Note • The AUX button to switch the input is disabled when an optional input module is not connected. ENGLISH - 15
-
 1
1 -
2
-
3
-
4
-
5
-
6
-
7
-
8
-
9
-
 10
10 -
 11
11 -
 12
12 -
 13
13 -
 14
14 -
 15
15 -
 16
16 -
 17
17 -
 18
18 -
 19
19 -
 20
20 -
21
-
22
-
23
-
24
-
25
-
26
-
27
-
28
-
29
-
30
-
31
-
32
-
33
-
34
-
35
-
36
-
37
-
38
-
39
-
40
-
41
-
42
-
43
-
44
-
45
-
46
-
47
-
48
-
49
-
50
-
51
-
52
-
53
-
54
-
55
-
56
-
57
-
58
-
59
-
60
-
61
-
62
-
63
-
64
-
65
-
66
-
67
-
68
-
69
-
70
-
71
-
72
-
73
-
74
-
75
-
76
-
77
-
78
-
79
-
80
-
81
-
82
-
83
-
84
-
85
-
86
-
87
-
88
-
89
-
90
-
91
-
92
-
93
-
94
-
95
-
96
-
97
-
98
-
99
-
100
-
101
-
102
-
103
-
104
-
105
-
106
-
107
-
108
-
109
-
110
-
111
-
112
-
113
-
114
-
115
-
116
-
117
-
118
-
119
-
120
-
121
-
122
-
123
-
124
-
125
-
126
-
127
-
128
-
129
-
130
-
131
-
132
 |
 |
