Panasonic PT-DW100U Dlp Projector - Multi Language - Page 13
Bottom, LENS FOCUS, ZOOM, SHIFT button
 |
View all Panasonic PT-DW100U manuals
Add to My Manuals
Save this manual to your list of manuals |
Page 13 highlights
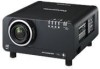
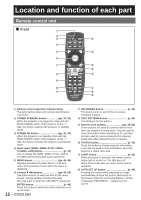
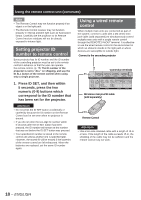
Getting Started ■ Side 8 ■ Top 9 ■ Bottom : 1 SHUTTER button p. 43) Press this button to black out the image temporarily. 2 ASPECT button p. 45) Switches the image aspect ratio. 3 LENS (FOCUS, ZOOM, SHIFT) button ...... (p. 37) These buttons are used to adjust the projection lens. 4 Function 1 (FUNC1) button p. 44) This button can control the functions set in "FUNC1" of the "OPTION1" screen from MAIN MENU. 5 DEFAULT button p. 48) Press this button to restore the default factory setting. 6 ID SET button pp. 18, 75) When two or more main units are used in the system, this button specifies the ID of the remote control. 7 ID ALL button pp. 18, 75) When two or more main units are used in the system, this button switches to the mode to control them simultaneously with a single remote control. 8 LOCK button This button is used to prevent unintentional operation of the projector by accidentally pressing a button, and to prevent the remote control batteries from becoming spent. 9 Remote control transmitter window Operate the remote control aiming at the remote control receiver window on the main unit. : Remote control wired terminal p. 18) To use the wired output terminal, connect the remote control and the main unit with the cable (sold separately). Note • The AUX button to switch the input is disabled when an optional input module is not connected. ENGLISH - 13
-
 1
1 -
2
-
3
-
4
-
5
-
6
-
7
-
 8
8 -
 9
9 -
 10
10 -
 11
11 -
 12
12 -
 13
13 -
 14
14 -
 15
15 -
 16
16 -
 17
17 -
 18
18 -
19
-
20
-
21
-
22
-
23
-
24
-
25
-
26
-
27
-
28
-
29
-
30
-
31
-
32
-
33
-
34
-
35
-
36
-
37
-
38
-
39
-
40
-
41
-
42
-
43
-
44
-
45
-
46
-
47
-
48
-
49
-
50
-
51
-
52
-
53
-
54
-
55
-
56
-
57
-
58
-
59
-
60
-
61
-
62
-
63
-
64
-
65
-
66
-
67
-
68
-
69
-
70
-
71
-
72
-
73
-
74
-
75
-
76
-
77
-
78
-
79
-
80
-
81
-
82
-
83
-
84
-
85
-
86
-
87
-
88
-
89
-
90
-
91
-
92
-
93
-
94
-
95
-
96
-
97
-
98
-
99
-
100
-
101
-
102
-
103
-
104
-
105
-
106
-
107
-
108
-
109
-
110
-
111
-
112
-
113
-
114
-
115
-
116
-
117
-
118
-
119
-
120
-
121
-
122
-
123
-
124
-
125
-
126
-
127
-
128
-
129
-
130
-
131
-
132
 |
 |
