Panasonic PT-DW100U Dlp Projector - Multi Language - Page 43
Basic operations using the remote control
 |
View all Panasonic PT-DW100U manuals
Add to My Manuals
Save this manual to your list of manuals |
Page 43 highlights
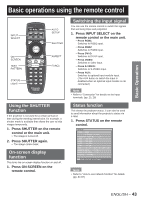
Basic Operation Basic operations using the remote control INPUT SELECT ON SCREEN TEST PATTERN STATUS LIGHT AUTO SETUP SHUTTER ASPECT FUNC1 Using the SHUTTER function If the projector is not used for a certain period of time during the meeting intermission, for example, a shutter mode is available that allows the user to hide images temporarily. 1. Press SHUTTER on the remote control or the main unit. • The image is turned off. 2. Press SHUTTER again. • The image comes back. On-screen display function This turns the on-screen display function on and off. 1. Press ON SCREEN on the remote control. Switching the input signal You can use the remote control to switch the signals that are being input and projected. 1. Press INPUT SELECT on the remote control or the main unit. • Press RGB1: Switches to RGB1 input. • Press RGB2: Switches to RGB2 input. • Press DVI-D: Switches to DVI-D input. • Press VIDEO: Switches to video input. • Press S-VIDEO: Switches to S-VIDEO input. • Press AUX: Switches to optional input module input. (The AUX button to switch the input is disabled when an optional input module is not connected.) Note • Refer to "Connection" for details on the input terminals. (pp. 25, 26) Status function This shows the projector status. It can also be used to send information about the projector's status via e-mail. 1. Press STATUS on the remote control. STATUS INPUT : RGB1 : 0.00kHz/ 0.00Hz PROJECTOR RUNTIME : 13h LAMP1 : 9h/OFF/ LAMP2 : 10h/OFF/ LAMP3 : 9h/OFF/ LAMP4 : 9h/ON/ TEMP : IN- 27 / OUT- 32 /OPT- 36 VERSION MAIN : 0.55 VERSION NETWORK : 0.09 REMOTE2 : DISABLE ENTER END STATUS VIA E-MAIL Note • Refer to "How to use network function" for details. (pp. 84-97) ENGLISH - 43
-
 1
1 -
2
-
3
-
4
-
5
-
6
-
7
-
8
-
9
-
10
-
11
-
12
-
13
-
14
-
15
-
16
-
17
-
18
-
19
-
20
-
21
-
22
-
23
-
24
-
25
-
26
-
27
-
28
-
29
-
30
-
31
-
32
-
33
-
34
-
35
-
36
-
37
-
 38
38 -
 39
39 -
 40
40 -
 41
41 -
 42
42 -
 43
43 -
 44
44 -
 45
45 -
 46
46 -
 47
47 -
 48
48 -
49
-
50
-
51
-
52
-
53
-
54
-
55
-
56
-
57
-
58
-
59
-
60
-
61
-
62
-
63
-
64
-
65
-
66
-
67
-
68
-
69
-
70
-
71
-
72
-
73
-
74
-
75
-
76
-
77
-
78
-
79
-
80
-
81
-
82
-
83
-
84
-
85
-
86
-
87
-
88
-
89
-
90
-
91
-
92
-
93
-
94
-
95
-
96
-
97
-
98
-
99
-
100
-
101
-
102
-
103
-
104
-
105
-
106
-
107
-
108
-
109
-
110
-
111
-
112
-
113
-
114
-
115
-
116
-
117
-
118
-
119
-
120
-
121
-
122
-
123
-
124
-
125
-
126
-
127
-
128
-
129
-
130
-
131
-
132
 |
 |
