Panasonic VDRD250 VDRD250 User Guide - Page 16
Before using, Using grip belt, Mode select switch [AUTO/MANUAL/FOCUS]
 |
UPC - 037988980222
View all Panasonic VDRD250 manuals
Add to My Manuals
Save this manual to your list of manuals |
Page 16 highlights
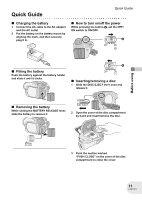
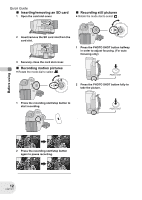
Before using Parts identification and handling 25 Card slot cover (l 34) 26 Card slot (l 34) 27 Tripod receptacle (l 18) 28 Card access lamp (l 34) 29 Battery release lever [BATTERY RELEASE] (l 28) 30 Speaker 31 LCD monitor (l 19) Due to limitations in LCD production technology, there may be some tiny bright or dark spots on the LCD monitor screen. However, this is not a malfunction and does not affect the recorded picture. 30 32 Mode select switch [AUTO/MANUAL/FOCUS] (l 49, 70) 31 33 Power LCD button [POWER LCD] (l 47) 34 Reset button [RESET] (l 155) 35 Disc eject lever [DISC EJECT] (l 32) 36 Disc/computer access lamp [ACCESS/PC] (l 32, 124, 139) 37 Disc compartment (l 32) 38 Grip belt (l below) 39 Shoulder strap fixture (l 17) 25 26 27 28 29 32 33 34 35 36 37 38 39 Using grip belt Adjust the belt length so it fits your hand. (U.S.A. only) When this unit is purchased, a sensor tag is attached to the grip belt. Remove the tag before use. 1 Flip the belt. 2 Take off the tag. 3 Replace the belt. Adjust the belt length and the pad position. 1 Flip the belt. 2 Adjust the length. 3 Fix the belt. 3 2 1 2 13 16 LSQT1011
-
 1
1 -
2
-
3
-
4
-
5
-
6
-
7
-
8
-
9
-
10
-
 11
11 -
 12
12 -
 13
13 -
 14
14 -
 15
15 -
 16
16 -
 17
17 -
 18
18 -
 19
19 -
 20
20 -
 21
21 -
22
-
23
-
24
-
25
-
26
-
27
-
28
-
29
-
30
-
31
-
32
-
33
-
34
-
35
-
36
-
37
-
38
-
39
-
40
-
41
-
42
-
43
-
44
-
45
-
46
-
47
-
48
-
49
-
50
-
51
-
52
-
53
-
54
-
55
-
56
-
57
-
58
-
59
-
60
-
61
-
62
-
63
-
64
-
65
-
66
-
67
-
68
-
69
-
70
-
71
-
72
-
73
-
74
-
75
-
76
-
77
-
78
-
79
-
80
-
81
-
82
-
83
-
84
-
85
-
86
-
87
-
88
-
89
-
90
-
91
-
92
-
93
-
94
-
95
-
96
-
97
-
98
-
99
-
100
-
101
-
102
-
103
-
104
-
105
-
106
-
107
-
108
-
109
-
110
-
111
-
112
-
113
-
114
-
115
-
116
-
117
-
118
-
119
-
120
-
121
-
122
-
123
-
124
-
125
-
126
-
127
-
128
-
129
-
130
-
131
-
132
-
133
-
134
-
135
-
136
-
137
-
138
-
139
-
140
-
141
-
142
-
143
-
144
-
145
-
146
-
147
-
148
-
149
-
150
-
151
-
152
-
153
-
154
-
155
-
156
-
157
-
158
-
159
-
160
-
161
-
162
-
163
-
164
-
165
-
166
-
167
-
168
-
169
-
170
-
171
-
172
-
173
-
174
-
175
-
176
-
177
-
178
-
179
-
180
 |
 |
