Panasonic VDRD250 VDRD250 User Guide - Page 32
Inserting/removing A Disc
 |
UPC - 037988980222
View all Panasonic VDRD250 manuals
Add to My Manuals
Save this manual to your list of manuals |
Page 32 highlights
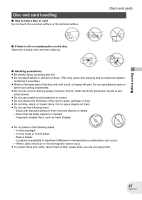
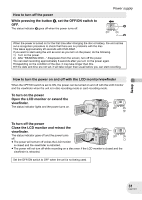
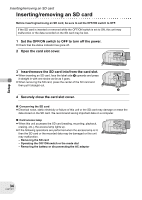
Inserting/removing a disc Inserting/removing a disc When inserting or removing the disc, fit the charged battery pack or connect the AC adaptor to the unit. The cover of the disc compartment will not open unless the unit is powered. 1 Slide the DISC EJECT lever once and release it. A few moments after the ACCESS/PC lamp blinks, the cover of the disc compartment will open slightly. 2 Open the cover of the disc compartment by hand and insert/remove the disc. ∫ Inserting disc Fit the disc onto the spindle in the center. A Recording/playback side B Pickup lens Click! B A ∫ Removing disc While pressing down on the spindle, grasp the edge of the disc and gently lift it out. Setup 3 Push the section marked "PUSH CLOSE" on the cover of the disc compartment to close the cover. 32 LSQT1011
-
 1
1 -
2
-
3
-
4
-
5
-
6
-
7
-
8
-
9
-
10
-
11
-
12
-
13
-
14
-
15
-
16
-
17
-
18
-
19
-
20
-
21
-
22
-
23
-
24
-
25
-
26
-
 27
27 -
 28
28 -
 29
29 -
 30
30 -
 31
31 -
 32
32 -
 33
33 -
 34
34 -
 35
35 -
 36
36 -
 37
37 -
38
-
39
-
40
-
41
-
42
-
43
-
44
-
45
-
46
-
47
-
48
-
49
-
50
-
51
-
52
-
53
-
54
-
55
-
56
-
57
-
58
-
59
-
60
-
61
-
62
-
63
-
64
-
65
-
66
-
67
-
68
-
69
-
70
-
71
-
72
-
73
-
74
-
75
-
76
-
77
-
78
-
79
-
80
-
81
-
82
-
83
-
84
-
85
-
86
-
87
-
88
-
89
-
90
-
91
-
92
-
93
-
94
-
95
-
96
-
97
-
98
-
99
-
100
-
101
-
102
-
103
-
104
-
105
-
106
-
107
-
108
-
109
-
110
-
111
-
112
-
113
-
114
-
115
-
116
-
117
-
118
-
119
-
120
-
121
-
122
-
123
-
124
-
125
-
126
-
127
-
128
-
129
-
130
-
131
-
132
-
133
-
134
-
135
-
136
-
137
-
138
-
139
-
140
-
141
-
142
-
143
-
144
-
145
-
146
-
147
-
148
-
149
-
150
-
151
-
152
-
153
-
154
-
155
-
156
-
157
-
158
-
159
-
160
-
161
-
162
-
163
-
164
-
165
-
166
-
167
-
168
-
169
-
170
-
171
-
172
-
173
-
174
-
175
-
176
-
177
-
178
-
179
-
180
 |
 |
