Panasonic VDRD250 VDRD250 User Guide - Page 31
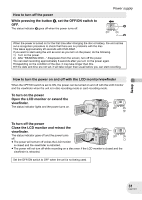
Open the LCD monitor or extend the, To turn off the power
 |
UPC - 037988980222
View all Panasonic VDRD250 manuals
Add to My Manuals
Save this manual to your list of manuals |
Page 31 highlights
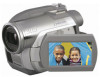
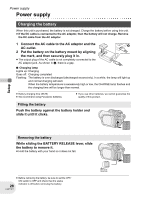
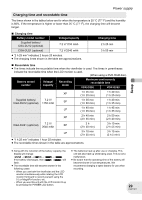
How to turn off the power While pressing the button A, set the OFF/ON switch to OFF. The status indicator B goes off when the power turns off. Power supply A B When the power is turned on for the first time after changing the disc or battery, the unit carries out a recognition procedure to check that there are no problems with the disc. This takes approximately 25 seconds with DVD-RAM. If you want to start using the unit as soon as you turn on the power, do the following. 1) Turn on the power. 2) After "READING DISC..." disappears from the screen, turn off the power. You can start recording approximately 8 seconds after you turn on the power again. ≥ Depending on the condition of the disc, it may take longer than this. ≥ If the date and time are not set, it will take longer than usual before you can start recording. How to turn the power on and off with the LCD monitor/viewfinder When the OFF/ON switch is set to ON, the power can be turned on and off with the LCD monitor and the viewfinder when the unit is in disc recording mode or card recording mode. To turn on the power Open the LCD monitor or extend the viewfinder. The status indicator lights and the power turns on. To turn off the power Close the LCD monitor and retract the viewfinder. The status indicator goes off and the power turns off. ≥ The power will not turn off unless the LCD monitor is closed and the viewfinder is retracted. ≥ The power will not turn off while recording on a disc even if the LCD monitor is closed and the viewfinder is retracted. Set the OFF/ON switch to OFF when the unit is not being used. Setup 31 LSQT1011
-
 1
1 -
2
-
3
-
4
-
5
-
6
-
7
-
8
-
9
-
10
-
11
-
12
-
13
-
14
-
15
-
16
-
17
-
18
-
19
-
20
-
21
-
22
-
23
-
24
-
25
-
 26
26 -
 27
27 -
 28
28 -
 29
29 -
 30
30 -
 31
31 -
 32
32 -
 33
33 -
 34
34 -
 35
35 -
 36
36 -
37
-
38
-
39
-
40
-
41
-
42
-
43
-
44
-
45
-
46
-
47
-
48
-
49
-
50
-
51
-
52
-
53
-
54
-
55
-
56
-
57
-
58
-
59
-
60
-
61
-
62
-
63
-
64
-
65
-
66
-
67
-
68
-
69
-
70
-
71
-
72
-
73
-
74
-
75
-
76
-
77
-
78
-
79
-
80
-
81
-
82
-
83
-
84
-
85
-
86
-
87
-
88
-
89
-
90
-
91
-
92
-
93
-
94
-
95
-
96
-
97
-
98
-
99
-
100
-
101
-
102
-
103
-
104
-
105
-
106
-
107
-
108
-
109
-
110
-
111
-
112
-
113
-
114
-
115
-
116
-
117
-
118
-
119
-
120
-
121
-
122
-
123
-
124
-
125
-
126
-
127
-
128
-
129
-
130
-
131
-
132
-
133
-
134
-
135
-
136
-
137
-
138
-
139
-
140
-
141
-
142
-
143
-
144
-
145
-
146
-
147
-
148
-
149
-
150
-
151
-
152
-
153
-
154
-
155
-
156
-
157
-
158
-
159
-
160
-
161
-
162
-
163
-
164
-
165
-
166
-
167
-
168
-
169
-
170
-
171
-
172
-
173
-
174
-
175
-
176
-
177
-
178
-
179
-
180
 |
 |
