Panasonic VDRD250 VDRD250 User Guide - Page 30
Connecting to the AC outlet, Turning the unit on/off, OFF/ON switch to ON.
 |
UPC - 037988980222
View all Panasonic VDRD250 manuals
Add to My Manuals
Save this manual to your list of manuals |
Page 30 highlights
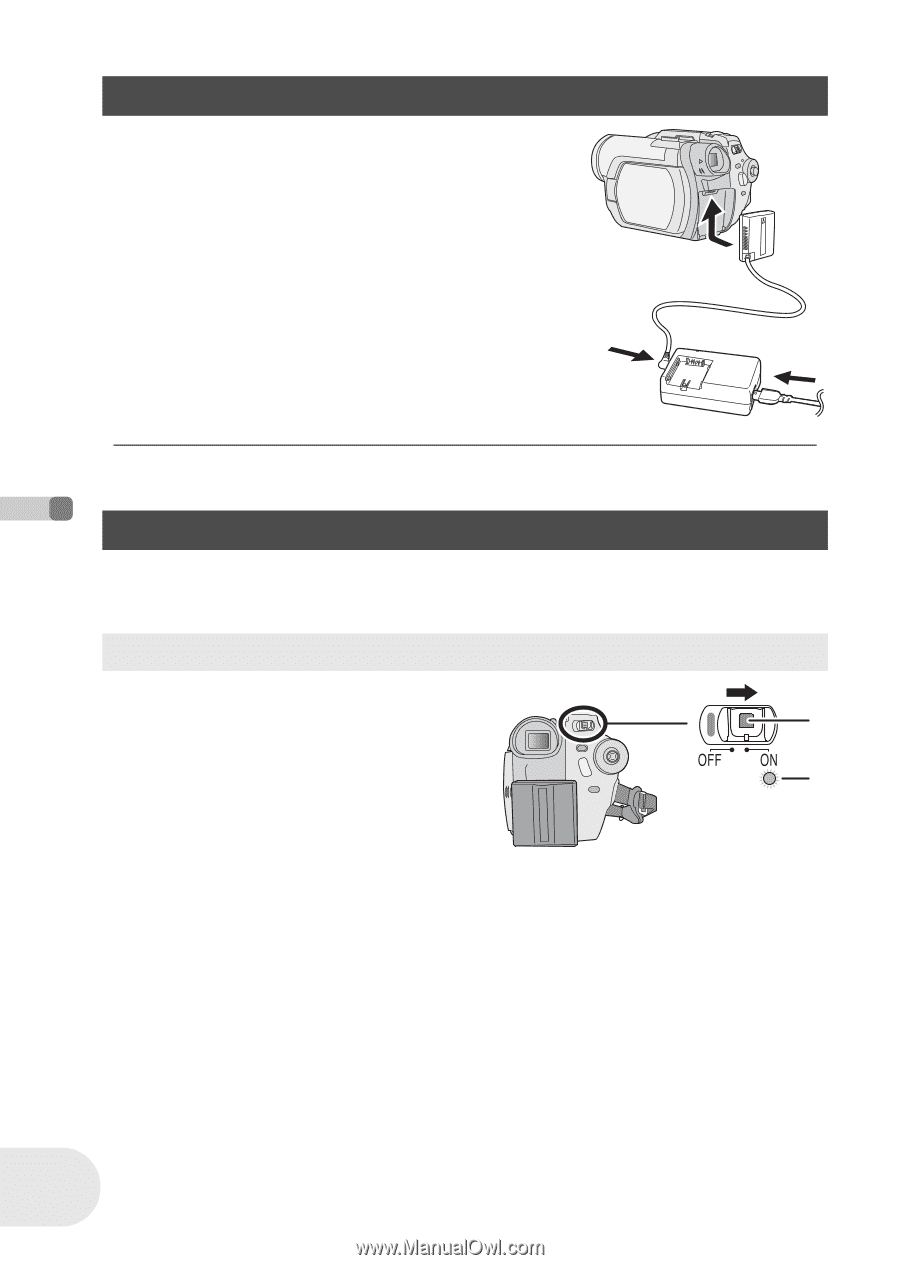
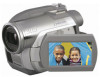
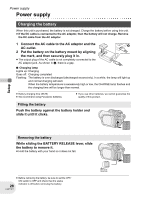
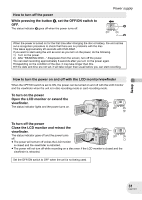
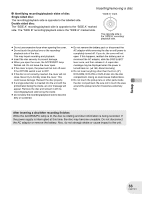
Power supply Connecting to the AC outlet 1 Connect the AC cable to the AC adaptor and the AC outlet. 2 Connect the DC cable to the AC adaptor. 3 Connect the DC cable to this unit. ≥ Do not use the AC cable for other equipment since the AC cable is exclusively designed for this unit. Do not use the AC cable from other equipment for this unit. ≥ While the DC cable is connected to the AC adaptor, the battery will not charge. Turning the unit on/off ≥ (VDR-D250 only) When recording, remove the lens cap before turning the unit on. If the unit is turned on with the lens cap attached, the automatic white balance adjustment (l 163) may not function properly. How to turn on the power While pressing the button A, set the OFF/ON switch to ON. A The status indicator B lights and the power turns on. ≥ (VDR-D300 only) In disc recording mode or card recording mode, the lens cover opens. B ≥ When the unit is turned on for the first time, a message asking you to set the date and time will appear. Select [YES] and set the date and time. (l 45) Setup 30 LSQT1011
-
 1
1 -
2
-
3
-
4
-
5
-
6
-
7
-
8
-
9
-
10
-
11
-
12
-
13
-
14
-
15
-
16
-
17
-
18
-
19
-
20
-
21
-
22
-
23
-
24
-
 25
25 -
 26
26 -
 27
27 -
 28
28 -
 29
29 -
 30
30 -
 31
31 -
 32
32 -
 33
33 -
 34
34 -
 35
35 -
36
-
37
-
38
-
39
-
40
-
41
-
42
-
43
-
44
-
45
-
46
-
47
-
48
-
49
-
50
-
51
-
52
-
53
-
54
-
55
-
56
-
57
-
58
-
59
-
60
-
61
-
62
-
63
-
64
-
65
-
66
-
67
-
68
-
69
-
70
-
71
-
72
-
73
-
74
-
75
-
76
-
77
-
78
-
79
-
80
-
81
-
82
-
83
-
84
-
85
-
86
-
87
-
88
-
89
-
90
-
91
-
92
-
93
-
94
-
95
-
96
-
97
-
98
-
99
-
100
-
101
-
102
-
103
-
104
-
105
-
106
-
107
-
108
-
109
-
110
-
111
-
112
-
113
-
114
-
115
-
116
-
117
-
118
-
119
-
120
-
121
-
122
-
123
-
124
-
125
-
126
-
127
-
128
-
129
-
130
-
131
-
132
-
133
-
134
-
135
-
136
-
137
-
138
-
139
-
140
-
141
-
142
-
143
-
144
-
145
-
146
-
147
-
148
-
149
-
150
-
151
-
152
-
153
-
154
-
155
-
156
-
157
-
158
-
159
-
160
-
161
-
162
-
163
-
164
-
165
-
166
-
167
-
168
-
169
-
170
-
171
-
172
-
173
-
174
-
175
-
176
-
177
-
178
-
179
-
180
 |
 |