Pfaff hobby 541 Owner's Manual - Page 31
colocación
 |
View all Pfaff hobby 541 manuals
Add to My Manuals
Save this manual to your list of manuals |
Page 31 highlights
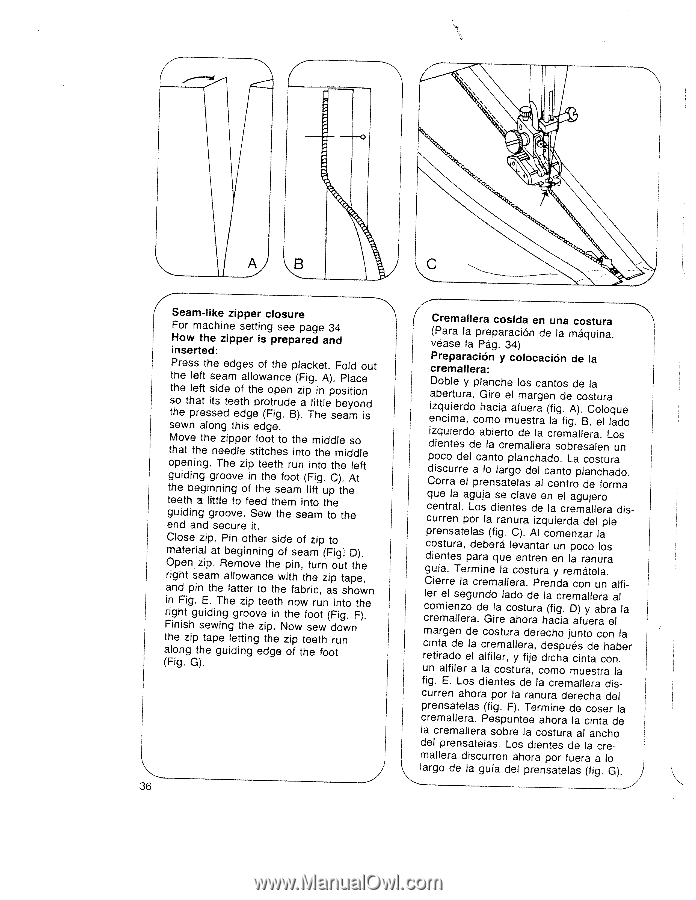
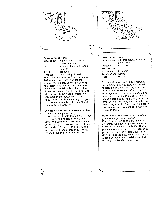
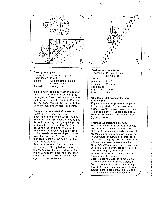
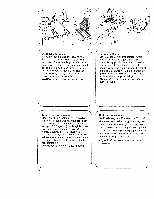
r \ \\ I H I I I 'Q'%.\ .\\ \ G N \N T\f hi1LII\\lLII4ITII11IIL1II1IIII Ji- III J 1 ' a A C 4 Seam-like zipper closure For machine setting see page 34 How the zipper is prepared and inserted: Press the edges of the placket. Fold out the left seam allowance (Fig. A). Place the left side of the open zip in position so that its teeth protrude a little beyond the pressed edge (Fig. 8). The seam is sewn along this edge. Move the zipper foot to the middle so that the needle stitches into the middle opening. The zip teeth run into the left guiding groove in the toot (Fig. C). At the beginning of the seam lift up the teeth a lfttle to feed them into the guiding groove. Sew the seam to the end and secure it. Close zip. Pin other side of zip to material at beginning of seam (Fig.. D). Open zip. Remove the pin, turn out the ' right seam allowance with the zip tape, and pin the latter to the fabric, as shown I in Fig. E. The zip teeth now run into the right guiding groove in the foot (Fig. F). Finish sewing the zip. Now sew down the zip tape letting the zip teeth run along the guiding edge of the foot (Fig. G). 36 4 Cremallera cosida en una costura (Para Ia preparaciOn de Ia máquina, véase Ia Pág. 34) Preparación y colocación de Ia cremallera: Doble y planche los cantos de Ia abertura. Gire el margen de costura izquierdo hacia afuera (fig. A). Coloque encima, como muestra Ia fig. B, el ado izquierdo abierto de Ia cremallera. Los dientes de Ia cremallera sobresalen un poco del canto planchado. La costura discurre a lo argo del canto planchado. Corra el prensatelas al centro de forma que Ia aguja se dave en el agujero central. Los dientes de Ia cremallera dis curren por Ia ranura izquierda del pie prensatelas (fig. C). Al comenzar Ia costura, deberá levantar un poco los dientes para que entren en Ia ranura guia. Termine Ia costura y remátela. Cierre a cremallera. Prenda con un alfi er el Segundo lado de Ia cremallera al comienzo de Ia costura (fig. D) y abra Ia cremallera. Gire ahora hacia afuera el margen de costura derecho junto con Ia cinta de Ia cremallera, después de haber retirado el alfiler, y fije dicha cinta con. un alfiler a Ia costura, como muestra Ia fig. E. Los dientes de Ia cremallera dis curren ahora por Ia ranura derecha del prensatelas (fig. F). Termine de coser Ia cremallera. Pespuntee ahora Ia cinta de Ia cremallera sobre Ia costura al ancho del prensatelas. Los dientes de Ia cre mallera discurren ahora por fuera a lo largo de Ia gula del prensatelas (fig. G). /
-
 1
1 -
2
-
3
-
4
-
5
-
6
-
7
-
8
-
9
-
10
-
11
-
12
-
13
-
14
-
15
-
16
-
17
-
18
-
19
-
20
-
21
-
22
-
23
-
24
-
25
-
 26
26 -
 27
27 -
 28
28 -
 29
29 -
 30
30 -
 31
31 -
 32
32 -
 33
33 -
 34
34 -
 35
35 -
 36
36 -
37
-
38
-
39
-
40
-
41
-
42
 |
 |